 Providing product recommendations
Product Recommendations provides personalized product recommendations to visitors of your Commerce website. The product recommendations are displayed in a widget for which Optimizely sets up individual strategies according to your KPIsStands for "key performance indicator" (also known as a conversion goal); the measurement of actions on web pages. The actions can be completed purchases, pages visited, time spent on site and so on. during the setup process. By using the Product Recommendations interface, you can refine Optimizely's algorithms, set up time-limited campaigns or overwrite strategies according to your needs.
This user scenario first gives you a rough overview of the installation process. Then it will provide you with four example scenarios on how to set up Product Recommendations campaigns in the Product Recommendations interface.
Installing Product Recommendations
The installation of Product Recommendations consists of the following steps:
- Installing the Product Recommendations environment
- Installing the native integration package via NuGet feed
- Configuring a scheduled job to export your product catalog to Product Recommendations
- Activating the widgets in your Commerce project
- Setting up tracking
As a first step, Optimizely provides your developer or administrator with the Product Recommendations environment that is needed to receive tracking data and to deliver recommendations. You will also receive the required scripts, configuration keys and credentials to configure tracking for your project.
After the Product Recommendations environment is set up, you must install and configure the native integration package EPiServer.Personalization.Commerce that is available through the Optimizely NuGet feed. The package also contains the integration APIs for Commerce. For an overview of all available APIs, see Recommendations API overview. For detailed information on the available NuGet packages, see Install and configure personalization.
In a next step, Product Recommendations needs to import the products of your catalog. Select Export product feed in the CMS admin interface and set up an export job that runs every 24 hours to keep your Product Recommendations up-to-date. For more information, see Exporting your catalog to Optimizely Product Recommendations.

To deliver product recommendations to your website, a developer has to activate the product recommendation widgets. Your project might have several widgets with different strategies for different page types.
In addition, to provide matching recommendations, Product Recommendations needs to track your visitor's activities over time. Product Recommendations accomplishes this by assigning visitors a consolidated user ID (CUID), which is stored in a cookie. See Tracking and recommendations to learn how to set up tracking for Product Recommendations.
Example campaigns in the Product Recommendations interface
In the following four sample scenarios you want to set up individual time-limited campaigns:
- Recommendations on the home page and recommending a matching product set
- Recommending matching accessories for a product
- Excluding products
- Recommending only high rated products
All attribute and value names are freely configurable and may be named different in your solution.
Example 1: Recommending a product set
A new collection of women's bags hit your store. You would like to set up the following recommendation scenario:
- Recommending women's bags on the shop's home page
- Recommending a matching product set if a specific bag was added to the shopping cart
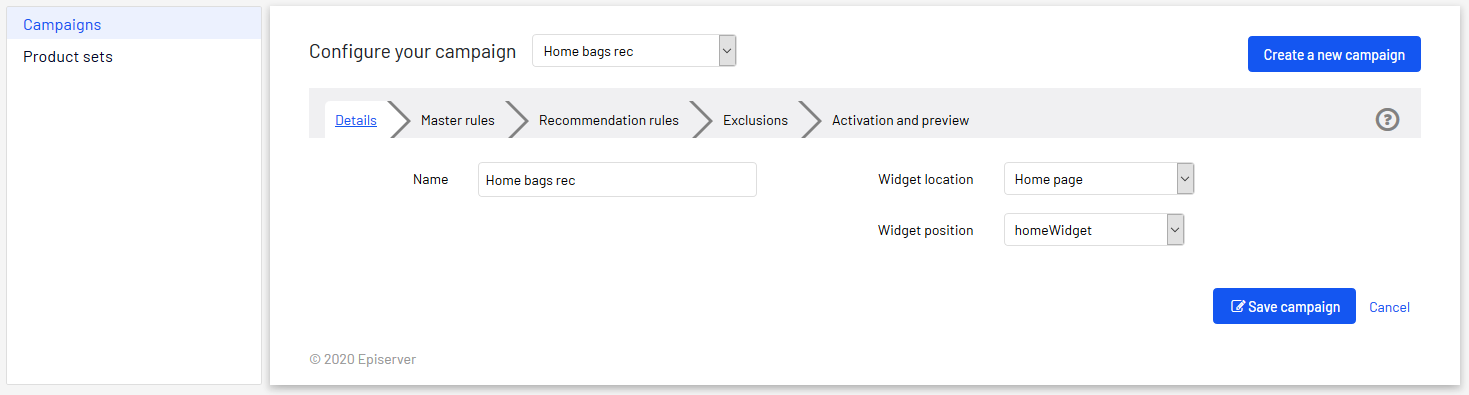
Step 1: Recommendations on the home page
- Go to the Product Recommendations interface and click the Configuration tab in the upper menu bar.

- In the Campaigns view, click the Create a new campaign button.
- In the Details tab:
- Enter a significant name for the campaign, for example Home bags rec.
- In the Widget location drop-down list, select Home page.
- In the Widget position drop down list, select the widget that is to deliver the recommendations.
By default, only one product recommendation widget is available.
- In the Recommendation rules tab select Category equals to Womens>Womens Handbags.
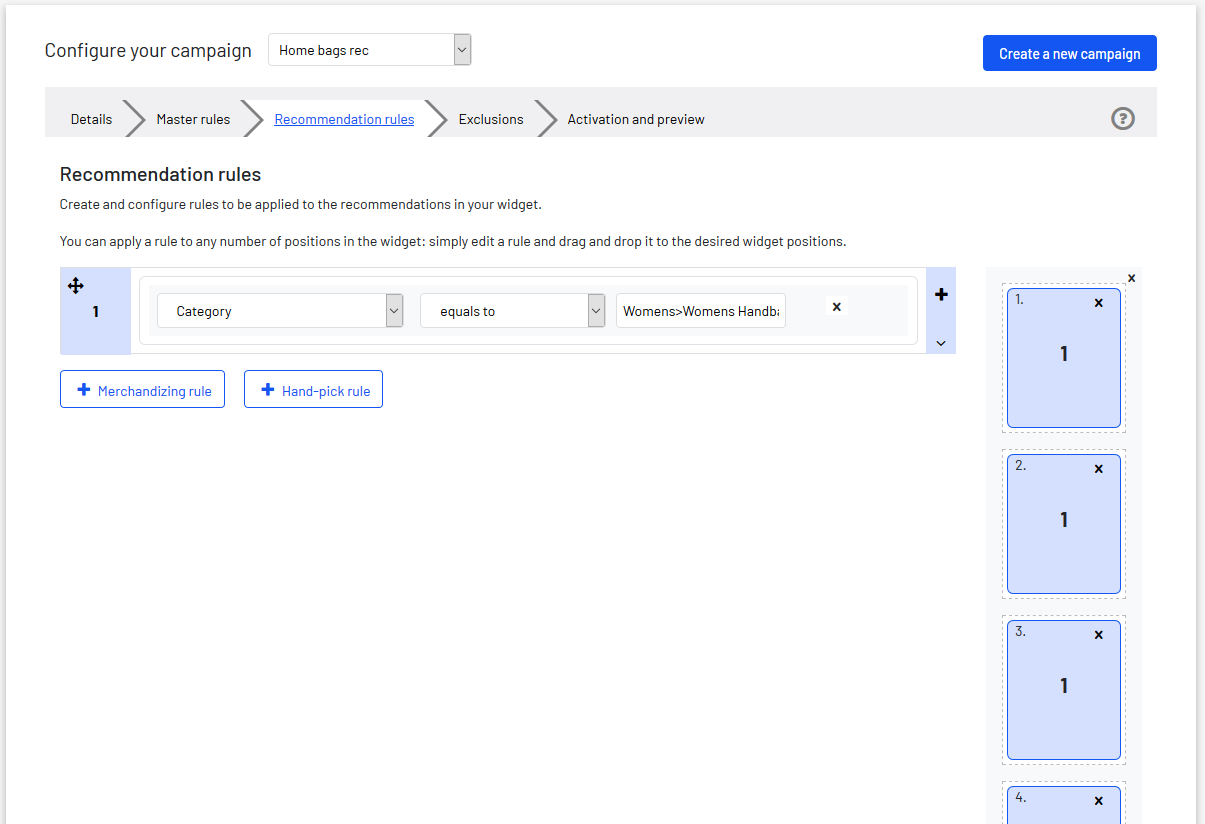
- Drag the rule onto one or more product positions, depending on the configuration in your widget.
- In the Activation and preview tab, add additional information like the time period and time when the recommendations are to be displayed.
- Click Save campaign.
- In the Campaigns management view, click the activation icon of your campaign.

-
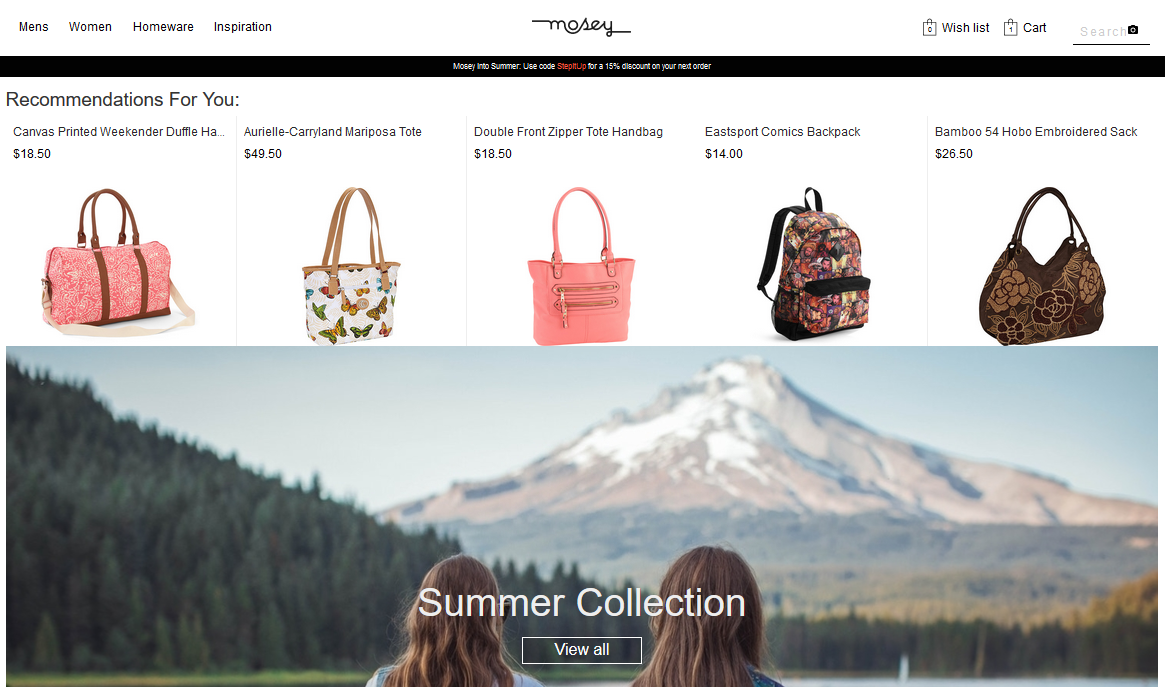
Check your website. On the home page of our shop site, a collection of women's bags is displayed.
Step 2: Recommending a product set
In the next step, you want to recommend a matching product set if visitors click a bag of a certain brand and add it to the shopping cart. On the basket page, they will see recommendations for matching shoes, a light dress, a short sleeve and a pant.
- Go to the Product Recommendations interface and click the Configurations tab in the upper menu bar.
- In the Campaigns view, click the Create a new campaign button.
- In the Details tab:
- Enter a significant name for the campaign, for example [brand name] basket set, as this campaign is set up exclusively for the Sun N Sand brand in your store.
- In the Widget location drop-down list, select Basket page.
- In the Widget position drop down list, select the widget that is to display the recommendations. If you have only one product recommendation widget on your product pages, only one widget will be displayed in the drop-down list.

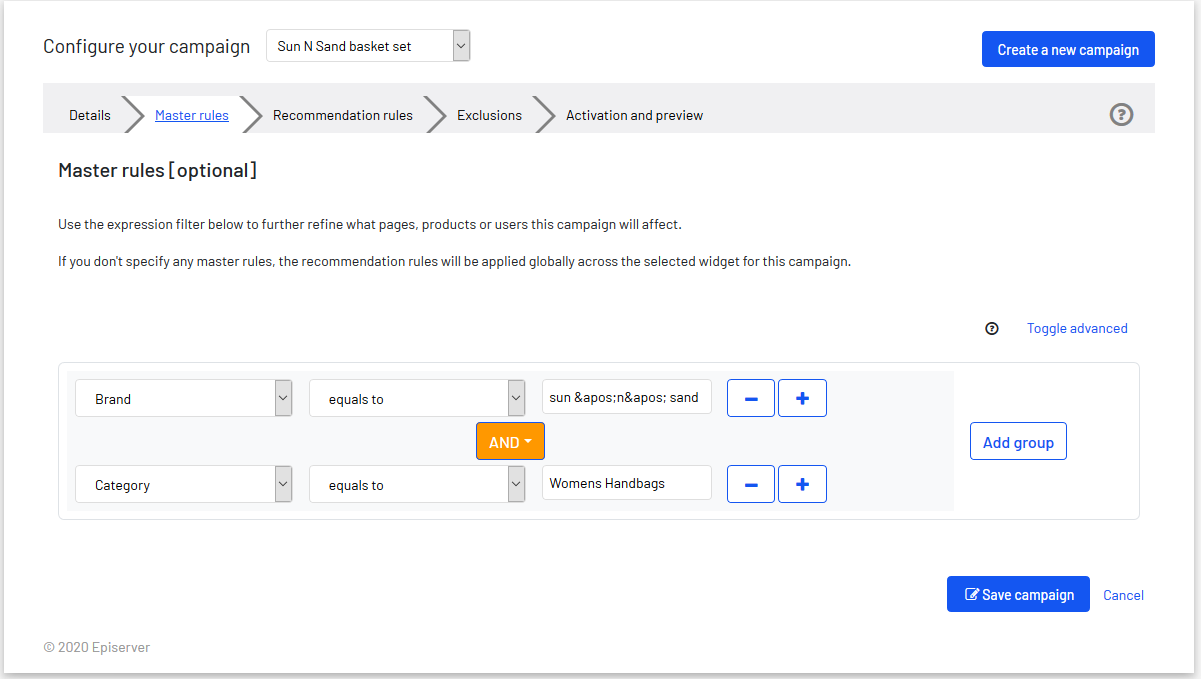
- As the product set should only be recommended if a certain criteria is met, you need to set up a master rule:
- Click the Master rules tab.
- Select Brand equals to [brand name]
- Click the + icon to add an expression.
- Select category equals to Womens handbag.
- Select the AND condition as both criteria must be met at the same time.
- Click the Recommendation rules tab and remove the default recommendation rule.
- Click Hand-pick rule and select Product set equals to Add new Product set.
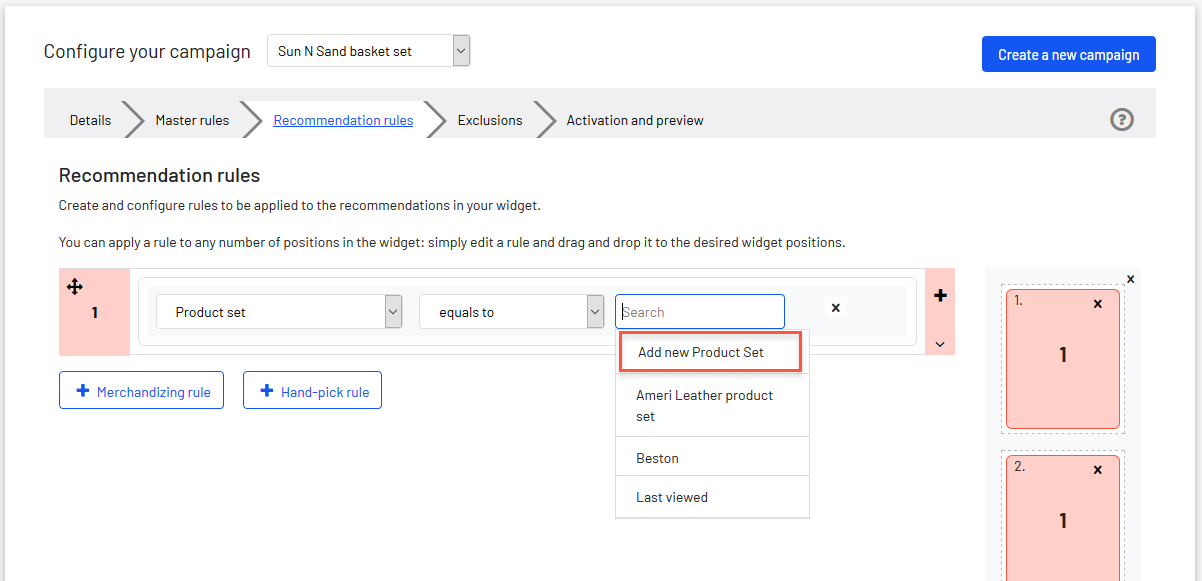
Alternatively, you can click Product set in the left menu pane and click Create a product set.
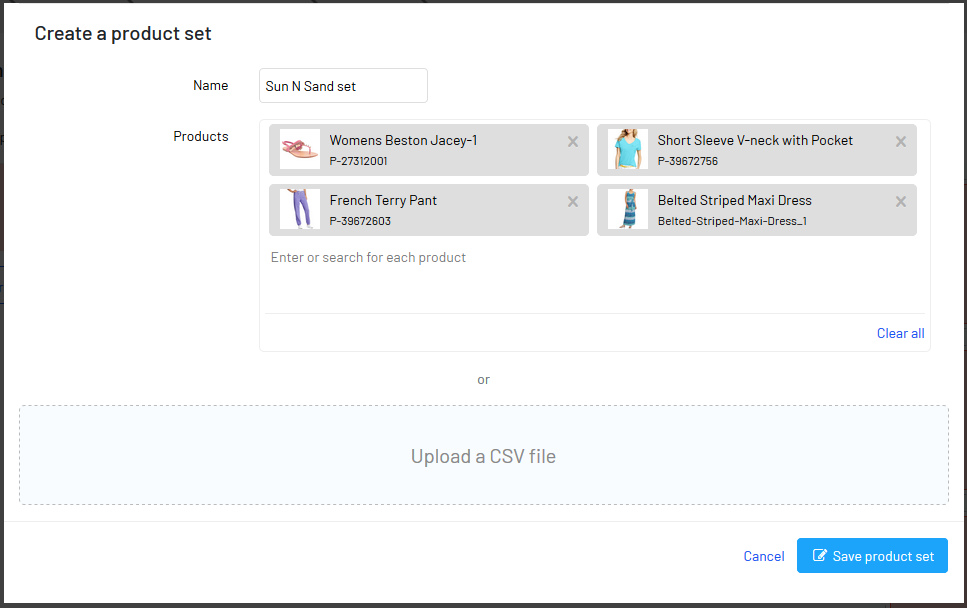
- In the Create a product set window, enter a name for the product set and add products by clicking into the field and typing a name. Alternatively, you can upload a CSV file. Then, click Save product set.
- Drag the rule onto one or more product positions, depending on the configuration in your widget.
- In the Activation and preview tab, add additional information like the time period and time when the recommendations are to be displayed.
- Click Save campaign.
- In the Campaigns management view, click the activation icon of your campaign.
- Check your basket page: If visitors add the women's bag that you configured in the master rule to their shopping cart and continue to the basket page, they will see the product set as shown on the image:

Example 2: Recommending matching accessories for a product
If you sell printers in your store, you might want to recommend matching printer cartridges on the printer's product page. Or, if you sell e-bikes, you might want to recommend e-bike batteries on the e bike page.
- Go to the Product Recommendations interface and click the Configuration tab in the upper menu bar.
- In the Campaigns view, click the Create a new campaign button.
- In the Details tab:
- Enter a significant name for the campaign, for example ebike rec.
- In the Widget location drop-down list, select Product page.
- In the Widget position drop down list, select the widget that is to display the recommendations. If you have only one product recommendation widget on your product pages, only one widget will be displayed in the drop-down list.
- In the Master rules tab, select category equals to ebikes.
- In the Recommendation rules tab select term equals to ebike batteries.
- Drag the rule onto one or more product positions, depending on the configuration in your widget.
- In the Activation and preview tab, add additional information like the time period and time when the recommendations are to be displayed.
- Click Save campaign.
- In the Campaigns management view, click the activation icon of your campaign.
Example 3: Excluding products
You have a new kids section on your website and do not want to recommend beverages on these pages as they bare the potential to contain alcohol.
- Go to the Product Recommendations interface and click the Configuration tab in the upper menu bar.
- In the Campaigns view, click the Create a new campaign button.
- In the Details tab:
- Enter a significant name for the campaign, for example no beverages rec.
- In the Widget location drop-down list, select Product page.
- In the Widget position drop down list, select the widget that is to display the recommendations. If you have only one product recommendation widget on your product pages, only one widget will be displayed in the drop-down list.
- In the Master rules tab, select category equals to Kids. If you have multiple kids sites such as kids shoes and kids shirts, add expressions by clicking the + icon. Use the OR condition to ensure that only one of the configured rules must be met.
- In the Recommendation rules tab select r.type1 NOT equals to beverages.
- Drag the rule onto a product position.
- In the Activation and preview tab, add additional information like the time period and time when the recommendations are to be displayed.
- Click Save campaign.
- In the Campaigns management view, click the activation icon of your campaign.
Example 4: Recommending only high rated products
Your store supports customer reviews on product pages with the highest ranking being five stars. You can set up a rule to only recommend products with a minimum rating of four stars.
As this is a general rule for which no condition must be met, you do not need to set up a master rule.
- Go to the Product Recommendations interface and click the Configuration tab in the upper menu bar.
- In the Campaigns view, click Create a new campaign.
- In the Details tab:
- Enter a significant name for the campaign, for example high rates rec.
- In the Widget location drop-down list, select Product page.
- In the Widget position drop down list, select the widget that is to display the recommendations. If you have only one product recommendation widget on your product pages, only one widget will be displayed in the drop-down list.
- In the Recommendation rules tab select customerrates greater than 3.
- Drag the rule onto a product position.
- Add additional information like the time period in the Activation and preview tab.
- Click Save campaign.
- In the Campaigns management view, click the activation icon of your campaign.