MyAccount
![]()
The MyAccount server controla server control uses API language to interact with the CMS and Framework UI to display the output. A server control can be dragged and dropped onto a Web form and then modified. lets logged-in customers (site visitors) view and edit their Personal Information, Billing Address and Shipping Address. If the customer is not logged in and arrives at this control, one of the following happens:
- the visitor receives a message about not being logged in. This happens when the server control’s
RedirectUrlproperty is empty and theweb.configfile’s<add key=”ek_RedirectToLoginURL” value=”” /> value is blank. - the visitor is redirected to a login page and once logged in, is sent back to the template containing the MyAccount server control. This happens when either the server control’s
RedirectUrlproperty contains the path of a template that contains a Login server control or when theweb.configfile’s<add key=”ek_RedirectToLoginURL” value =”” /> valueis set to the path of a template that contains a Login server control. If the control’sRedirectUrlproperty and theweb.configfile contain different locations, theRedirectUrlproperty in the control overrides theweb.configfile.
Typically, the information displayed in this control is collected the first time a customer goes through the checkout process. A customer’s information might appear in the Personal Information area before they have been through the checkout process if they are a current Ektron user or registered membership user.
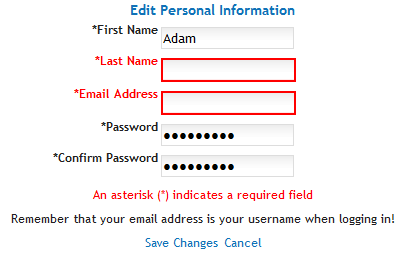
If a logged-in customer arrives at this server control and is missing required information, it must be entered before continuing. For example, a customer needs to provide a Last Name or E-mail Address.
As a developer, you need to create a link to this control in a site location that appears only after log in. For example, you might place the link on a menu or on a master page that appears after a customer logs in.
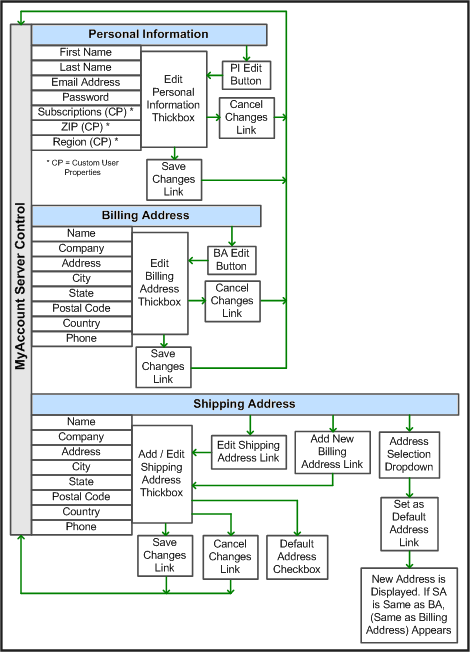
A customer typically arrives at this control by clicking a link placed on a main page, master page, or menu. The following figure shows the flow of the MyAccount server control.
Inserting the MyAccount server control onto a page
Prerequisite
You must have installed the server controls. See Installing server controls into Visual Studio Toolbox.
- In Visual Studio, choose View > Toolbox.
- Click the Ektron server control tab to display the server controls.
- Drag the MyAccount server control and drop it into the desired location on the page.
NOTE: You also can place the cursor on the page where you want the server control, then double click the server control that you want.
<CMS:MyAccount ID="MyAccount1" runat="server" />
- Click on
MyAccountin the code to display and modify the control’s properties using the Properties window of Visual Studio. The page is updated as you modify the property values.
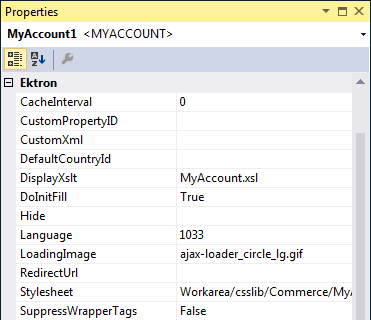
MyAccount properties
The following are Ektron-specific server controla server control uses API language to interact with the CMS and Framework UI to display the output. A server control can be dragged and dropped onto a Web form and then modified. properties. For information about native .NET properties such as font, height, width and border style, use Visual Studio® help.
- CacheInterval (Double)
The number of seconds that a server controla server control uses API language to interact with the CMS and Framework UI to display the output. A server control can be dragged and dropped onto a Web form and then modified.’s data is cached. The default is 0 (zero). For example, if you want to cache the data for 5 minutes, set to 300. See also: Caching with server controls.
- CustomerPropertyID (String)
An ID or comma separated list of IDs for a Custom User Property (or properties) to expose in the UI. These properties are used to define information about a user beyond the standard Ektron user properties; such as Username, First Name, Password and email Address.
IDs for these properties can be found in the Workarea > Settings > Configuration > Custom Properties screen. See also: Custom User properties.
- CustomXml (Code-behind Only) (String)
Lets you inject custom XML into the generated XML before being processed by the XSLTExtensible Stylesheet Language Transformations. Enter a string of XML that you want to make available to the XSLT as follows:
<root><customXml>custom-xml-inserted-here</customXml></root>
See also: Displaying custom XML in Ektron’s server controls.
- DefaultCountryID (Integer)
The ID of the default country that appears in the Billing Address and Shipping Address. Set this ID to the country from which the majority of your customers will be making purchases. If the customer is from a different country, the customer can it change when editing the Billing or Shipping Address.
NOTE: If a customer enters information in the Billing Address area, the Billing Country seeds the Shipping Country when adding a new Shipping Address.
To find a country’s numeric ID, sign into the Workarea. Then go to Settings > Commerce > Configuration > Countries. The Numeric ID is in the left column of that screen.
- DisplayXslt (String)
If desired, enter a relative or absolute path to an Xslt that determines the display of the page. By default, the control uses
MyAccount.xsl. This file is located insiteroot\Workarea\Xslt\Commerce.WARNING! Files stored in the
siteroot\Workareafolder are overwritten (or deleted) when you upgrade Ektron. To avoid problems, copy the default file to a folder outside thesiteroot\workareafolder then edit it. If there is no default file, create the file outside thesiteroot\workareafolder. Next, in this property, enter the path to that file relative to the site root folder. - DoInitFill (Boolean)
By default, Fill occurs during the Page_Init event. Set to false if you want to postpone the fill-action until later. In this case, Fill is automatically called during the Page Render event. You might do this if you need to set or change a property on the control in code-behind and have it render with your changes shown.
- Hide (Boolean)
Hides or displays the output of the control in design time and run time.
- True. Hide the control output.
- False. Display the control output.
- Language (Integer)
Set a language for viewing content; shows results in design-time (in Visual Studio) and at run-time (in a browser).
- LoadingImage (String)
The image to display while the control is fetching data. The default is
siteroot\Workarea\images\application\ajax-loader_circle_lg.gif.WARNING! Files stored in the
siteroot\Workareafolder are overwritten (or deleted) when you upgrade Ektron. To avoid problems, copy the default file to a folder outside thesiteroot\workareafolder then edit it. If there is no default file, create the file outside thesiteroot\workareafolder. Next, in this property, enter the path to that file relative to the site root folder. - RedirectUrl (String)
Enter the path of a template that contains the Login server control. When a customer arrives at this control and is not logged in, the control checks this property for a path to template containing a Login server control. If one exists, the customer is sent to that template. When the customer logs in, the template containing the MyAccount server control appears. If no path exists, the control checks the
web.configfile’s <addkey=”ek_RedirectToLoginURL”value=””/> value for a path. - Stylesheet (String)
Specify the path to a style sheet for use with this server control. Leave blank to use the default style sheet. To use a custom style sheet, place it in a folder outside the
siteroot\workareafolder then edit it. Next, in this property, enter the path to the custom style sheet relative to the site root folder. - SuppressWrapperTags (Boolean)
Suppresses the output of the span/div tags around the control.
- True. Suppress wrap tags.
- False (default). Allow wrap tags.
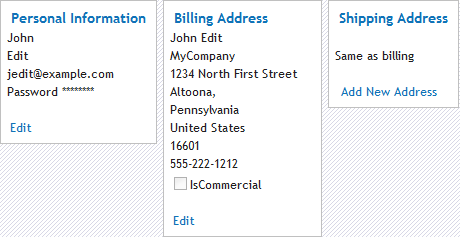
Editing personal information
The Personal Information area lets customers view and edit some information contained in their profile. By default, a customer can edit their First Name, Last Name, email Address, and Password. By adding a list of Custom User Property IDs to the CustomPropertyID property, you can let customers view and edit custom properties in their profile. See also: Custom User properties.
A customer can change the information in the Personal Information area by clicking Edit in the lower left corner of this area. The resulting page lets the person change any information in this area. When done, the customer clicks Save Changes to save the changes and return to the My Account page.
Editing a billing address
The Billing Address area lets customers view and edit their billing address information. A customer can edit their Name, Company, Address, City, State, Postal Code, Country, and Phone number. This information is used for billing purposes when the customer makes a purchase. Credit card companies typically want part or all of this information to match a customer’s credit card account information when making a purchase.
To edit a customer’s billing address, click Edit in the lower left corner of the Billing Address area.The resulting page let the person change any information in this area. When done, a customer clicks Save Changes to save the changes and return to the My Account page.
Editing a shipping address
The Shipping Address area lets customers view, edit, delete or add a new address to their shipping address information. The fields in this area are the same as those in the Billing Address area with 2 exceptions: a Same as Billing check box, and a Default Address check box. The Same as Billing Address check box lets customers place a check mark in the box and use their billing address information as their shipping address. The Default Address check box lets customers specify the current shipping address as the default they want to use when making future purchases.
To edit a customer’s shipping address, click Edit in the lower left corner of the Shipping Address area. The resulting page let the person change any information in this area. Note that a customer must uncheck Same as Billing to be able to edit the shipping address. Otherwise, it is locked to the billing address. When done, a customers clicks Save Changes to save the changes and return to the My Account page.
Adding a shipping address
To add a new shipping address, the customer clicks Add New Address located in the bottom center of the Shipping Address area.The resulting page lets the person enter new shipping address information. Note that the Same as Billing checkbox is not available when adding a new address. When done, a customer clicks Save Changes to save the changes and return to the My Account page.
Deleting a shipping address
To delete a shipping address, the customer clicks Delete Address at the bottom of the Shipping Address area. The visitor is asked to confirm. If the customer does and there are no other shipping addresses, the billing address is used as the shipping address. If the shipping address is the same as the billing address, you cannot delete it.