OrderList
![]()
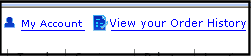
The OrderList server control lets customers view a list of processed orders. Customers typically reach this server control by clicking a link on your site, such as the View Order History link.
Customers also can reach this control through a link at the end of the Checkout process. The link appears when the Checkout server control’s TemplateOrderHistory property contains the path to the template containing the OrderList server control.
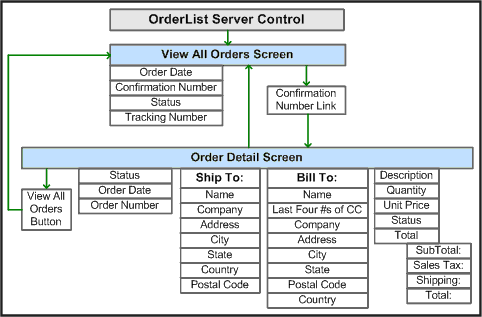
The following image depicts the flow of the OrderList server control.
Inserting the OrderList server control onto a page
Prerequisite
You must have installed the server controls. See Installing server controls into Visual Studio Toolbox.
- In Visual Studio, choose View > Toolbox.
- Click the Ektron server control tab to display the server controls.
- Drag the OrderList server control and drop it into the desired location on the page.
NOTE: You also can place the cursor on the page where you want the server control, then double click the server control that you want.
<CMS:OrderList ID="OrderList1" runat="server" />
- Click on
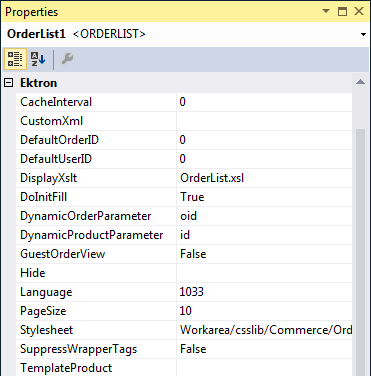
OrderListin the code to display and modify the control’s properties using the Properties window of Visual Studio. The page is updated as you modify the property values.
OrderList properties
The following are Ektron-specific server controla server control uses API language to interact with the CMS and Framework UI to display the output. A server control can be dragged and dropped onto a Web form and then modified. properties. For information about native .NET properties such as font, height, width and border style, use Visual Studio® help.
- CacheInterval (Double)
The number of seconds that a server controla server control uses API language to interact with the CMS and Framework UI to display the output. A server control can be dragged and dropped onto a Web form and then modified.’s data is cached. The default is 0 (zero). For example, if you want to cache the data for 5 minutes, set to 300. See also: Caching with server controls.
- CustomXml (Code-behind Only) (String)
Lets you inject custom XML into the generated XML before being processed by the XSLTExtensible Stylesheet Language Transformations. Enter a string of XML that you want to make available to the XSLT as follows:
<root><customXml>custom-xml-inserted-here</customXml></root>
See also: Displaying custom XML in Ektron’s server controls.
- DefaultOrderId (Long)
The default ID of the list of orders to display.
- DefaultUserId (Long)
The default ID of the user for which to display a list of orders.
- DisplayXslt (String)
If desired, enter a relative or absolute path to an Xslt that determines the display of the page. By default, the control uses
OrderList.xsl. This file is located insiteroot\Workarea\Xslt\Commerce.WARNING! Files stored in the
siteroot\Workareafolder are overwritten (or deleted) when you upgrade Ektron. To avoid problems, copy the default file to a folder outside thesiteroot\workareafolder then edit it. If there is no default file, create the file outside thesiteroot\workareafolder. Next, in this property, enter the path to that file relative to the site root folder. - DoInitFill (Boolean)
By default, Fill occurs during the Page_Init event. Set to false if you want to postpone the fill-action until later. In this case, Fill is automatically called during the Page Render event. You might do this if you need to set or change a property on the control in code-behind and have it render with your changes shown.
- DynamicOrderParameter (String)
Sets the QueryString parameter name which is used to pass an order ID dynamically. By default, this parameter is OID.
- DynamicProductParameter (String)
The QueryString parameter name which is used to pass the product ID to the product details page. For example, if your QueryString parameter for products is ID, enter that in this property. Then, when customers click a product in their order list, this parameter is passed with the product’s ID to the product details page.
- GuestOrderView (Boolean)
Set to true to allow guest account visitors to view their orders. If you do, a visitor can go to the View Orders screen, enter an order number and an email address, then view all submitted orders. See also: Viewing a customer orders list.
- Hide (Boolean)
Hides or displays the output of the control in design time and run time.
- True. Hide the control output.
- False. Display the control output.
- Language (Integer)
Set a language for viewing content; shows results in design-time (in Visual Studio) and at run-time (in a browser).
- PageSize (Integer)
The maximum number of orders to show per page.
- Stylesheet (String)
Specify the path to a style sheet for use with this server control. Leave blank to use the default style sheet. To use a custom style sheet, place it in a folder outside the
siteroot\workareafolder then edit it. Next, in this property, enter the path to the custom style sheet relative to the site root folder. - SuppressWrapperTags (Boolean)
Suppresses the output of the span/div tags around the control.
- True. Suppress wrap tags.
- False (default). Allow wrap tags.
- TemplateProduct (String)
The URL path of the template that allows a customer to view the details of a product in an order. When a path is entered, the product’s title becomes a link that lets customers navigate to the template containing details of the product; for example, the template containing a Product server control.
Viewing a customer orders list
When customers arrive at this server control, they see the View All Orders portion of the server control.
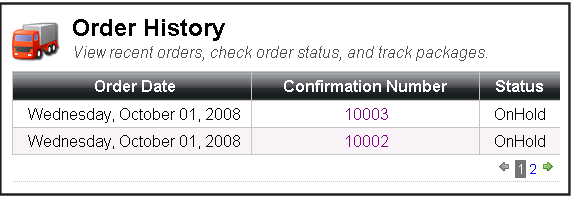
This part of the server control displays a list of submitted orders. Customers can view each order's date, confirmation number, and status. When the number of orders exceeds the number defined in the MaxResults property, the list is paged and a user can navigate among pages with the links provided.
A customer can click the confirmation number to view the Order Details screen.
To navigate back to the list of all orders, customers click View All Orders.
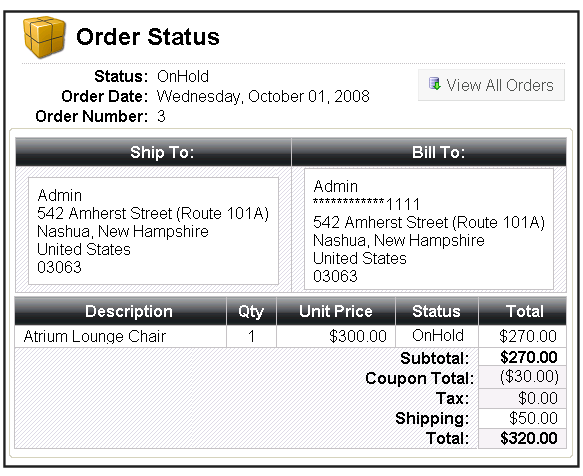
Viewing order details
- Status. The status of the order.
- Order Date. The date the order was submitted. This is the date an order went through the checkout process.
- Order Number. The order's ID number.
- Ship To:. Information needed to ship the order to customer.
- Person to whom the product is being shipped
- Company Name (optional)
- Street Address
- City and State or Region
- Country
- Zip Code
- Tracking Number. This field appears if a tracking number has been entered in the View Order screen in the Workarea.
- Bill To:. Displays information about who is being billed for the order.
- Person paying for the order
- Credit Card information. For security purposes, only the last 4 digits appear.
- Company Name (optional)
- Street Address
- City and State or Region
- Country
- Zip Code
- Description. A list of products in the order. When the path to the product server control is entered in the
TemplateProductproperty, the product’s title becomes a hyperlink. - Quantity. The total number of each product.
- Sale Price. The per unit price of each product.
- Total. The total amount paid for each product ordered. This is the Unit Price multiplied by the Quantity.
- Subtotal. The sum of all the order’s line products before additional charges or discounts, such as tax, shipping and coupons.
- Coupon Total. The total amount discounted, based on all applied coupons.
- Tax. The tax amount applied to this order. See also: Configuring eCommerce.
- Shipping. The amount charged to ship the order to the recipient. See also: Configuring eCommerce.
- Total. The sum of all charges, including all line items, tax, shipping and handling.