Entering a Catalog Entry’s Media
Use the Media tab to add product images that appear on the following server controls.
Product (the smallest thumbnail may appear)
Product List
Product Search
Recommendation
See Also: Images in eCommerce
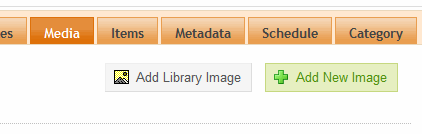
Adding a New Image
Follow these steps to add a new image. See Also: http://www.w3schools.com/tags/tag_IMG.asp
1. Click the Media tab.
2. Click Add New Image.
3. Enter an image Title. This is a required field.
4. Enter the image’s Alt text. This is a required field.
5. Click Browse and navigate to the image you want to add.
6. Click Upload.
7. The image is uploaded to the siteroot/uploadedimages folder.
Note: When an image is uploaded to the Media tab, the original image and any thumbnails associated with it are added to the Library. For example, if you add an image named “TestImage” (actual file name: “case.jpg”) with a 150px and 50px thumbnails, you see the following entries in your library (File Name - Path):
TestImage - /~siteroot~/uploadedImages/case.jpg
case[filename]150 - /~siteroot~/uploadedImages/case[filename]150.jpg
case[filename]50 - /~siteroot~/uploadedImages/case[filename]50.jpg
8. The image appears on the screen, below any existing images.
9. Determine if you want the image’s smallest thumbnail to appear on the product server control by selecting Yes or No next to Gallery Display. (See example below). See Also: Product Server Control, thumbnails
10. If you want to designate the image as the product icon, click Set as Product Icon. See Also: Product List, Product Search, and Recommendation server controls
To learn about the image thumbnails, see Determining Thumbnail Size.
Note: If you assign several images to an eCommerce catalog entry, and want to allow searching for that catalog entry by image file name, the search only works with the first image assigned to the catalog entry.
Editing an Existing Image
Note: You cannot change an existing image. If you need to do this, delete the image you do not want, then add the correct one. You can only edit the Title and Alt Text.
1. Click the Media tab.
2. Move the cursor to the field that you want to edit.
3. Click the pencil icon to the right of the field (shown below).
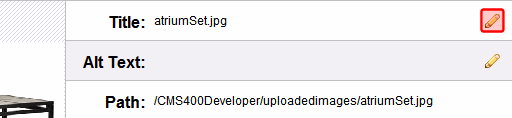
4. Update the text as needed.
5. Click OK ( ).
).
Determining Thumbnail Size
When you create a catalog entry, you base it on a Product Type. The selected product type’s Media Defaults information determines the sizes of thumbnails created for each image assigned to the Media tab. See Also: Media Defaults Tab4
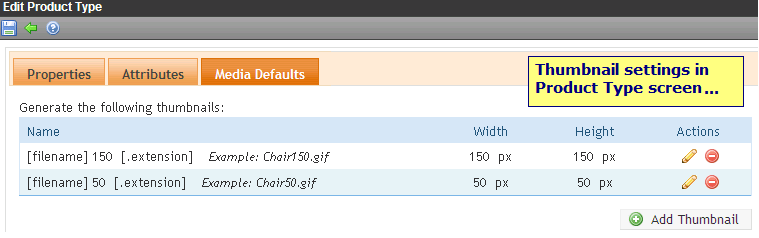

If the image is less than both thumbnail dimensions (height and width), it appears full size.
If the image is greater than the thumbnail’s dimensions, the image is reduced proportionately, scaling its dimensions to the thumbnail size.
The Default Image
If you do not assign an image to a catalog entry, but one is assigned to appear on a server control, the following default image is used.

If you want to change the default image, edit the following file:
siteroot/WorkArea/images/application/Commerce/productImageBackground.gif