or descending
  ). Each landing page list item has a toolbar that lets you perform actions on the item.
 NOTE: The landing pages feature is part of Ektron's marketing suite.
A landing page should accomplish a singular conversion goal of your marketing campaign, such as getting the contact information of your MQLMarketing Qualified Lead; someone who is more likely to become a customer versus others who are "browsing but not buying." MQLs can be identified through analysis of activity data.. A page layout should be concise, avoid scrolling, and keep important information near the top. You typically create a landing page before a CTACall to action; a user interface element that prompts a site visitor to touch or click it to proceed on a path toward conversion from site visitor to customer. For example, links that say "For more information...," "Add to cart," or "Buy now." because you will link the CTA to the landing page.
Launch the landing page app by clicking on the ![]() icon. Click Landing Pages in the toolbar to see the list of available landing pages. Using the pulldown menus on the list page, you can sort the list by type of data (date modified, title, status, date created, and first or last name of the last person to edit the page) or by order (ascending or descending ). Each landing page list item has a toolbar that lets you perform actions on the item.
icon. Click Landing Pages in the toolbar to see the list of available landing pages. Using the pulldown menus on the list page, you can sort the list by type of data (date modified, title, status, date created, and first or last name of the last person to edit the page) or by order (ascending or descending ). Each landing page list item has a toolbar that lets you perform actions on the item.
Best Practices
Before you create a landing page, an administrator should set up the forms you will use, and map the form fields using DXH. For information about setting these up, see the following sections.
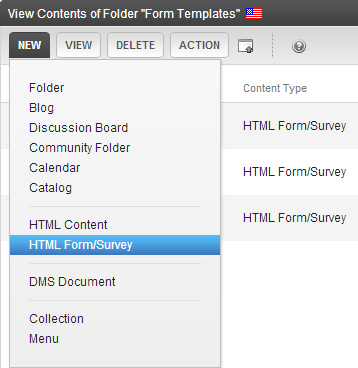
To create a landing page, click Landing Pages in the toolbar, then click Create New Landing Page. The new landing page form appears.
You can create your own landing page templates with PageBuilder and display it in the template list. See Setting up a landing page layout. For additional information, see Creating Web pages with PageBuilder.
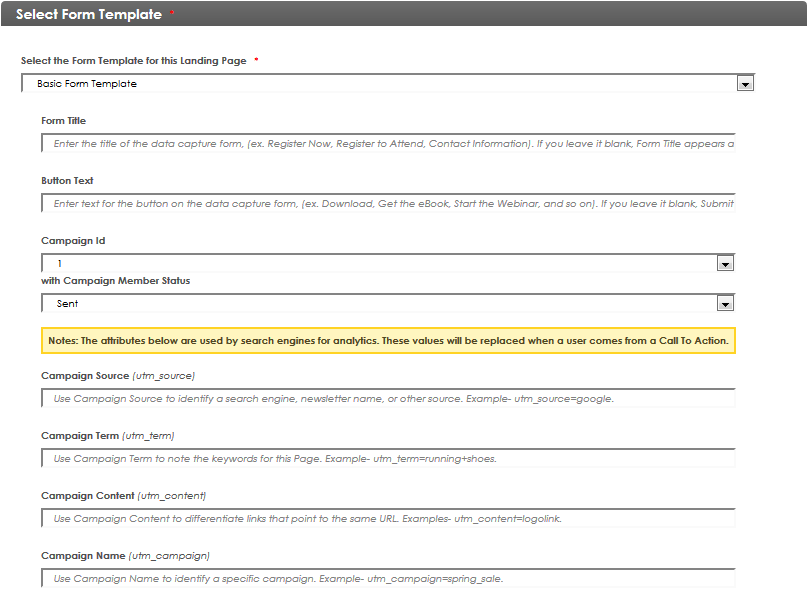
IMPORTANT: The following fields are hidden fields that let you collect data for Google Analytics. They do not appear on the landing page. After you have created a landing page, you cannot change the campaign attributes by editing the properties screen. However, you can modify (or add) these values from the landing page by editing the Form Block of the data capture form.
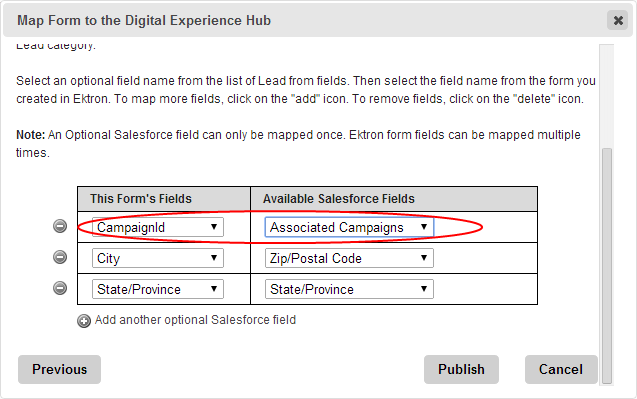
CampaignIdA1.NOTE: If you are using Salesforce with DXH, this field becomes a drop-down selector from which you can choose an available campaign. Each form can have its own set of campaign options based on what each has been mapped to.

IMPORTANT: The following attributes are used by search engines for analytics and are replaced when a user comes from a call to action.
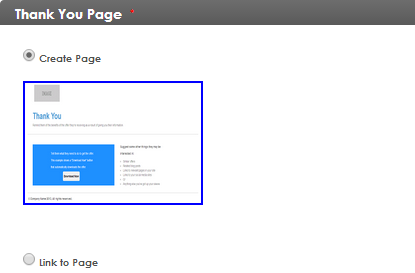
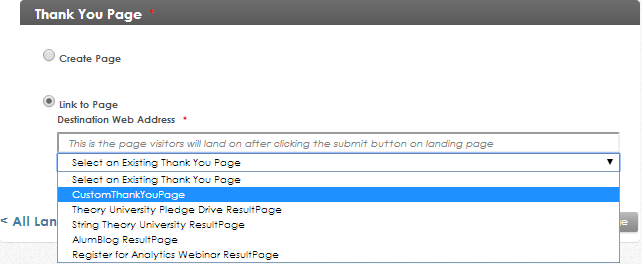
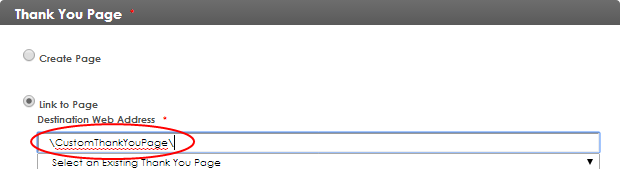
If you choose Link to Page, select an existing thank you page, or specify a path to a custom thank you page. See also: Editing an existing Thank You page and Creating a custom Thank You page.

IMPORTANT: If you click Save & Go to Page, the page appears in a new window, unless you have pop-ups blocked. If the page does not appear in the new window, check your browser's security settings and allow pop-ups for Ektron sites.
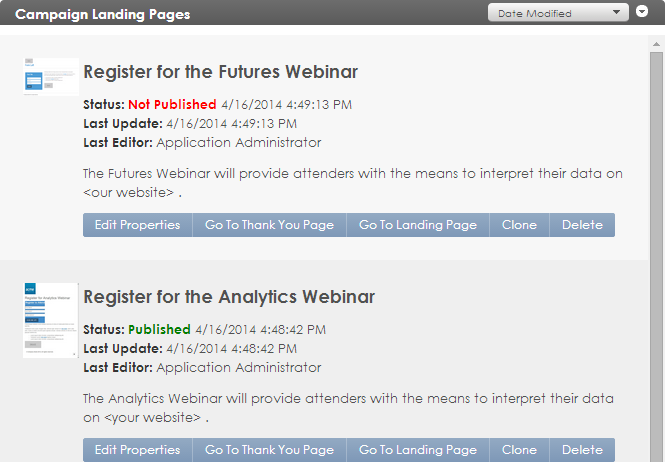
After the page is created, it appears in the landing Page list. You can change its specifications by clicking Edit Properties.
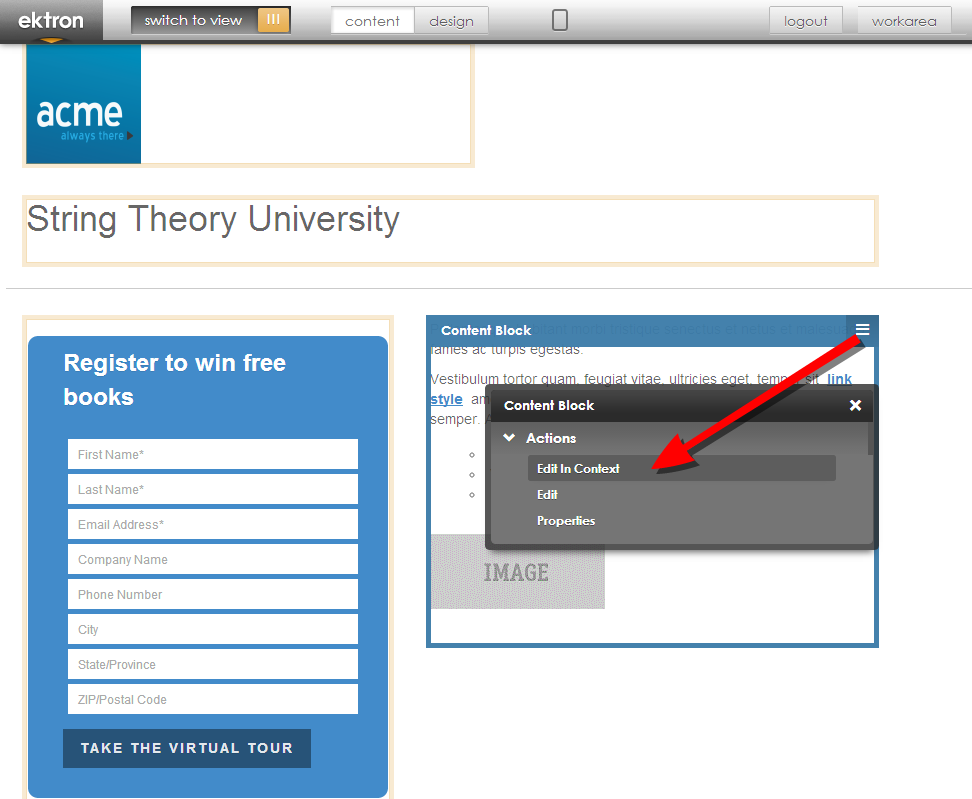
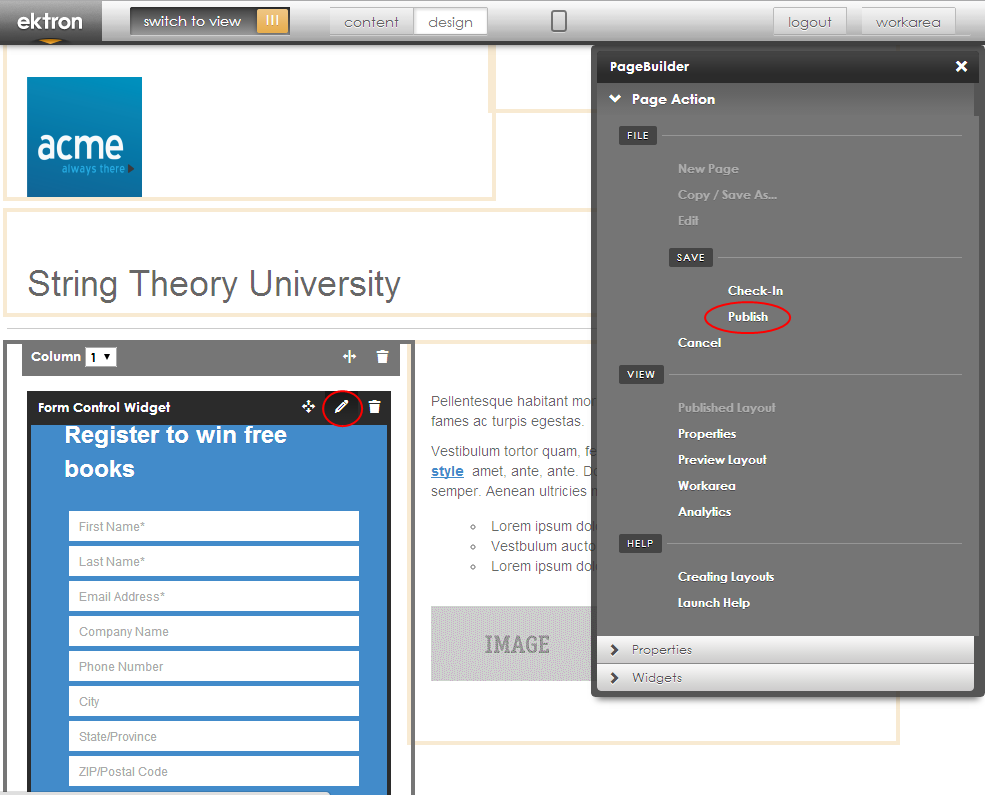
There are 3 aspects to editing a landing page.
Tips
- Keep important information high and avoid scrolling.
- Keep information brief and focused. Avoid overloading the reader.
- Represent your brand (logo) consistently
- Make your landing page consistent with your call to action so that a site visitor correlates the CTA to the landing page.
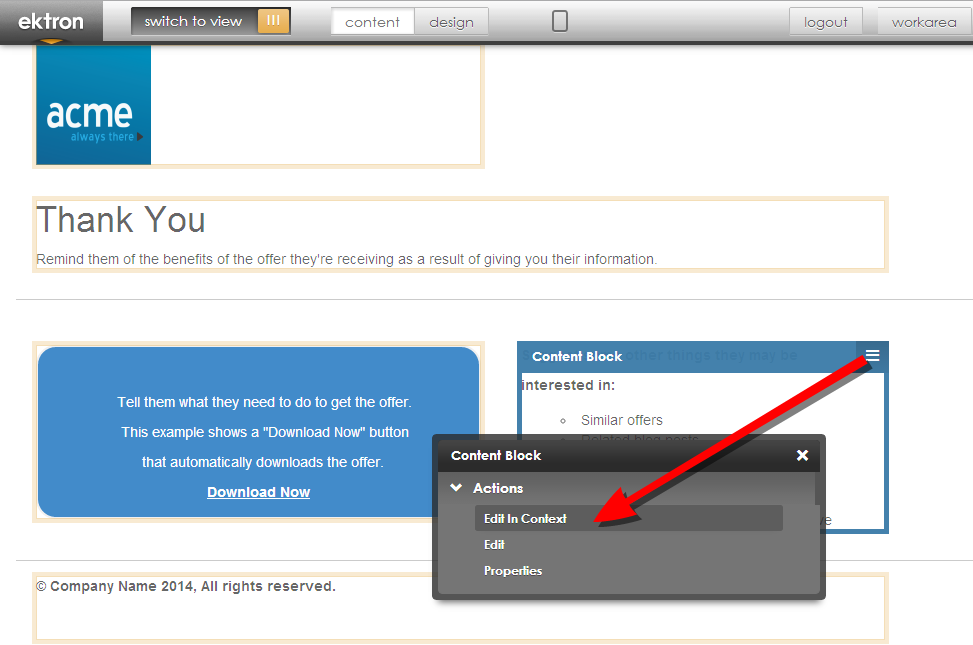
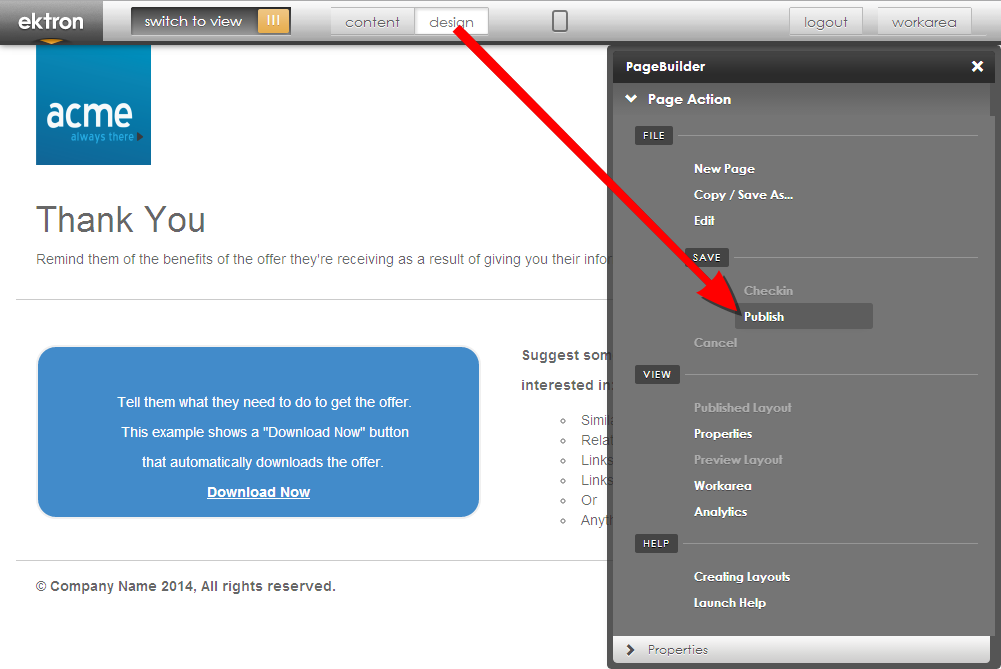
- The Thank You (or response) page reinforces the site visitor's action. You can place additional CTAs on the Thank You page.
To edit the properties of a landing page, click Edit Properties on the Landing Page list page.
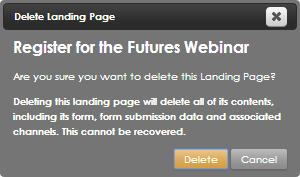
The properties of a landing page are described in Creating a landing page. Because of the set up that occurs when you create a landing page, if you edit a landing page or its properties, be aware of the following effects.
 ).
).These instructions apply to landing pages and thank you pages.
See Setting up a landing page layout if you want to create additional landing page layout (you need administrator permissions). For information about PageBuilder, see Creating Web pages with PageBuilder.
A confirmation page (Thank You) reinforces the action that the user took. You can place additional CTAs on the confirmation page such as a way to share the experience with social media. Ektron provides a default Thank You page that you can edit.
).) (from the File menu of the in-context editor).NOTE: You can create a new thank you page from a landing page, but you can add a custom thank you page to the Link to Page drop-down list only when you create a page from an existing thank you page. If you create a thank you page from a landing page, you will need the URL to enter into the Link to Page field.
If you created a thank you page from a landing page, use the URL from the created page and enter it into the Link to Page field.
Administrators have additional access and control to the landing page resources. For example, you may want to apply your own cascading style sheet (CSSCascading Style Sheet; sets the look and formatting of a markup language document.) to your site, or set up a DXH connection to collect your form data.
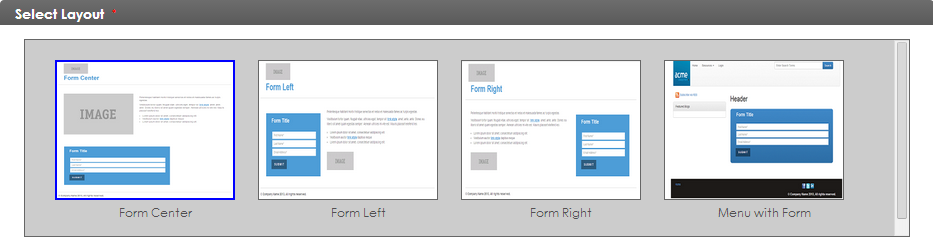
Ektron provides several landing pages (Form Center, Form Left, Form Right, and Menu with Form). They are listed in the Select Layout section of the Create Landing Page screen. You can create additional landing pages to select for use, using the following procedure.

NOTE: Creating Web pages with PageBuilder describes how to create new pages.
LandingPages/SharedTemplate/SharedLandingPage.aspx wireframe and click Next.IMPORTANT: Each name must be unique. You cannot name your layout Form Center, Form Left, Form Right, or Menu with Form (with or without spaces) because these are the default layouts.
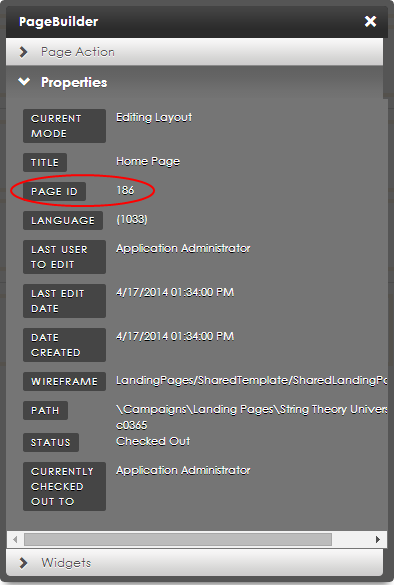
Home-Page.aspx is displayed. NOTE: In the Workarea, a landing page layout has a manifest, which is a collection of page attributes that comprise the new landing page.
NOTE: In the Workarea, the Page ID is the Content ID in the properties view.
Applying a system-wide CSS
Ektron provides several system-wide CSSCascading Style Sheet; sets the look and formatting of a markup language document. options from which you can choose.
d:\Sites\<YourSite>\content\bootstrap\Custom.Applying a local CSS to your landing page and thank you page
You can apply a local CSSCascading Style Sheet; sets the look and formatting of a markup language document. to your site pages, overriding the system-wide CSS. If you have a specific CSS that you want to use, upload it to d:/Sites/<your_site>/<local_folder>. For example:
d:/Sites/YourSite/MyThankYou/
  MyThankYou.aspx
  MyThankYou.css
  MyThankYou.js
  MyThankYou.jps
When you create a landing page, the landing page Web address defaults to http://<your_website>/<name_of_landing_page>. In some cases, you may want to indicate in your URL that landing pages are in the same URL path. For example:
http://<your_website>/LP/<name_of_landing_page_001>
  ...
http://<your_website>/LP/<name_of_landing_page_00n>
Adding a prefix gives your URL more definition, and also lets you easily set up a redirect alias to a proxy service.
The following procedure shows how to set the prefix.
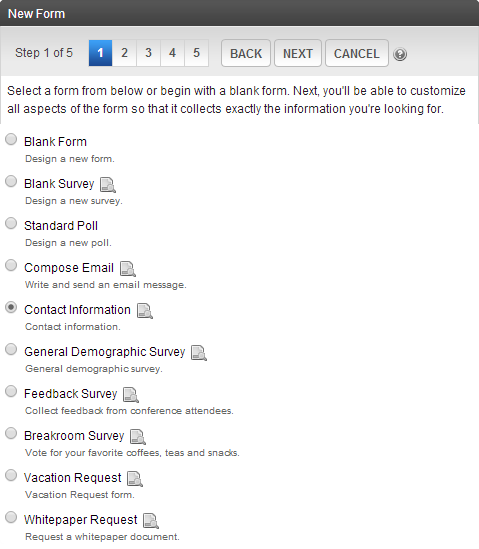
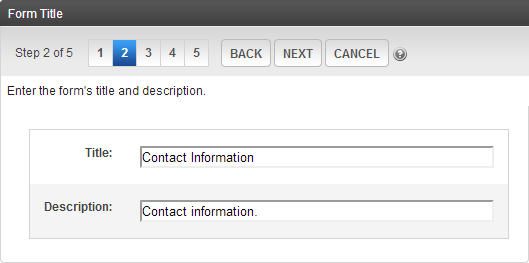
Ektron provides Basic and Advanced data forms. The forms contain the following information. You can modify these or create your own.
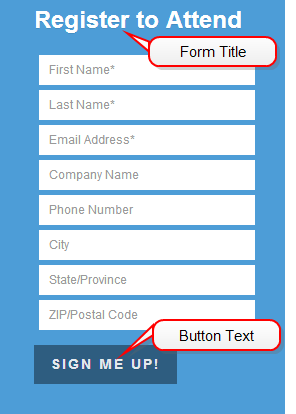
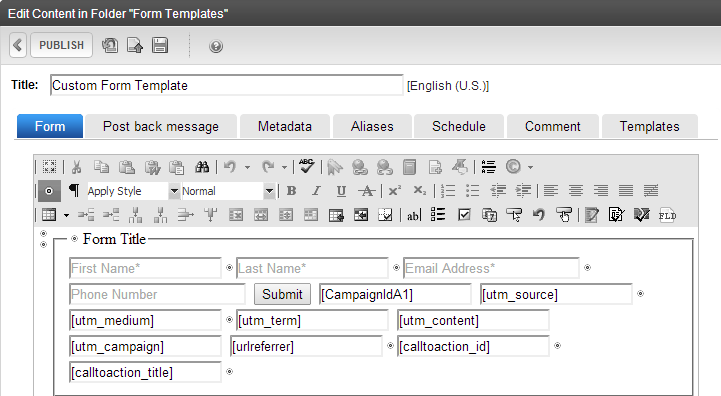
Custom Form Template and remove several fields from the form so that only first name, last name, email address, and phone number appear on the form.IMPORTANT: If you create a drop-down list in the HTML form, the (case-sensitive) field values must match exactly when you map the external application's field values through DXH.
NOTE: The following hidden fields do not display on the published form but collect Google Analytics:
[CampaignIdA1]
[utm_source]
[utm_medium]
[utm_term]
[utm_content]
[utm_campaign]
[urlreferrer]
[calltoaction_id]
[calltoaction_title]
IMPORTANT: If you create a drop-down list in the HTML form, the (case-sensitive) field values must match exactly when you map the external application's field values through DXH.
[CampaignIdA1]
[utm_source]
[utm_medium]
[utm_term]
[utm_content]
[utm_campaign]
[urlreferrer]
[calltoaction_id]
[calltoaction_title]
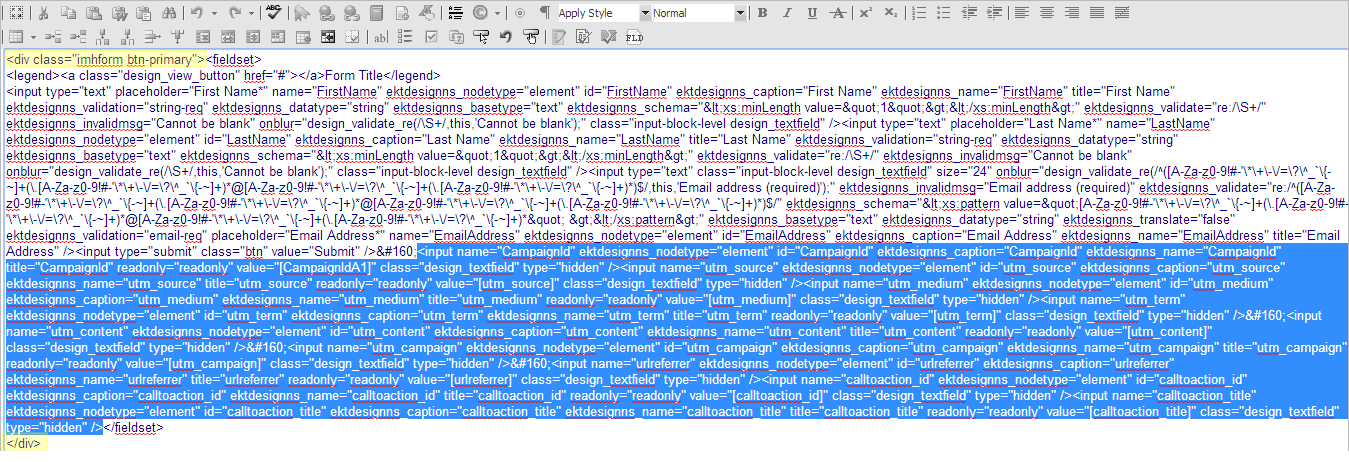
Here is unpacked code:
<input name="CampaignId" ektdesignns_nodetype="element"
  id="CampaignId" ektdesignns_caption="CampaignId"
  ektdesignns_name="CampaignId" title="CampaignId"
  readonly="readonly" value="[CampaignIdA1]"
  class="design_textfield" type="hidden" />
<input name="utm_source" ektdesignns_nodetype="element"
  id="utm_source" ektdesignns_caption="utm_source"
  ektdesignns_name="utm_source" title="utm_source"
  readonly="readonly" value="[utm_source]"
  class="design_textfield" type="hidden" />
<input name="utm_medium" ektdesignns_nodetype="element"
  id="utm_medium" ektdesignns_caption="utm_medium"
  ektdesignns_name="utm_medium" title="utm_medium"
  readonly="readonly" value="[utm_medium]"
  class="design_textfield" type="hidden" />
<input name="utm_term" ektdesignns_nodetype="element"
  id="utm_term" ektdesignns_caption="utm_term"
  ektdesignns_name="utm_term" title="utm_term"
  readonly="readonly" value="[utm_term]"
  class="design_textfield" type="hidden" />
<input name="utm_content" ektdesignns_nodetype="element"
  id="utm_content" ektdesignns_caption="utm_content"
  ektdesignns_name="utm_content" title="utm_content"
  readonly="readonly" value="[utm_content]"
  class="design_textfield" type="hidden" />
<input name="utm_campaign" ektdesignns_nodetype="element"
  id="utm_campaign" ektdesignns_caption="utm_campaign"
  ektdesignns_name="utm_campaign" title="utm_campaign"
  readonly="readonly" value="[utm_campaign]"
  class="design_textfield" type="hidden" />
<input name="urlreferrer" ektdesignns_nodetype="element"
  id="urlreferrer" ektdesignns_caption="urlreferrer"
  ektdesignns_name="urlreferrer" title="urlreferrer"
  readonly="readonly" value="[urlreferrer]"
  class="design_textfield" type="hidden" />
<input name="calltoaction_id" ektdesignns_nodetype="element"
  id="calltoaction_id" ektdesignns_caption="calltoaction_id"
  ektdesignns_name="calltoaction_id" title="calltoaction_id"
  readonly="readonly" value="[calltoaction_id]"
  class="design_textfield" type="hidden" />
<input name="calltoaction_title" ektdesignns_nodetype="element"
  id="calltoaction_title" ektdesignns_caption="calltoaction_title"
  ektdesignns_name="calltoaction_title" title="calltoaction_title"
  readonly="readonly" value="[calltoaction_title]"
  class="design_textfield" type="hidden" />
</div> tag.<div class="imhform btn-primary"> ... </div>
NOTE: The default theme is imhform btn-primary, but you can insert your own CSS theme.
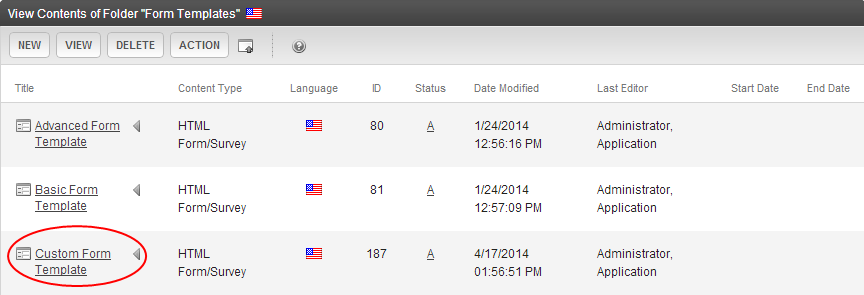
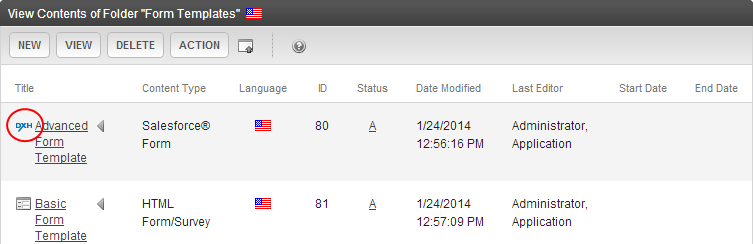
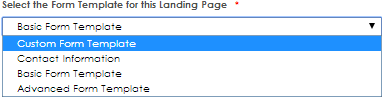
When you create a new landing page, you can select among the Form Template options, which includes the newly created forms as shown in the following image:
Prerequisite
This procedure requires the Digital Experience Hub (DXHDigital Experience Hub) to be already set up. For complete information about setting up and using DXH with Ektron, see Ektron Digital Experience Hub release notes.
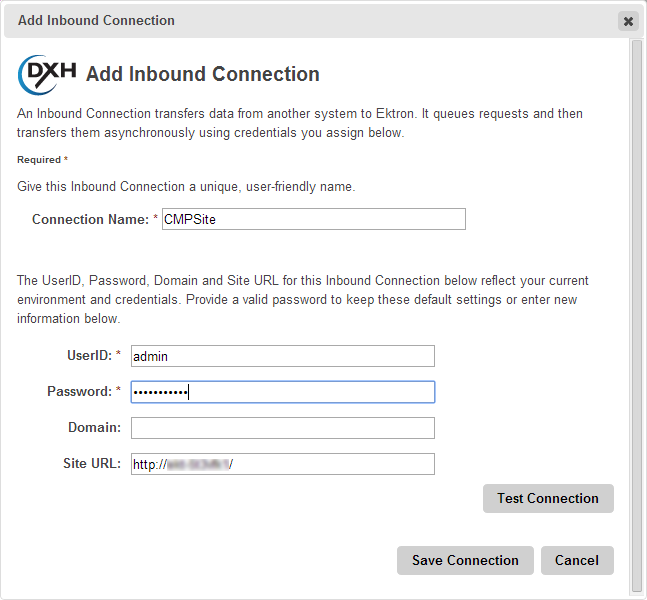
Before your website forms can send you data, you must set up an inbound connection.
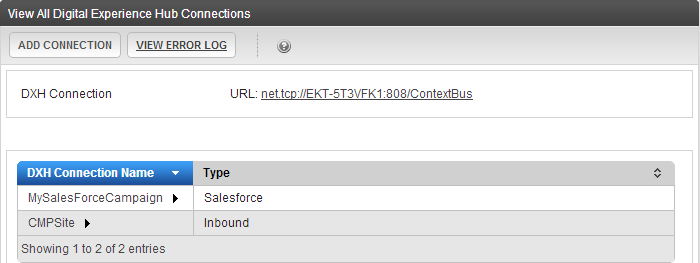
The View All Digital Experience Hub Connections screen appears.
The Add Inbound Connection screen appears.
The Connection is added to the View All Digital Experience Hub Connections screen.
Prerequisite
This procedure requires the Digital Experience Hub (DXHDigital Experience Hub) to be already set up. For complete information about setting up and using DXH with Ektron, see Ektron Digital Experience Hub release notes.
Before your website forms can send you data, you must set up an inbound connection.
Prerequisite
This procedure requires the Digital Experience Hub (DXHDigital Experience Hub) to be already set up. To set up and use DXH with Ektron, see Ektron Digital Experience Hub release notes. You should also have an inbound connection set up: see Setting up an inbound connection to collect the form data.
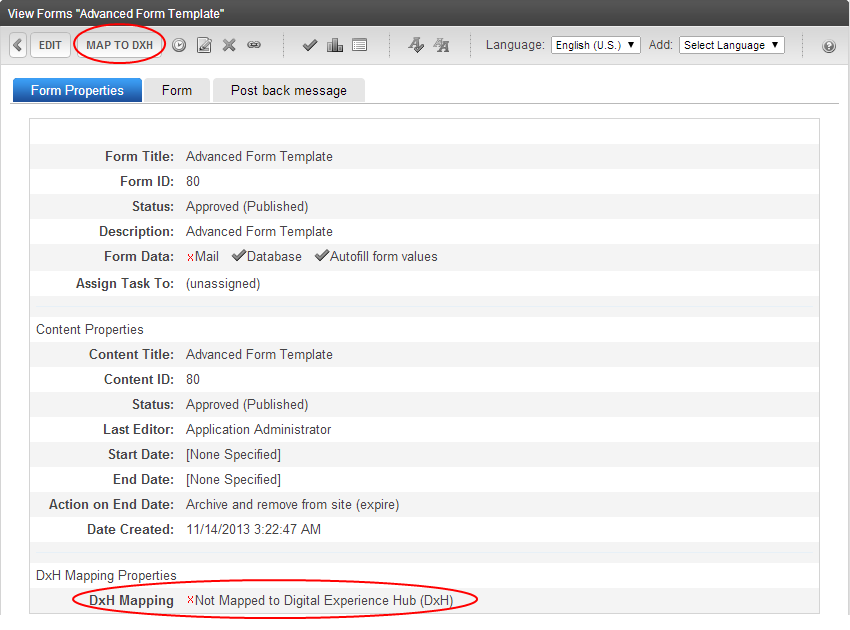
If you have DXH, you can map the Advanced and Basic Form Templates, and any other forms that you create (see Editing the properties of a landing page). After you map the fields for a template, DXH maintains the mappings for any landing page that you create that uses the mapped form template. (You do not need to map the fields again for new landing pages.)
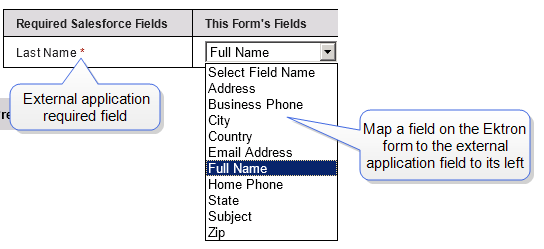
IMPORTANT: The external application field's data type must match the Ektron form field.
 ) to map other Ektron form fields to optional external fields.
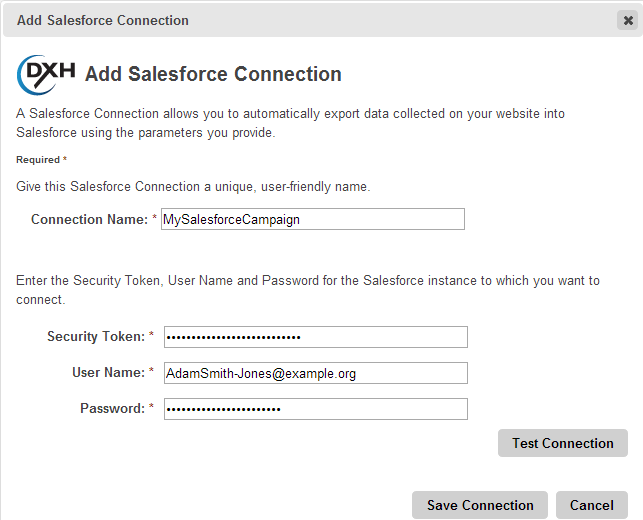
NOTE: For Salesforce campaigns, map the CampaignId field as shown in the following image. (Associated Campaigns is available only in the Lead and Contact categories of Salesforce.)
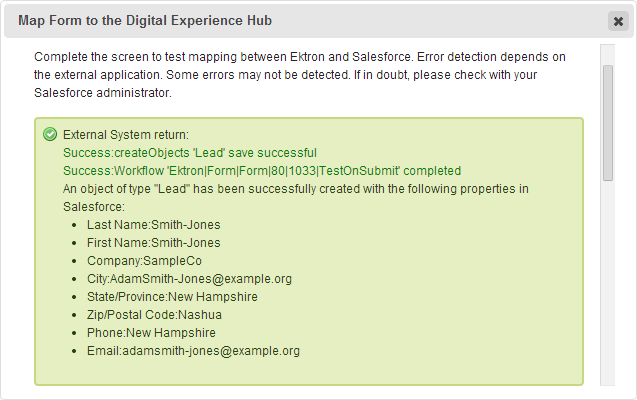
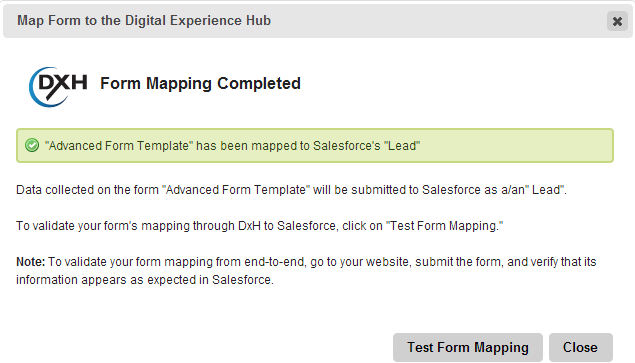
Test Form Mapping
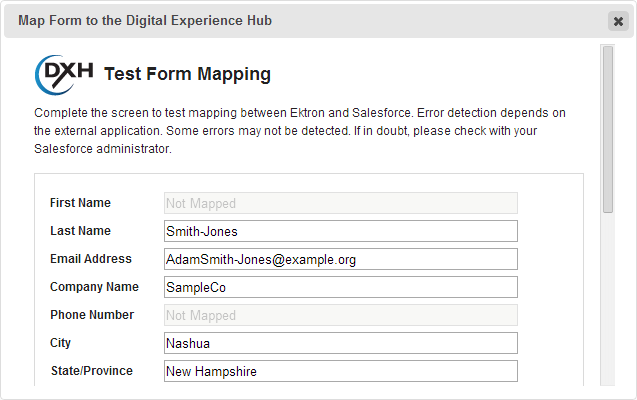
Test Form Mapping Success