 Restricting product by group
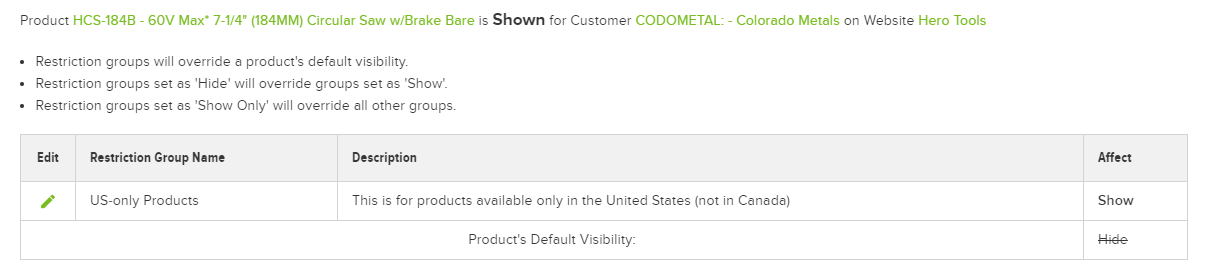
The screen displays the ultimate result for the product ("Shown" or "Hidden") at the top of the screen. A list of all applicable restriction groups displays below, demonstrating how the system arrived at the ultimate result.
- Go to Catalog > Validation Tool.
- Select a Website from the drop-down.
- Type a Customer Number or Company Name in the Customer search box to select a customer.
- Type a Product Number or Product Title in the Product search box to select a product.
- Click Validate.
Use the Validation Tool to confirm if a product is or is not visible to a customer. To determine the visibility of a specific product for a specific customer:
Validation Tool
Because restriction groups are based on customer Bill To/Ship To fields, the user's cart must be revalidated every time a change is made to the user's selected Bill To/Ship To. The user's cart is revalidated if the user adds an item to their cart, then changes their Bill To/Ship To. The cart also is revalidated if the user adds an item to their cart, then changes their Bill To/Ship To so the warehouse changes and backorders are not allowed.
Cart Validation
- Go to Catalog > Restriction Groups.
- Click Add Restriction Group.
- Enter the Restriction Group Name (required), and an optional description.
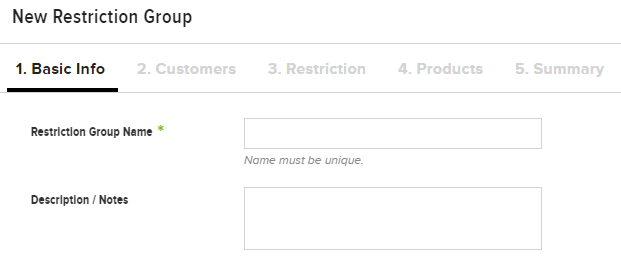
- Click Continue.
- Next, select affected customers. Enter rules using the Rules Engine, and/or select specific customers.Note: The Customer Bill To Fields rule type only applies to customers where the Bill To toggle = YES. Similarly, the Customer Ship To Fields rule type only applies to customers where the Ship To toggle = YES.
- If using the rules engine to enter rules, select a Rule Type, then fill in the appropriate fields.
- Alternately, choose not to use the rules engine, and click Select Customers under the Specific Customers header to handpick customers affected by the restriction group. Select one or more customers, then click Assign. Click Done to save.
- Click Select Customers under the Exclude Customers header to choose customers who fit the rules, but are excluded from the restriction group. Select one or more customers to exclude, then click Assign. Click Done to save.Note: Either rules must be entered, or specific customers selected, in order to continue. Restriction groups cannot be created with excluded customers only.
- Click Continue.
- Next, choose restriction options.
- Hide selected products: "Hide" overrides products with a default setting of "Show." If products are in multiple restriction groups, "Hide" overrides "Show."
- Show selected products: Restriction groups with "Show" override products with a default setting of "Hide."
- Show only selected products: If products are in multiple restriction groups, "Show Only" overrides all other groups and product default settings. This can be used to display a limited catalog.
- Choose which websites the restriction group applies to. If the restriction group should not apply to all websites, choose Select websites, then click Assign Websites to choose a websites.
- Click Continue.
- Next, select the products affected by the restriction group. Enter rules using the rules engine, or select specific products.
- If using the rules engine to enter rules, select a Rule Type, then fill in the appropriate fields.
- Alternately, choose not to use the rules engine, and click Select Products under the Specific Products header to handpick products affected by the restriction group. Select one or more products, then click Assign. Click Done to save.
- Click Select Products under the Exclude Products header to choose products that fit the rules, but are excluded from the restriction group. Select one or more customers to exclude, then click Assign. Click Done to save.
- Click Continue.
- Finally, click the Active toggle to activate the restriction group. Restriction groups are not live until the product index is rebuilt, either manually or with an integration job. Click Rebuild Product Index to rebuild the index manually.
- Finally, click the Active toggle to activate the restriction group. Restriction groups are not live until the product index is rebuilt, either manually or with an integration job. Click Save and Rebuild Product Index to rebuild the index manually.
- Click Save.
Create a Restriction Group
- In the Admin Console, go to Catalog > Products
- Select Edit next to a product.
- Select the Product Restrictions finger tab.
- Select either the Show or Hide radio button next to Default Visibility. Restriction groups that affect the product override this setting based on the behavior hierarchy (see above).
To modify the product restrictions setting:
The Product Restrictions setting determines if individual products are set to appear or not appear on the website by default. These values can be overridden by restriction groups. Products with Hide as their default value are hidden from the website unless overridden by Show or Show Only restriction groups. Products with Show as their default value are shown on the website unless overridden by Hide restriction groups.
Product Restrictions Setting
- With all restriction groups active, customers in show only restriction groups only see the products in the groups (show only wins and every other product/group is hidden)
- With only show and hide groups active, customers in both restriction groups do not see products in the group (hide wins)
- With no groups active, the default product behavior determines if the product is available on the site
This is how the hierarchy looks in practice:
- Hide restriction group > Show product setting
- Show restriction group > Hide product setting
- Hide restriction group > Show restriction group
- Show Only restriction group > All settings (if product is in multiple restriction groups)
Customers and products both can belong to multiple restriction groups. Use this behavior hierarchy to determine which customer/product setting prevails.
Restriction Group Behavior Hierarchy
HHC also carries various types of industrial coolant. Since these coolants are considered hazardous materials, HHC cannot ship them to their customers in Canada. HHC creates a restriction group hiding all products in the Industrial Coolant category from customers whose Country data field equals Canada.
Use Case 2: Hazardous Products
Hero Heating and Cooling (HHC) sells HVAC products in the upper Midwest region of the United States, as well as parts of Southern Canada. One of their vendors, Vendor A, has signed a distribution contract with HHC, on the contingency that Vendor A's products are sold only in the state of Minnesota. HHC marks all of Vendor A's products with a default behavior of "hide," then creates a restriction group showing those products to customers with the Customer Ship To StateId of Minnesota.
Use Case 1: State-Specific Products
To allow products to be affected by restriction groups, ensure the Restrictions by Item Setting is set to YES.
Use Restriction Groups to prevent or allow website users to view/purchase specific products. Restriction groups can be thought of as "exception groups"; they are assigned to customers to provide an exception for the way products generally are viewed/purchased. Customers and products may belong to multiple restriction groups.
To modify the message provided to the user, go to the Admin Console >�Administration > System >�SIte Messages, and then search for Cart_RemovedProductsFromCart. Change the message and or the target website.
Result: Customer A receives a message stating, "Due to business rules and restrictions, some items were removed from your cart - review before finalizing purchase.".
Behavior: Customer A goes to the website without logging in. Customer A reviews Product A and places the item in the cart. To check out, Customer A then logs into the website.
Precondition: Customer A is restricted from purchasing Product A.
Products added to a shopping cart that are restricted, are automatically removed and a site message will display alerting the user of the change to the cart. Consider this scenario to understand when this situation may occur:
Additional Information on Expected Behavior
As Restriction Grey is an Include All group, it allows all customers to see the products assigned to it, except where the customers are assigned to the restriction group. Both Restriction Red and Restriction Blue are Exclude All groups, preventing customers from seeing the included products unless the restriction group is assigned to the customer. So, when logged in, ABC users can see red products, XYZ users can see blue products, and all other users for all other customers can see gray products.
RESULT:
- Create three restriction groups: Restriction Red (with Exclude All parameters), Restriction Blue (with Exclude All parameters), and Restriction Grey (with Include All parameters)
- Assign all red products to Restriction Red, all blue products to Restriction Blue, and all gray products to Restriction Grey.
- Rebuild the Product Search Index
- Assign Restriction Red to ABC, and Restriction Blue to XYZ. Assign Restriction Grey to both ABC and XYZ.
POSSIBLE SOLUTION:
Customer ABC wants to restrict their users to purchasing only red products on the commerce site. Customer XYZ wants to restrict their users to purchasing only blue products. All other customers may access the gray products.
SCENARIO B:
Since there are no restrictions assigned to them, gray products are visible to all customers. When ABC users log in, they can see both red and gray products. When XYZ users log in, they can see both blue and gray products. The Exclude All parameters exclude the red and blue products from all customers, EXCEPT where the restriction groups are assigned to those customers (ABC and XYZ, respectively).
RESULT:
- Create two restriction groups: Restriction Red (with Exclude All parameters) and Restriction Blue (with Exclude All parameters)
- Assign all red products to Restriction Red, and all blue products to Restriction Blue
- Rebuild the Product Search Index
- Assign Restriction Red to ABC, and Restriction Blue to XYZ
POSSIBLE SOLUTION:
Customer ABC wants to restrict their users to purchasing only red and gray products on the commerce site. Customer XYZ wants to restrict their users to purchasing only blue and gray products. All other customers may access the gray products.
SCENARIO A:
The following scenarios illustrate common uses for restriction groups. As there are multiple options for implementing each scenario, only one possible solution is listed.
Restriction Groups in Action
Note: Products added to the exceptions product list for the Customer record will display on the storefront. Any products not listed, that are a part of the restriction group, will not display on the storefront.
- Go to Admin Console > Customers.
- Locate the Bill To record for the customer to whom you would like to assign a restriction group
- Click Edit.
- Select the Restriction Group finger tab.
- Click Add Customer Restriction Group.
- Select the Restriction Group Name from the drop-down list.
- Click Save.
- Optionally, click the Exception Products finger tab and assign any product exceptions to the group by clicking the Assign Products button. Select the appropriate products, click the Assign button, then click the Done button.
Once products have been added to a restriction group, apply the restriction group to the relevant customers. To manage a customer's restriction groups, follow the steps below:
Assign a Restriction Group to a Customer
- Go to Admin Console > Catalog > Products.
- Locate the Product record for the product that you would like to assign to the restriction group.
- Click Edit.
- Click the Details finger tab for the selected product.
- Select the Restriction Group from the drop-down field.
- Click Save.
Once a restriction group is created, add the relevant products to the restriction group. By default, a product may only be assigned to one restriction group. To add products to a restriction group, follow the steps below:
Assign a Product to a Restriction Group
- Go to Admin Console > Catalog > Restriction Groups.
- Click the Add New Restriction Group.
- Fill in the following values:
- Restriction Group Name: This field is used to set the readable, unique key of the restriction group
- Description: This field is used to give a description of the restriction group
- Default Condition: This field is used to define the functionality of the restriction group, and has the following options:
- Include All: Select this to prevent customers from viewing/purchasing products in this group. This option allows all customers to see this group of products, except for the customers the group is assigned to.Note: By default, the system assumes all products are Include All; that is, that all products may be viewed and purchased by all customers. Creating an Include All restriction group and assigning it to a customer creates an exception for that customer, preventing them from seeing the products in that group.
- Exclude All: Select this to allow customers to view/purchase products in this group. This option prevents all customers from seeing this group of products, except for the customers the group is assigned to.
- Click the Save or Save and Add New.
Create a restriction group to prevent or allow a customer to purchase certain products. To create a restriction group, follow the steps below:
Creating a Restriction Group
Use Product Restriction Groups to prevent or allow customers to view/purchase an item or items on the website. Restriction Groups could be thought of as "exception groups": they are assigned to customers to provide an exception for the way products generally are viewed/purchased. Consider the following scenario: Canadian customers are not permitted to purchase hazardous products that are only available in the United States. (This scenario assumes that generally all customers can see all products.) To prevent this from occurring, a Hazardous Materials restriction group should be created and assigned to all customers located in Canada, and all of the relevant hazardous products should be assigned to the restriction group. See the additional scenarios at the end of this article for examples of how to configure restriction groups to meet business needs.
InsiteCommerce allows for more granular and flexible restrictions based on product groups or on an item by item basis. This functionality works by overriding the restriction settings based on the customer, and is controlled by the Restrictions By Item Setting.
InsiteCommerce allows for more granular and flexible restrictions based on product groups or on an item by item basis. This functionality works by overriding the restriction settings based on the customer, and is controlled by the Website Setting RestrictionsByItem.