Modifying the styles of an existing widget in Spire: raw CSS rules
This example shows how to modify the styles of the ProductPrice component. This component is used across the site.
- This will involve the use of style extension objects in Spire.
- This will involve the use of styled-components to specify CSS rules.
- This solution is ideal if you need to customize the style of a widget and:
- The Mobius component does not provide a prop to modify that style or
- The CSS rules are complex.
Spire allows for CSS styles to be passed down to specific child widgets. This capability is the result of adding a React Context Provider and Hook to additionalStyles.tsx. The widgets with this ability include Banner, Button, Image, Link, LinkList, Logo, NavigationList, Quick Order, Rich Content, Slideshow, SocialLinks, Subscribe, SecondaryNavigation, HeaderLinkList, HeaderSearchInput, Header/MainNavigation, HeaderSignIn, HeaderShipToAddress, CurrencyMenu, and LanguageMenu.
Prerequisites
- You have created a custom blueprint.
This example will use the VS Code IDE for modifying the widget A pre-configured content holder ISC_Content user roles may use to add content to website pages without having to develop page elements. styles.
Steps
- Open your IDE.
- In your IDE, open the ~/src/FrontEnd directory from the InsiteCommerce repository.
- Find the WidgetExtensions directory in your custom blueprint directory (such as ~/FrontEnd/modules/blueprints/myCustomBlueprint/src/WidgetExtensions).
- In the WidgetExtensions directory, create a new file named CommonComponentsExtensions.ts. The name does not matter. This file will be used for components that are used across the Storefront.
- Add the following code to the CommonComponentsExtensions.ts file.
import{ productPriceStyles } from"@insite/content-library/Components/ProductPrice"; import{ css }from"styled-components"; import mergeToNew from"@insite/client-framework/Common/mergeToNew"; // Note: Modifying the styles this way will affect all instances of // the widget across the Storefront. // Each component and widget in Spire exports a base style extensions object. // You can import this object and modify the properties on it. This will affect // all instances of the component or widget across the Storefront. In this example, // the style extensions object is named "productPriceStyles". // The `mergeToNew` function uses lodash's `_.merge()` behind the scenes // to make deep merging two objects easier. You can also do this manually // using the JavaScript spread (...) operator. productPriceStyles.wrapper=mergeToNew(productPriceStyles.wrapper,{ // This is using the `css` utility function provided by styled-components. // You should extend the base widget or component CSS rules // when you add new CSS rules. // Note: You should NOT use CSS selectors to apply CSS rules. // Each of the Mobius components used by widgets in Spire // makes use of the style extension objects. This allows you // to target a specific element within a widget to apply styles. css: css` ___CSS_0___ text-align: right;`,}); - Save the file.
- Run Spire using your custom blueprint. Below is an example of starting Spire from the terminal. You may also do this from your IDE. Spire includes some default VS Code launch configurations.
1 npm run start myCustomBlueprint 3000 - Go to the Storefront. The Storefront URL is http://localhost:3000. Use the port number used to run Spire.
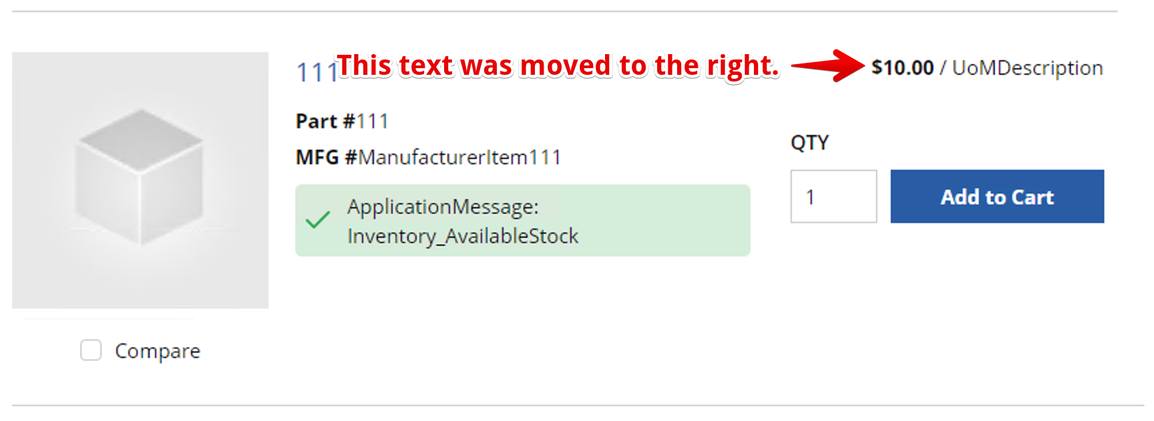
- Go to a Product Detail page and the Product List page.
Results
An image of the resulting Product Detail page is below.
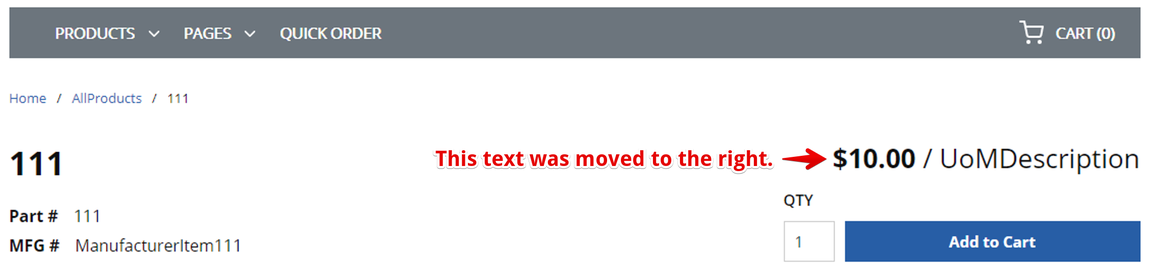
An image of the resulting Product List page is below.