 Set up and use search autocomplete
When searching for products on a website, entering a minimum of three characters into the search field will trigger the autocomplete functionality. As more characters are entered, the search results are refined to more accurately match the search query. The content displayed in the autocomplete preview consists of the following components.
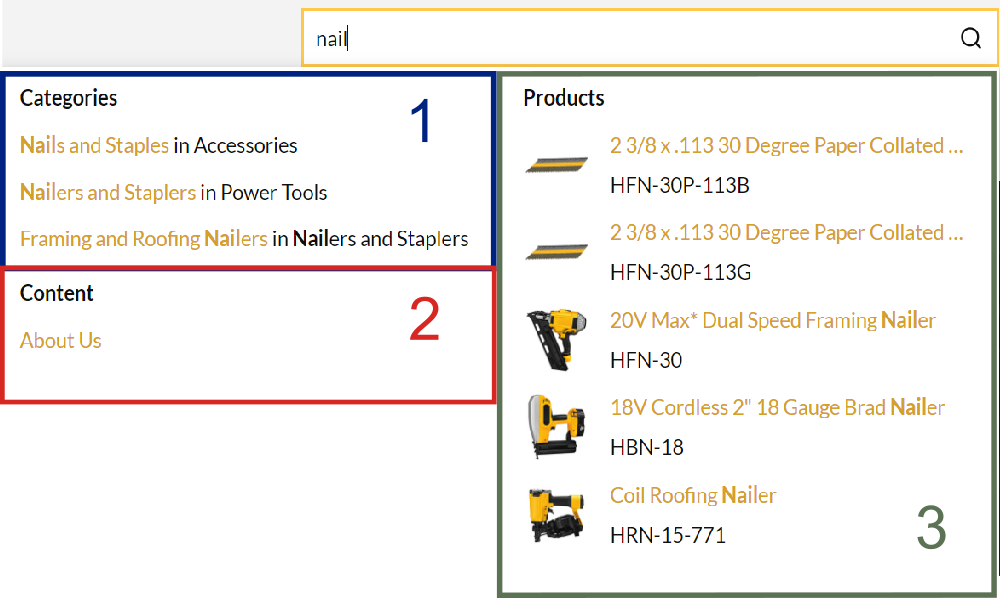
- Categories
- If a category name contains text that matches the search query, it will display in the Autocomplete window.
- Content
- Search crawls the actual content of pages for any text that matches the search query, such as blogs or white papers.
- Product Details
- Product Image - located in the
Admin Console > Catalog >
Products > click Edit for a product > Content tab >
Small Image Path. Note: If a Product Image is not provided, the global default image appears in place of the product image.
- Product Title - located in the Admin Console > Catalog > Products > click Edit for a product > Details tab.
- Product Number - located in the Admin Console > Catalog > Products > click Edit for a product > Details tab.
- Manufacturer Number - located in the Admin Console > Catalog > Products > click Edit for a product > Details tab.
- Product Image - located in the
Admin Console > Catalog >
Products > click Edit for a product > Content tab >
Small Image Path.
The Search Autocomplete feature is active by default and does not require the activation of any settings to function correctly.
Configure search autocomplete
The autocomplete functionality within B2B Commerce® can be configured to show search results pertaining to content on the page, product specific content, and category information. Each of these can be configured to show up to 10 results; the default is set to 5 2. Additionally, these settings can be set uniquely per website. Use the steps below to configure the settings.
Settings
Use the following steps to find the desired settings which are listed below.
- Go to Admin Console > Administration > System > Settings.
- In the search box, enter the Setting name and select it from the list.
- Update the Setting as necessary.
Enable Autocomplete
| Setting Name | Value | Description |
|---|---|---|
| Autocomplete | On/Off |
If On, users will see the autocomplete drop-down as they type in the search box. |
Categories
- Any category that contains a product that matches the search query will display in the Autocomplete window.
| Setting Name | Value | Description |
|---|---|---|
| Show Categories | On/Off |
If On, category autocomplete results will show up as the user starts typing in the search box. |
| Category Limit | Number | The maximum number of category autocomplete results that display. Maximum value: 10. |
Content
- Search crawls the actual content of pages for any text that matches the search query, such as blogs or white papers.
| Setting Name | Value | Description |
|---|---|---|
| Show Website Pages | On/Off | If On, CMS pages will show up as autocomplete results as the user is typing in the search box. |
|
Website Pages Limit |
Number | The maximum number of CMS page autocomplete results that display. Maximum value: 10; Default value is 2. |
Product Details
Search Autocomplete will return and display any products that match the query terms.
| Setting Name | Value | Description |
|---|---|---|
| Show Products | On/Off | If On, product autocomplete results will show up as the user starts typing in the search box. |
| Product Limit | Number | The maximum number of product autocomplete results that display. Maximum value: 10 |
Location of the Search Autocomplete product metadata
- Product Image - located in the Admin Console > Catalog > Products > click the Edit button for a product > Content tab > Small Image Path.
- Product Title - located in the Admin Console > Catalog > Products > click the Edit button for a product > Details tab.
- Product Number - located in the Admin Console > Catalog > Products > click the Edit button for a product > Details tab.
- Manufacturer Number - located in the Admin Console > Catalog > Products > click the Edit button for a product > Details tab.
Use search term redirects
Use search term redirects to create a redirect associated with a specific search term. This can be useful when there is a particular page with products or content relevant to a common search term.
This is not to be confused with HTML redirects, where each page from an old website can be mapped to an equivalent page on the new site, ensuring users with bookmarks or old indexing are redirected to the current website.
Create search term redirects
- Go to Admin Console > Marketing > Search > Redirects.
- Click Add Search Term Redirect to add a new redirect.
- In the Term field, enter the term that would be in the search query (this can be more than one word).
- In the Redirect URL field, provide the redirect URL (this can be either an internal or external URL).
- Determine which website this Search Term Redirect will be applied to. If no website is chosen, it will be applied to all websites.
- If desired, use the date picker menu to select an Activate On date and/or a Deactivate On date. If no date is chosen, the Search Term Redirect starts immediately and persists indefinitely until deleted or the Activate On/Deactivate On Date is updated.
As the list of Search Term Redirects grows, sort the records quickly based on any of the column titles, filter the list using the search filter, or display/hide items that have been archived.
Work with stopwords
Stopwords are the common words in language that are ignored when included within a search query. B2B Commerce has a default set of stopwords already included, but it may be useful to add additional subjective terms from being included in search query processing. For example, words such as "quality", "cheap", "value", and so on could be added so that if a user enters a query of "cheap bolts", search will only process the word "bolts."
The following is the default list of stopwords:
they, this, to, was, will, with
that, the, their, then, there, these,
no, not, of, on, or, such,
for, if, in, into, is, it,
a, an, and, are, as, at, be, but, by,
Stopwords are not case sensitive.
Manually add stopwords
- Go to Admin Console > Marketing > Search > Stopwords.
- Click Stopword.
- Enter the Stopword in the Word field.
- Click Save if only one Stopword is being added, otherwise click Save and Add to add additional stopwords.
Manually remove a stopword
- Go to Admin Console > Marketing > Search > Stopwords.
- Select the word to be removed from the Stopword list by clicking Edit.
If multiple words are to be removed click the checkbox next to each word that needs to be removed.
Import or export stopwords
- Go to Marketing > Search > Stopwords.
- Click Import.
- Click Choose File and select the file to be imported.
- Select the desired import options for the import file.
- Click Import to import the Stopword file.
Work with synonyms
Synonyms allow your customers flexibility and variation when searching for products on your website. As an example, you offer several types of bubblers on your website, but they are not all called bubblers. Some are called water fountains, some are drinking fountains and others are referred to as fountains. The goal is to make sure when customers search for any of these variations, they are all returned in the search results.
B2B Commerce supports two types of synonyms: Bidirectional and Synonym.
Synonyms are not case-sensitive.
Bidirectional synonyms
When there's many similar products that have slight name variations, like with the bubbler example, it is best to use a bidirectional synonym. When using bidirectional synonyms, search substitutes all of the listed synonyms for any of the terms a customer searches or when the system indexes the product's data.
In the bubbler example, searching B2B Commerce for water fountain produces products with the terms water fountain, drinking fountain, fountain or bubbler. This configuration also produces results for partial matches since the system indexes synonyms as a string. So, searching for "water" additionally surfaces products that include terms within this synonym string.
Synonyms
If you think your customers might search for a term, but you know your data reliably represents that term in other ways, use a uni-directional synonym. For example, if you know none of the products in your catalog are called "bubbler," but you know some customers may search for this term when looking for water fountains or drinking fountains, set up a uni-directional synonym for "bubbler."
If your data uses abbreviations not commonly searched by customers, set up a synonym with the abbreviation, for example "ELLB," as the synonym. Indicate "elbow" as the replacement token for this so that the system replaces all searches for "ELLB" with "elbow," both in queries and the index. Then if a user searches for "elbow," they will get the results they need.
The synonyms configuration has a number of notable exceptions:
- Avoid configuring single-character synonyms
- Avoid creating dimensional synonyms (for example, in=inch or .5=1/2)
- Avoid creating synonyms only valid for a single or small number of products (such as competitive part numbers). Instead, Optimizely recommends adding this data to the product itself and ensuring it is indexed.
- Avoid creating over 1,000 synonym records as there can be performance implications. If you approach this number, review the use cases with your partner for a more performant approach.
When creating synonyms, each Synonym relationship must be its own record. You can do this manually, by adding the various relationships into the list, or, if the number or relationships is lengthy, you may want to create the relationships in an Excel spreadsheet and then import it into the Synonyms list.
Create synonyms
To provide context for the instructions below, recall the bubbler scenario above. The goal here is to make sure when a customer searches for any variants of bubbler, they all are returned in the search results.
- Go to Admin Console > Marketing > Search > Synonyms.
- Click Add Synonym.
- Set the Bidirectional toggle to Yes if this synonym should replace any synonym found with all synonym values. Unidirectional synonyms replace any synonym found with all replacement tokens.
- Click Add Synonym to enter your synonyms.
Using the steps above and referring to the provided scenario, the following table illustrates what would need to be included in the Synonyms list to satisfy the scenario:
| Synonym | Synonym | Bidirectional |
|---|---|---|
| Bubbler | water fountain | Yes |
| Bubbler | drinking fountain | Yes |
| Bubbler | fountain | Yes |
Boost and bury search results
This article provides general descriptions and instructions for how to boost and/or bury search results. For more detailed descriptions and explanations on the impact of boosting and burying, review the Understanding Search Ranking and Relevance article.
General descriptions
Administrators can boost or bury particular product searches, depending on various business requirements. Boosting and burying can be adjusted in the following areas:
Field boosting
Fields can be included or excluded from the index to make them query-able on the storefront. Adjust their boost value to increase or decrease the rank of search results based on what fields the query matches.
Fields with search type of Content and Category are only used for results within autocomplete and will not influence product search results.
Query boosting
Query Boosting uses different criteria to find matches in the indexed fields when users search on the storefront. Adjust the boost value to increase or decrease the rank of search results based on the type of query that found the match.
Product boosting
Products can be boosted and buried across all websites or categories where they appear. A positive or negative value is set for a particular product. This value is added to the organic search score and raises or lowers the product based on where the new boosted value sorts numerically in the result set.
Category boosting
Category boosting boosts all products in a specific category instead of boosting a product individually. This boost value combines with other product boost values to deliver the final result.
If a category is in a multi-level hierarchy, ensure the boosting value is entered on the child category instead of the parent category. Values entered on parent categories do not boost products, as there are no products assigned to parent categories.
Sponsored product
Designate a product as Sponsored to ensure it appears at the top of all website searches with a "Sponsored" label, regardless of the product's boosting value. Administrators can select how many sponsored products are present with each search.
Purchase history
When you enable the setting to boost search results by purchase history, the system captures and indexes customer purchase history data. After you rebuild the product search index, all products included in orders for a customer bill-to, within the values set on the Frequently Purchased Threshold and the Lookback Months for Purchase History Boosting settings, are flagged as frequently purchased.
All products included in orders for a customer bill-to at least once, but less than the values set on the Frequently Purchased Threshold and Lookback Months for Purchase History Boosting settings, are flagged as less frequently purchased.
When customers search for products on your website, the system will boost any product flagged as frequently purchased for the current bill-to customer based on the Boost Amount for Frequently Purchased Products setting. They system will also boost (or bury) any products flagged as less frequently purchased based on the Boost Amount for Less Frequently Purchased Products setting.
How to boost and bury
Field and query boosting
- Go to Marketing > Search > Select either Field or Query Boosting.
- Select Edit for the desired field.
-
Adjust the Boost Value.
The Boost Value is a multiplier applied to search scores for matches on the field or query. A number greater than 1 will boost the result and a number less than 1 will bury the result. (range of 0.0-100.0) Boost values less than 1 are displayed in RED to indicate a negative impact and any value of 1 or greater is displayed in GREEN to show a positive impact.
New fields cannot be added to Field Boosting. The system is limited to the fields included in the list, as well as custom properties. Custom properties appear in Field boosting automatically. Select the Show Non-Queryable Fields toggle to view any field not currently indexed; custom properties may appear here instead of in the main list, as they are not indexed by default.
Product boosting
- Go to Marketing > Search > Product Boosting.
- Click Edit on the selected Product.
-
Select the Yes or No toggle
to indicate if the Product is sponsored or not.
Sponsored search allows merchandisers to guarantee an item appears at the top of the search results page.
- Enter the Search Boost value.
- Click Save.
Category boosting
- Go to Marketing > Search > Category Boosting.
- Click Editon the selected Category.
- Enter the Category Search Boost value and/or the Product Search Boost value.
- Click Save.
Purchase history boosting
- Go to Administration > System > Settings.
- Search for Enable Boosting by Purchase History.
- Toggle the Enable Boosting by Purchase History to YES. If Yes, products that have been purchased within a defined lookback period are boosted in search results. Default value: No.
- Set the value for
- Set the value for Frequently Purchased Threshold. This is the number of times a customer must have purchased a product within the defined lookback months to consider it frequently purchased for boosting. Default value: 3.
- Set the value for Boost Amount for Frequently Purchased Products. This is the multiplier applied to search result scoring for products that have been purchased more than the frequently purchased threshold. This value is included with the values for matches for all indexed fields and other boosting options to determine the search score and search rankings. Default value: 3.
- Set the Boost Amount for Less Frequently Purchased Products. This is the
- Set the Allow Filtering for Previously Purchased Products toggle to YES or NO. If Yes, users can filter search results or category product lists to only see products that they have previously purchased, based on data available in the order history table. Default value: Yes.
- Click Save.
Search Autocorrect and Did You Mean options
You can choose to disable the AutoCorrect or Did you Mean search settings without turning off suggested search. You must have the Enable Search Suggestions setting set to Yes to adjust the Autocorrect and Did You Mean settings individually. The logic works as follows:
- If autocorrect is off and did you mean is on, all suggestions above the did you mean threshold produce did you mean results
- If did you mean is off and autocorrect is on, suggestions above the autocorrect threshold will produce autocorrect results
- If both settings are off, the behavior will be the same as disabling Search Suggestions entirely
Disable Autocorrect
- Go to Administration > Search > Settings in the Admin Console.
- Search for Enable Autocorrect.
- Set the toggle to No. When enabled, website users see autocorrected suggestions when searching for products.
Disable Did You Mean
- Go to Administration > Search > Settings in the Admin Console.
- Search for Enable DidYouMean.
- Set the toggle to No. When enabled, website users see "Did you mean" suggestions when searching for products.
Working with ngram indexing for partial matches
When your customers search, they want to see results when there is a partial match of a product or manufacturer number.
With Ngram Indexing enabled, searches for partial matches that meet the character lengths of the minimum through maximum ngram length will return results for products with the entered search string within their product number or manufacturer item.
Search will allow ignoring of non-alphanumeric characters. For example, if you set your Minimum Ngram Length to 6 and your Maximum Ngram Length to 7, search will return product ABC-00-1234 when your customers search for 001234 or 00-1234.
Enable Ngram Indexing
- Go to Administration > System > Settings in the Admin Console.
- Search for Enable Ngram Indexing.
- Set the toggle to Yes. If yes, product number and manufacturer item values will be indexed using ngram indexing. This will index segments of the values to return relevant results for partial matches. For example, if your product numbers are formatted like ABC12345 and your customers normally search for only the numeric segments, 12345 will be indexed and a search for it will return a match for the product. Values will be indexed both with special characters included and with them stripped out. Default is No.
- Enter a value in the Minimum Ngram Length field. This is the smallest number of characters of ngram segments to be indexed. This should match the smallest search term length your customers would search for matches on product numbers. For performance reasons and to prevent erroneous matches, the minimum value is 3. Default is 5.
- Enter a value in the Maximum Ngram Length field. This is the largest number of characters of ngram segments to be indexed. This should match the largest character length of your product numbers. For performance reasons and to prevent erroneous matches, the minimum value is 3. Default is 8.