 Setting up, creating and managing promotions
Working with promotions includes creating a new promotions, adding rules, adding results and assigning a promotion to a website. Keep in mind, due to the numerous configuration possibilities, this article provides the general descriptions and steps, not specific promotion scenarios.
- Create a New Promotion
- Add Promotion Rules to a Promotion
- Add Promotion Results to a Promotion
- View a Promotion before It Is Live
- Assign a Promotion to a Website
If a Sales Representative provides a price quote on a product, any available promotions are disallowed. Additionally, any promotions applied to an order prior to submitting a quote request will be removed.
Details
The Promotion Details finger tab (Admin Console > Marketing > Promotions > edit or create a new promotion) contains fields that manage the high level description and general operation of the promotion. Promotions details are as follows:
- Name: This required text field reflects the name of the promotion.
- Description: This text field reflects a description and explanation of the promotion.
- Promo Code: This text field reflects the promotional code that is used by the end user. This field is not mandatory, as some promotions do not require a promo code.
- Rank: This numerical field ranks promotions from the lowest to highest number. The promotion with the lowest rank is executed first, and stops subsequent promotions from being applied. If multiple promotions are allowed on a single transaction, this field does not apply, unless using multiple Orderline level promotions.
If a Promo Code is applied to a cart after a ranked promotion is applied, the Promo Code promotion overrides the ranked promotion.
If using ranked promotions, do not assign the same rank to multiple promotions. This can cause inconsistencies in promotion calculation.
- Activate On: This date field reflects the date and time the promotion is active.
- Deactivate On: This date field reflects the date and time the promotion is deactivated.
- Live: This field is a Yes/No toggle. If set to Yes, the promotion is live and available on the website. If set to No, the promotion will not be live on the website, but it can be viewed in the CMS before it is live (see View a promotion before it is live).
Create a new promotion
- Go to Admin Console > Marketing > Promotions.
- Click Add Promotion.
- Enter the Promotion Details:
- Enter the Promotion's name in the Name field.
- Optionally, add a Description. Descriptions can be helpful when there are multiple promotion authors, when promotion names are similar to existing promotions, or to describe the trigger and results of the promotion.
- Optionally, enter a code in the Promo Code field.
When using the Promo Code field, there is no need to create additional Rules unless additional complexity is desired, such as qualifying that a customer needs to be from a certain company for the code to be accepted.
- Enter the Promotion's rank in the Rank field. This numerical field ranks promotions from the lowest to highest number. The promotion with the lowest rank is executed first, and stops subsequent promotions from being applied. If multiple promotions are allowed on a single transaction, this field does not apply, unless using multiple Orderline level promotions.
If a Promo Code is applied to a cart after a ranked promotion is applied, the Promo Code promotion overrides the ranked promotion.
If using ranked promotions, do not assign the same rank to multiple promotions. This can cause inconsistencies in promotion calculation.
- Enter the date/time at which the promotion will activate using the date/time buttons. These fields populate with the current date and time in the user's timezone based on the user's computer or device. If you want to set promotions to start and end in different time zones, you would need to, for example, calculate these dates/times, base them on a time-based or regional custom property/customer segment or have different promotions for different time zones.
- Enter the date/time when the promotion will deactivate using the date/time buttons. These fields populate with the current date and time in the user's timezone based on the user's computer or device. If you want to set promotions to start and end in different time zones, you would need to, for example, calculate these dates/times, base them on a time-based or regional custom property/customer segment or have different promotions for different time zones.
The Deactivate On field may be left blank to keep the promotion active for an undetermined period of time.
- Toggle the Live toggle to Yes to activate the promotion.
- When finished, click Save or Save & Add New.
Add promotion rules to a promotion
Because rules are highly customizable, this section describes the fields and general process of adding promotion rules, but does not go into detail about each rule type. For more information, see Promotion rule type descriptions
- Go to Admin Console > Marketing > Promotions.
- Find the desired promotion and click Edit.
- Click the Rules finger tab.
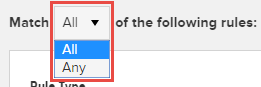
- If creating multiple rules in a singular Rule Group, use the drop-down to determine if Any or All of the rules within the Rule Group need to match.
- Select the desired rule from the Rule Type drop-down menu.
- Select the desired Rule variables.
The Rule variables dynamically change based on the selected Rule Type. The chosen Rule Type also determines if it is possible to add an additional Rule to the same Rule Group.
- Add additional Rules to the current Rule Group by clicking Add Rule.
If more than one Rule Group exists, the execution order is determined by the order that the Rule Groups are positioned on the page. To change the order, drag and drop the Rule Group to the correct position.

- Use the Condition Option drop-down to select the desired condition:
- If an additional Rule must be met, select "AND".
- If an alternate Rule may be met, select "OR".
- If no further Rules exist or will be added, select "AND".
- When finished, click Save.
Add promotion results to a promotion
After the Rules have been created, establish the Results.
- Go to Admin Console > Marketing > Promotions.
- Find the desired promotion and click Edit.
- Click the Results finger tab.
- Within the dialog box, select the desired Result Type from the drop-down menu.
- Update the Result Type variables as necessary for the selected result.
The fields displayed below the Result Type drop-down menu dynamically change based on the selected Result Type.
- When finished, click Save.
View a promotion before it is live
B2B Commerce provides the ability to view a promotion from the CMS before it is live on the website. To view a promotion that is not yet live, the following conditions must be satisfied.
-
The Live field must be set to No for the promotion in the Admin Console. Find this setting in Admin Console > Marketing > Promotions under the Details finger tab tor the selected promotion.
-
The CMS user must have the ISC_ContentApprover role.
-
The CMS must be in Edit mode.
When the user is in CMS Edit mode and enters a promotion code from the Review and Pay page, a message will appear to let the CMS user know that the promotion is not live yet. This message is configurable. The section below describes how to change the message if desired.
Configure the CMS message for promotions that are not yet live
You can change the default CMS message for promotions that are not live. To do so, follow these steps.
-
Open the Admin Console.
-
Go to Administration > System > Site Messages.
-
Click Edit next to the site message name Promotion_Is_Not_Live_Yet.
-
Enter the new site message in the Message field.
-
Select the Website Target. (The default is All Websites.)
-
Click Save.
Assign a promotion to a website
In order for a promotion to be applied to a user's cart, it must first be assigned to the appropriate website.
- Go to Admin Console > Marketing > Promotions.
- Find the desired promotion and click the Edit button.
- Select the Websites finger tab.
- Click Assign Websites.
- Select one or more websites from the list. Click Assign.
- Click Done to save.
Alternately, assign a promotion to a website from within a website record.
- Go to Admin Console > Websites.
- Find the desired website and click the Edit button.
- Click the Promotion finger tab.
- Find the desired promotion and click the Edit button.
- Select the Websites finger tab.
- Click Assign Websites.
- Select the desired websites and click Assign.
- Click Done.
Your promotions are now ready to be used.