 Setting up order cancellation
Optimizely B2B Commerce allows users to cancel orders via the Admin Console or website. Enabling this option requires some initial setup:
- Update settings to expose the cancel options.
- Build the cancel order integration job.
If an order is canceled without a Cancel Order integration job, B2B Commerce will show that the order has been canceled. However, this cancellation has only occurred on the B2B Commerce side, and without the integration job, it will not have been communicated to the ERP. To correctly send the order cancellation to the ERP, the Order Cancel integration job must be built.
Setting up the option to cancel orders is a two step process:
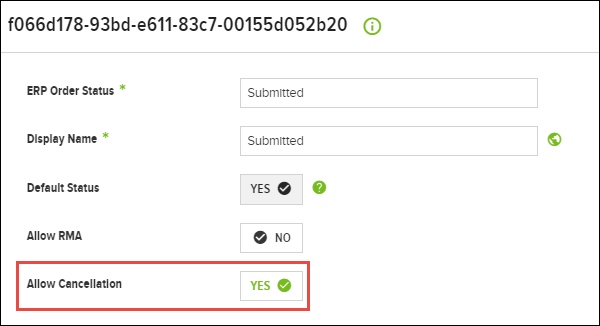
- Create the correct order statuses via the Order Status Mapping tool (See the Order Status Mapping article for more details).
- Identify which statuses allow for order cancellation.
Create and map the order statuses
- Go to Admin Console > Administration > System > Order Status Mapping.
- Create the mapping and select the option to Allow Cancellation (See the Order Status Mapping article for more details).
- Click Save.
Identify the cancellable order statuses
- Go to Admin Console > Administration > System > Settings.
- Search for Cancellable Order Statuses.
- Enter the cancellable order statuses listed within the Order Status Mapping screen that will allow an order to be canceled. As necessary. use the Plus sign to add additional statuses.

- Click Save.
Create the integration processor
As is standard with most submission based integration workflows, an custom coded integration processor needs to be created first, which calls the API to update the ERP. The integration processor is then referenced as a part of the integration job, which is described below.
Create the cancel order integration job
- Go to Admin Console > Administration > Jobs > Job Definitions.
- In the Primary toolbar, click Add New Job Definition.
- In the Details finger tab, populate the following fields:
Field Name Value Notes Job Name OrderCancel This is the recommended name. Job Type Execution Connection ERP Connection Typically done through the API connection, if any Preprocessor None Integration Processor This is custom per the customer ERP Post Processor None - Click Save.
- Next, click the Parameters finger tab and click Add Job Definition Parameter.
- Populate the following fields:
Field Name Value Note Name OrderNumber Value Type String Default Value Leave blank Prompt Order Number This can be left blank - Click Save.