 Create product variants in Optimizely PIM
Overview
For products that vary by specific properties but are merchandised together on a single product detail page on your Optimizely B2B Commerce website, you will want to create product variants in Optimizely PIM. Variant products may differ in areas like color, size, or dimension. For example, you might have the same bathroom sink that comes in colors of white, linen, and bone. To help efficiently merchandise this product in PIM, you would add or import each sink into PIM and then create a parent product where the color options would display.
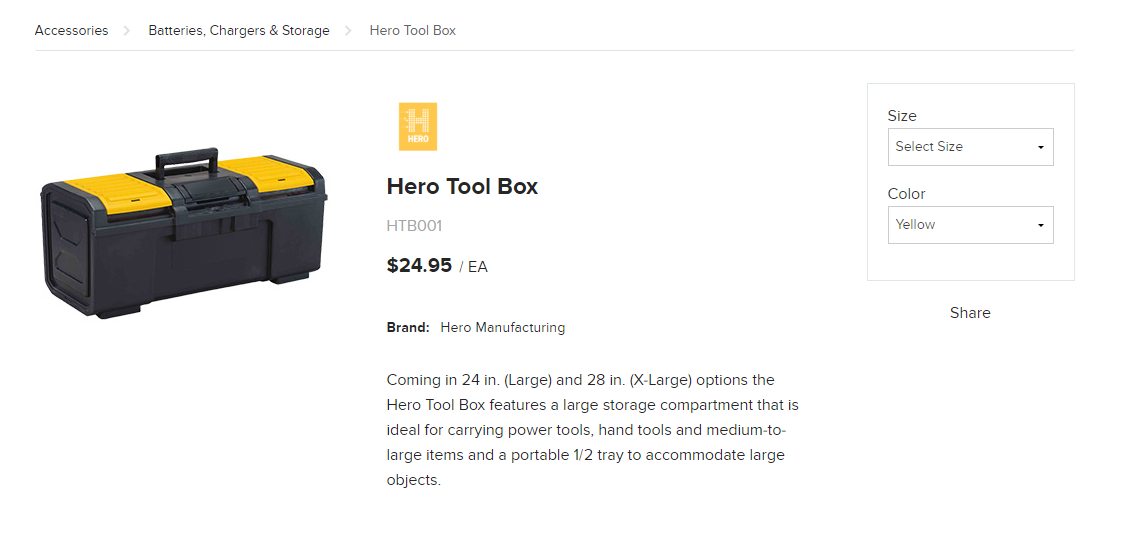
B2B Commerce Storefront View
Variant products display to your customers as options to select when on the product detail page. Here, you can see the size and color selector, where you would choose your variant option.
Best Practices
To manually create variants, you must create a parent product after all the child variants are created. For example, if you take the tool box above, you must create an individual product for the yellow, red, and blue boxes. Once the variant types have been established, then you can create the parent tool box product. Alternatively, you can create variants via import. In this case, you can create parent products manually or via import, and then define them as parents via an import process before assigning the child products.
Use Case
Carrie has a particular type of faucet that comes in two distinct finishes: matte gold and matte silver. She wants customers to search for one product and select the color from one product detail page, rather than creating two separate products that could be difficult to find in search results. Multiple products could also give the impression that each product is different in some way, rather than just being variations of the same product.
First, Carrie checks to ensure she has a separate product for each of her faucet finishes - these products were all imported into PIM during the setup process. From the product list, Carrie selects the two products and clicks Create Parent from the footer bar menu.
From the first step, Carrie selects the property on which these products vary - in this case, it would be Finish - and continues to the next step. There is one validation issue where there is a null value for the selected property on one of the products, which she corrects right in the grid that appears.
Next, she defines the order in which the property options appear on the parent. In this case, she wants Matte Silver to appear first, since it is the most popular. She drags the property values into that order. She also selects Matte Silver as the default value, so it will be the auto-selected option when a user first appears on this product detail page. She does have the option to leave the default value blank if she does not want any option to be selected when a customer lands on the page.
Finally, she enters the system values for the parent product, including product title, product number, URL segment, and product template. When she clicks Continue, she is taken to the parent product Edit page, where she can make additional changes if needed.
Organizing Product Variants
Creating parent and child product relationships enables you to showcase product variants. Because of this relationship, there are some properties that cannot be changed for child products until they are unassigned from their parent:
-
Cannot change (manual or bulk) the assigned product template for a child product
-
Cannot remove variant properties within a product template assigned to a child product
-
Cannot remove property values assigned to a child product from a property
-
Cannot delete any property that is used as a variant property
Create a Parent Product
- From the product list, select several products. These products must have a template. It is likely, but not required, that each product will have the same template.
- Click Create Parent.
- On the first step of the Product Variant wizard, select the properties on which the children vary. For example, if you are creating a parent for different t-shirts, you would select Size and Color.
- Click Add to add these properties to the Selected Properties panel.
- Click Continue.
- If there are validation errors, you will be prompted to resolve them. Use the tooltips to review all errors, then return to the product list page to make the necessary changes to the child products and make the appropriate changes to the products. When you continue it will re-validate the data.
- On the second step of the wizard, drag and drop the properties and their values to indicate the order in which they will display on the product detail page. You can also select whether any of the values are Default, meaning they will appear as the product option selected automatically when you land on this product detail page.
- Click Continue.
- On the third step, enter the data for the new parent product, including Product Title, Product Number, URL Segment, and Product Template.
- When finished, click Continue. You will be taken to the Edit Product page for the new parent product. In the product grid, parent products are indicated with a parent and child icon to the right of the product number.
Edit a Parent Product
Editing a parent product works in the same way as editing a standard product. You also have an additional tab for managing child products on the Edit Product page of a parent product.
- Find a parent product in the product grid and click the Product Number to begin editing.
- On the Edit Product page, click the Child Products tab.
- Click a child product to edit the child product information.
- Click the Edit Variant button to access the edit variant wizard to adjust the variant properties or drag and drop the properties or their values to adjust how these will display on your site.
- To return to the parent product, click the Parent Product link from the left menu.
Define Parent Products by Import
You can bulk define parent products by import instead of manually identifying them. The parent product must already exist and the variant property must have a Control Type of Radio Button or Dropdown.
- On the Imports page, click the Variants icon in the top right, and then select Define Parent Products by Import.
- If you have not already formatted your products according to the template format, click Download Template.
- Once you have a formatted template file, click Choose File.
- Locate your product file and click Open.
- Click Continue. If you receive any validation errors, please resolve them before attempting to import again. You can download the provided file to view error messages that are specific to each row.
- View your import progress at the top of the Imports list page or click Cancel to stop it. A log of the import displays on the Imports page.
Assign Child Products by Import
You can bulk define child products by import instead of manually identifying them. The parent and child products must already exist and the variant property must have a Control Type of Radio Button or Dropdown.
- On the Imports page, click the Variants icon in the top right, and then select Assign Child Products by Import.
- If you have not already formatted your products according to the template format, click Download Template.
- Once you have a formatted template file, click Choose File.
- Locate your product file and click Open.
- Click Continue. If you receive any validation errors, please resolve them before attempting to import again. You can download the provided file to view error messages that are specific to each row.
- View your import progress at the top of the Imports list page or click Cancel to stop it. A log of the import displays on the Imports page.