 Configuring transactional mails
This topic is for administrators and developers with administration access rights in Shopware.
This topic describes how to configure sending of transactional mails An email triggered by a recipient action (such as an order or purchase) or event (such as an anniversary). It is sent out subsequent to the event. when using Shopware as e-commerce platform with Optimizely Campaign.
How it works
Sending of transactional mails uses these templates:
- A Sender template in Shopware, which sends the variables of the transaction (for example customer name, ordered products) via the HTTP API Stands for "application programming interface". The API specifies how some software components should interact with each other, such as accessing a database or computer hardware, or easing the work of programming graphical user interface components. APIs often are in the form of a library that includes specifications for routines, data structures, object classes, and variables. See also: https://world.optimizely.com/documentation/class-libraries/.
- A Recipient template in Optimizely Campaign, which uses field functions to insert sent variables into relevant locations. This creates the finished transactional mail with layout, and sends it to the recipient.
The sending and receiving of the content of the variables use the transaction recipient list as a buffer.
- The Shopware template sends the variables.
- The variables are written into the transaction recipient list: each variable into the relevant recipient list field.
- Using field functions, Optimizely Campaign copies the template with the individual variables from the transaction recipient list and places it in the desired location in the transactional mail.

Configuration steps
- Set up the transaction recipient list.
- Configure the template in Optimizely Campaign.
- Configure the template in Shopware.
- Configure the details of transaction mails.
- Set up the transactional mails for multiple shops.
Step 1. Setting up a transaction recipient list
To set up a transaction recipient list, contact customer support. Plan in advance which variables you want to transfer from Shopware into Optimizely Campaign for your transactional mails.
List the Shopware variables for which you require a corresponding recipient list field in your transaction recipient list. Also, let Optimizely know the naming of the recipient list fields.
Step 2. Creating a template in Optimizely Campaign
Create the template and add the desired transactional mail texts (the unchangeable, static texts to be sent to recipients) and insert field functions in the places where the content of the Shopware variables should be.
About field functions
Field functions are placeholders that refer to a specific recipient list field in your transaction recipient list. The variables and content of the variables sent from Shopware are written into the relevant recipient list fields in your transaction recipient list. The field functions you place load relevant content from the referenced recipient list field in the next step.
Set up a transactional mail text that greets each customer using the last name and the order date. For this you need these variables: salutation, lastname and orderdate.
The content of the variables is first written to a relevant recipient list field of the transaction recipient list (from Shopware via the HTTP API). To access these recipient list fields, insert the individual field functions into the Optimizely Campaign template and place the name of the recipient list field in curly brackets. To import the variable contents, the static text and field functions in the Optimizely Campaign template could look like this:
Hello, {salutation} {lastname}! Thank you for your online order from {orderdate}.The example will appear in the sent transactional mail as follows:
Hello, Mr. Miller!
Thank you for your online order from August 3.
To create the template, do the following:
- Open the Optimizely Campaign menu and select Campaigns > Transactional Mails.
- Click Create….

- Drag the Recipients node from the left action area to the working area on the right.
- In the Recipient lists drop-down list, select your transaction recipient list.

Customer support sets up a separate transaction recipient list for you. Be sure you use this transaction recipient list, instead of a regular recipient list. To see if a recipient list is a transactional recipient list, check the column Transaction API.
- From the left action pane, drag the message node for the desired marketing channel Channel through which advertising messages or information are transmitted to customers and prospects. For example, email, SMS, print or push. (email, SMS) into the workspace.
- In the Name box, assign a concise name to your transactional mail (such as Order confirmation).

- In the context menu for the message node, click Edit Content….
- In the Template drop-down list, select the desired template and confirm your selection by clicking Next.
- Configure the template for the transactional mail according to your requirements. Enter a subject and insert the static texts that you want recipients to receive, into the content paragraphs. Insert the relevant field function for the recipient list field of the transaction recipient list into places where variables from the Shopware template should appear (see the previous example in this topic).
- Click Close.
- Connect the Recipient node with the message node.
- Click Save and Close.
- To activate your transactional mail and to start the sending process, select the mailing in the overview and click Start.
Step 3. Configuring the template in Shopware
Configure a transactional mail template that sends variables to Optimizely Campaign via the HTTP API.
Prerequisites
- Authorization code for your transaction recipient list in to Optimizely Campaign. To see the authorization code, open the Optimizely Campaign menu and select Administration > API Overview. Open the Recipient lists tab and select the desired transaction recipient list. Click Manage authorization codes and copy the authorization code from the list. If no authorization code is available for the selected recipient list, click Create authorization code.
- The mailing ID for the template in Optimizely Campaign. To see the mailing ID, open the the Optimizely Campaign menu and select Campaigns > Transactional mails. Copy the relevant mailing ID of the template in the list in column ID.
The Shopware integration contains two functional templates for demonstration purposes:
- sREGISTERCONFIRMATION
- sORDER
Do not use the system template sOPTINNEWSLETTER, which is included in the Shopware standard, to set up the newsletter registration. If you do, newsletter registration with Optimizely Campaign will not work.
- Log in to the back-end of your Shopware system with administrator rights.
- Go to Configuration > Email templates.

- Go through the directory structure to the template that you want to configure.

- To send the template variables to Optimizely Campaign via the HTTP API, select optivo broadmail ("Send with optivo broadmail").

- In the optivo authcode box, enter the authorization code of your transaction recipient list in Optimizely Campaign.

- In the optivo bmMailingId box, enter the mailing ID of the template in Optimizely Campaign.

- Open the optivo broadmail tab.

If the mailing is activated via Optimizely Campaign, the field values in the tabs Plaintext, HTML-Text, and Attachments are ignored.
- In the fields of the optivo broadmail tab, map the Shopware variables with the corresponding recipient list fields in your transaction recipient list to Optimizely Campaign. To see available variables for the respective template, click Sample variables.


Mapping ("Assigning")
The Shopware integration from Optimizely Campaign uses the following structure for mapping:
Name of the recipient list field=name of the Shopware variableEnter the mapping assignment for each variable line-by-line, and end each line with a semicolon. Separate the individual variables/mapping assignments with line breaks.
Example:
salutation={salutation};
firstname={firstname};
	lastname={lastname};
	smail={sMAIL};
	shopname={config name=shopName};
Use the example lines to map and transfer:
- Shopware variable value {salutation} to transaction recipient list field
salutation - Shopware variable value {firstname} to transaction recipient list field
firstname - Shopware variable value {lastname} to transaction recipient list field
lastname - Shopware variable value {sMAIL} to transaction recipient list field
smail - Shopware variable value {config name=shopName} to transaction recipient list field
shopname
Make sure that you map the Shopware variables to be transmitted to existing recipient list fields. Contact customer support to set these up. Determine in advance which data/content to transfer to Optimizely Campaign, and which content you can implement as static text in the Optimizely Campaign template.
- Shopware variable value {salutation} to transaction recipient list field
- Click Save template.


Step 4. Configuring transactional mails
The language template in Shopware writes the ordered products as a character string to the recipient list field orderPositions in the transaction recipient list. In the template sORDER, which contains the Shopware integration by default, you will find the following line next to the standard customer data:
orderPositions={foreach item=details key=position from=$sOrderDetails}
  "{$details.ordernumber}"{literal};{/literal}
  "{$details.quantity}"{literal};{/literal}
  "{$details.price} EUR"{literal};{/literal}
  "{$details.amount} EUR"{literal};{/literal}
  "{$details.articlename}"{literal};{/literal}{/foreach};
The foreach loop summarizes ordered products in a character string in CSV Stands for "comma-separated values"; tabular data in a plain text file separated by the comma character. format. The individual columns (order number, quantity, price, total price, and article name) are separated by semicolons. The individual products are separated by line break characters.
Adjusting the foreach loop
- Go to Configuration > Email templates.
- Go to the supplied template sORDER in the System emails directory of the Shopware integration.
- Open the optivo broadmail tab.
- Make changes in the mapping instruction line for the recipient list field orderPositions. For example, replace EUR with another currency, such as USD.
If you have good knowledge of Shopware template features, you can also use these functions to configure data to be transmitted. Observe the correct masking of special characters when making adjustments. In addition, the masking of the separator (semicolon) with {literal} must be retained within the loop.
- Click Save template.
Creating a field function for ordered products
To use the ordered products that are transmitted as a character string in a transactional mail, you need a specific field function in your client. This must use the template engine from Optimizely Campaign to transfer the character string to HTML, and to display ordered products in a table inside the transactional mail.
- Open the Optimizely Campaign menu and select Administration > Field Functions.
If Field functions is not available in your client, contact customer support to enable this feature.
- Click Create….

- Under General, in the Name field, enter a name for the new field function, such as CSVOrderObjects.

- In the Type drop-down list, select Velocity.
- In the Default replacement tab in the Content area, enter the following code in the Default replacement field.
<table>
    <tr>
        <td>Product ID</td><td>SKU</td><td>Name</td><td>Quantity</td>
        <td>Price</td>
    </tr>
#set ($csvContent = $csv.readFromString($user.data.orderpositions))
#foreach($row in $csvContent)
    <tr>
#foreach($item in $row)
        <td> $item </td>
#end
    </tr>
#end
</table>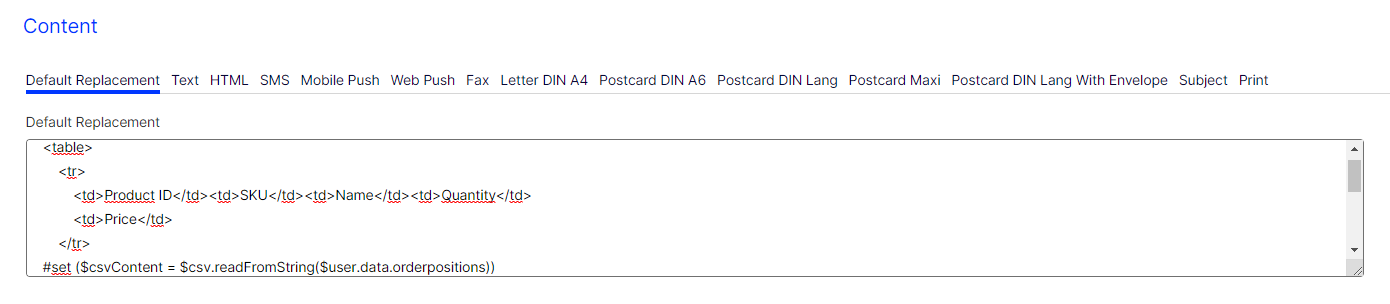
- Click Save.
If you have HTML knowledge, you can customize the layout of the table. See Field functions.
Step 5. Setting up transactional mails for multiple shops
If you have additional sub-shops in different languages in Shopware, you can set up individual templates in multiple languages to send transaction mails. You may need separate transaction recipient lists, contact Optimizely customer support in advance.
You may for example want to set the registration confirmation language for your newsletter to English for non-German-speaking recipients. Insert the English translation into the template, and use the corresponding field functions created for the English-speaking customers, in the places where the content of the variables provided by Shopware is to be used. If you do not have any field functions for international parameters in your client, contact customer support.
- Configure an individual template for transactional mails in Optimizely Campaign as described in Create a template in Optimizely Campaign.
- Log in to the back end of Shopware using administrator rights.
- Go to Configuration > Email templates.
- To find the desired template, go through the list on the left.
- In the text box, click the globe icon.
- Select the sub-shop or the language version for the shop from the menu bar on the left.
- In the optivo authcode box, enter the authorization code for the corresponding transaction recipient list in Optimizely Campaign.
- In the optivo bmMailingId box, enter the mailing ID of the individual template you want to use in Optimizely Campaign.
- Click Save translations.