 Creating an Email Product Recommendations campaign
Email Product Recommendations is part of the Optimizely Digital Experience Platform. It requires a specific installation and license. The Optimizely Digital Experience Platform contains many features to support you in your daily work. Depending on how your solution is set up, some features described in this documentation may not be available to you. Contact your system administrator to find out more. See Optimizely World for technical information.
Email Product Recommendations lets you deliver product recommendations to customers by email.
To create an Email Product Recommendations campaign Personalization: Describes the rules for sending email that share a strategy and time frame while marketing a product or service., select Configuration > Email Product Recommendations. In the Campaigns section, click Create a new campaign. There are three main steps in the set-up process:
- Styling the product information image
- Configuring recommendation strategies
- Previewing and generating the recommendations code
Styling the product information image
The Style editor step lets you configure the way the product information image appears for email recommendations. Your modifications are displayed in the Preview section.
- Campaign. The name of your Email Product Recommendations campaign Personalization: Describes the rules for sending email that share a strategy and time frame while marketing a product or service..
- Image. Modify the dimensions (number of pixels) and background color (hexadecimal values) of the product information image. Opacity modifies the background color so that you can have a transparent background.
The size of the actual product image will not change because that image is delivered with the same size as it is provided from your system to Optimizely in the product catalog feed.
- The Text styles section defines the font attributes:
- Title. Modify the font attributes and alignment of the product title.
- Price. Modify the font attributes and alignment of the product price.
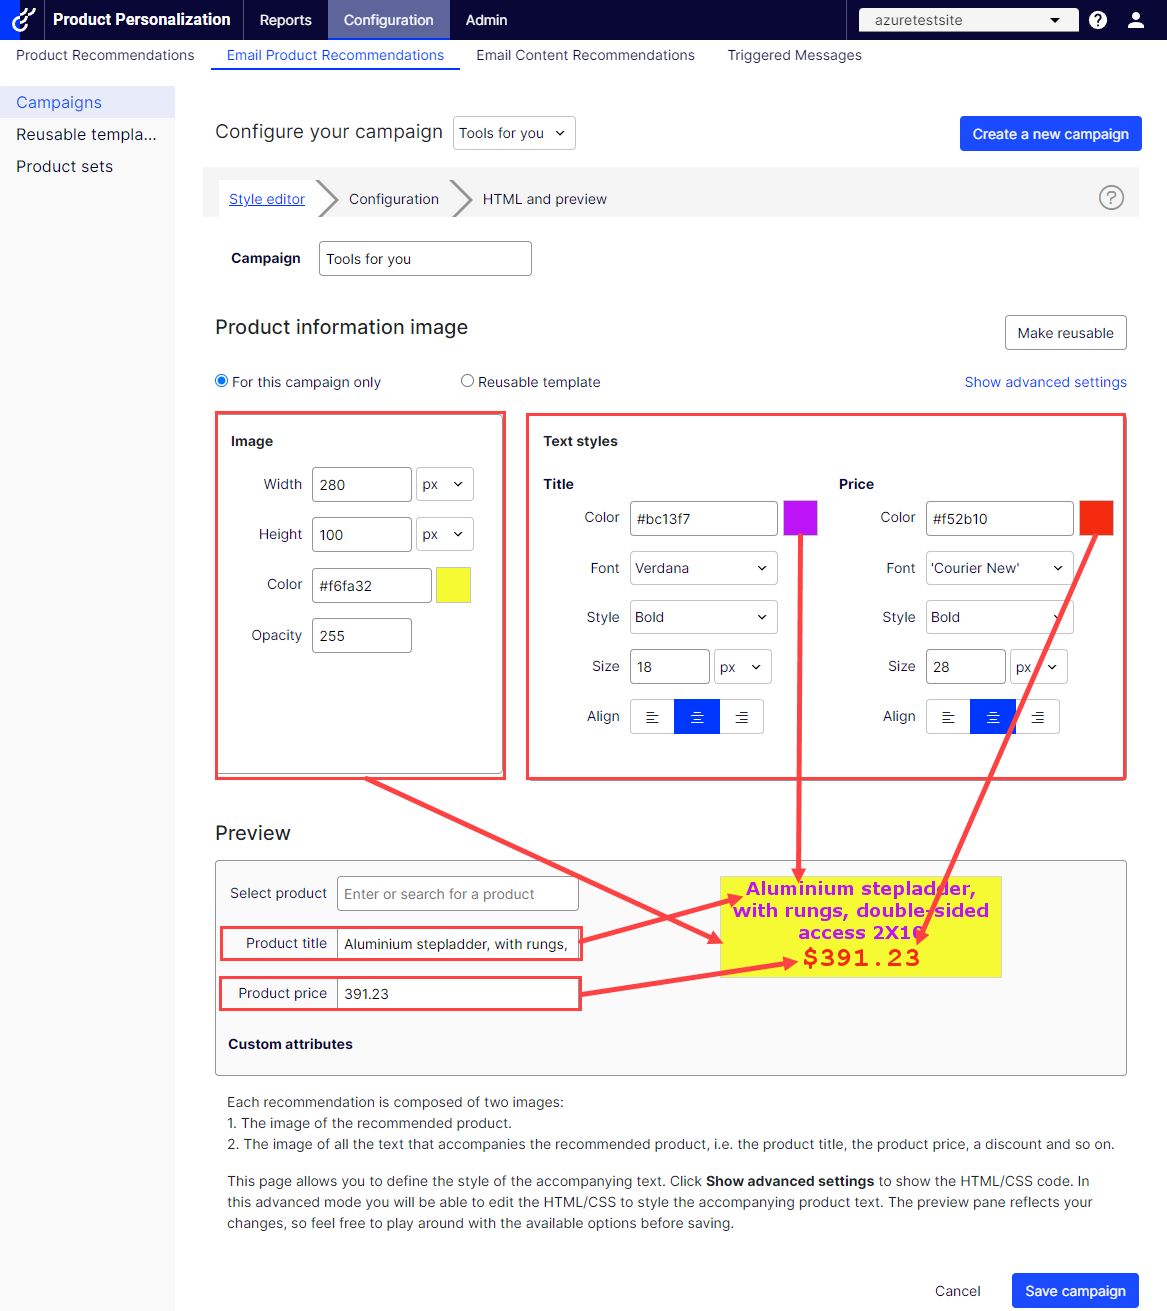
Click Show advanced settings to edit HTML and CSS Stands for "Cascading Style Sheet"; a file type that defines the appearance and layout on the website, containing fonts, colors, and so on. CSS files separate the layout of website content from the content itself, making it easier to make layout changes on a website. (See also page template and page type.) for the image. You can edit other elements, such as displaying Was prices or product ratings. The product information image is rendered in a similar way that a browser does, so you can use standard HTML and CSS.
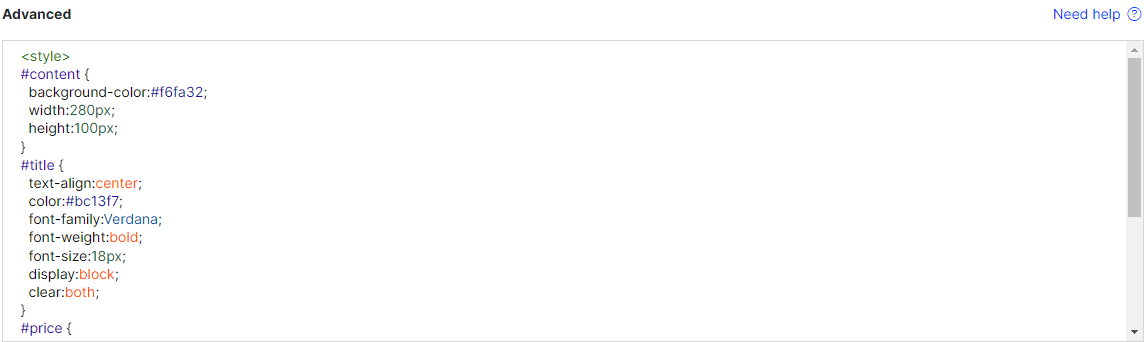
Click Need help for information about the syntax of variables and logical operations.

Select the Configuration step next.
Configuring email recommendations strategies
In the Configuration step, specify how many products you want to appear in the Email Product Recommendations campaign Personalization: Describes the rules for sending email that share a strategy and time frame while marketing a product or service., specify localization settings, add third-party tracking code, and configure the recommendation strategies.
- Set the number of products you want to display in the campaign in the Number of products field.
- If your site is multi-lingual and is being tracked under a single account in the Optimizely Personalization Portal, select the appropriate locale for the Mail campaign. The Locale field refers to the language to be used in the text of the product recommendations.
Each campaign should be specific per locale (such as dk, en, se, and so on), and only products that have the locale should be recommended. This is so email recipients get only products that the customer can buy, and not products that might be sold in only some countries or locales where the customer cannot make a purchase. You also can use other filter attributes (such as allowedcountry or exceptioncountry) to ensure recipients get the best recommendation.
- If you want to add third-party analytics code to the product recommendations to track their performance in tools such as Google Analytics, Coremetrics, Omniture and so on, add the tracking parameter generated by your preferred analytics tool in the Tracking code field.
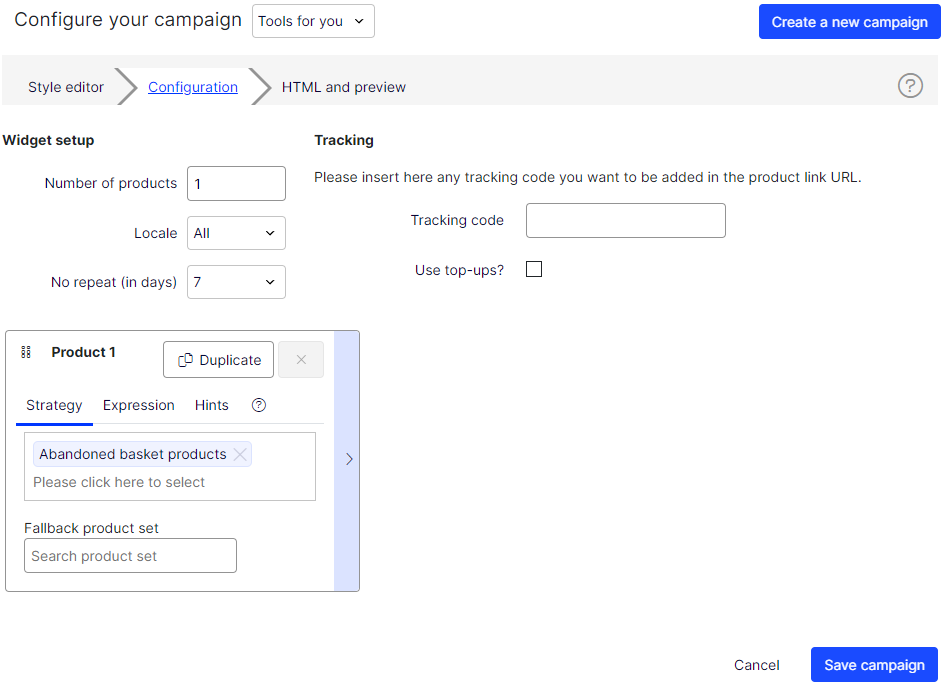
Use top-ups? displays a best seller from the last 7 days, if none of the strategies in the stack return a result.
- In No repeat (in days), set the number of consecutive days that recommendations are not repeated in multiple emails for the same campaign. For example, if you sent a Daily Deals type of email and you want to ensure that the recommendations are different, you can select No repeat in 3 days. This ensures that if the same user sees the same campaign multiple times in 3 days, the user will see different recommendations.
The visual editor displays the number of positions you chose to set up.
In each of the positions, you can choose one or more different strategies available. The strategies in each position are independent of each other. So, you can apply a different strategy or combination of strategies to each position.
Click a Strategy a criterion (such as best sellers for conversion, best trending, or abandoned basket products) used to determine when a mail is sent. field and scroll through the drop-down list. (You can start typing in the name of a strategy to filter the list.) When you find the strategy you want, click its name to add it to the product position.

You can stack strategies for each position, one after the other, so that the system finds products that match the first strategy in the top line first. If that strategy returns no products, the next strategy in the stack is tried, and so on, until the position is filled. For example, a strategy stack might look like this:

In this example, Optimizely searches for products that were abandoned by the user (based on the email address of the recipient, having browsed or purchased on the site using the same email address). If no product was found, Optimizely uses the second strategy line to find recently viewed products. If it does not find any recently viewed products, it finds new products (recently added to the site) from the past 14 days, and so on, until a matching product is found. See Creating a product set for information about product sets.
The example strategy also has a fallback the default action if no criteria is met; without a fallback, no action occurs. product set specified.
- Reorder the stack of strategies. Drag and drop a strategy up or down in the list.
- Reorder product positions. Grab the button in the top left and drag it to the desired order.
- Duplicate. Click Duplicate to copy the same strategy stack in another product position.
- Delete. Click X in the top right corner.
To ensure that there is never a blank position in an Email Product Recommendations campaign, you can do either of the following actions:
- Fallback product set. Select a product set from a list of preselected products that can appear in the recommendations if none of the strategies return a result.
Fallback product sets and top-ups will not follow hints Attributes that span products, such as products that fit into the same category, or products that were recently viewed; similar to expressions that work on specific product attributes. or expressions Commerce: Customizable conditions that let users extend the marketing system. Promotions, customer segments, and policies rely on expressions. For example, to set a promotion of 40% off Item X, use Catalog ID for Item X and Reward of 40%. applied to the product position.
- Use top-ups check box. Ensures that the system displays a best seller from the last 7 days, if none of the strategies in the stack return a result.
Empty slots in the widget occur when the Strategies, Expressions and Hints are too restrictive and no results are returned.
You can check if a fallback or top-up was used for a recommendation by looking at the Detailed Information on the HTML and preview page.

Click Detailed information to see expanded data.

Previewing and generating the recommendations code
The HTML and preview step lets you generate the code that is added to your email template, and lets you preview the output of the Email Product Recommendations widget Configurable screen element that displays information..
Generating the HTML code to add to your template
- Select your ESP Stands for "email service provider" from the drop-down list to populate the fields for the Variables.
If you do not see your ESP, you can manually insert your ESP email variable in the Email address variable field. This information is available from your ESP, so contact your ESP account manager or support team, if you are unsure what the correct variable is. (Depending on your client setup, you may see additional fields for other variables; for example, if you have Triggered Messages A product that lets you send automated personalized emails via an Email Service Provider (ESP), which are initiated by the the email recipient's on-site actions. and used a trigger strategy in your Email Product Recommendations campaign Personalization: Describes the rules for sending email that share a strategy and time frame while marketing a product or service., a Trigger fire ID variable field will be present.)

The Email address variable is required to let Optimizely identify the user by their email to serve personalized recommendations that are specific to the user. Upon sending an email, your ESP populates the variable in the link with the recipient's email address. If the variable is not present or is incorrect, Optimizely is not informed of the user's email address, and therefore cannot personalize the recommendations.
- After the variable is populated, click Generate code.The generated HTML code appears.
- Copy and paste the HTML code into your email template to retrieve recommendations.
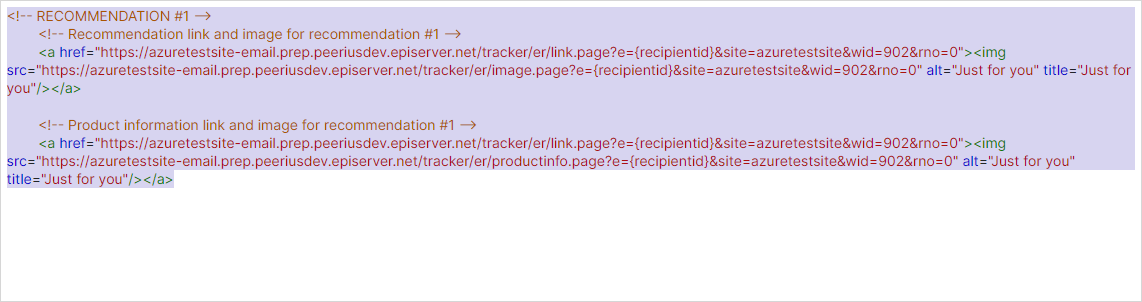
The generated HTML code is annotated to clearly show the links for each product recommendation. Each recommendation consists of two images (the product image and the product information image), and each of these is commented so you have the flexibility to use the images in the way you want to best fit your template design.
The generated code does not include any other formatting. You can add HTML and CSS Stands for "Cascading Style Sheet"; a file type that defines the appearance and layout on the website, containing fonts, colors, and so on. CSS files separate the layout of website content from the content itself, making it easier to make layout changes on a website. (See also page template and page type.) in your template to style the recommendations, such as adding them to a table or resizing the product images.
Previewing your campaign
To preview the output of the configuration you have set up, you can choose one of the following options:
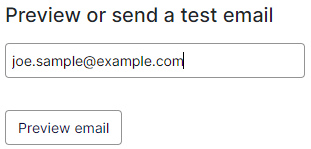
- Preview the email recommendations within the Personalization Portal (showing recommendations below the Preview email button).

- Send a test email to your email address to view the recommendations within a basic email template. You must enter your email address in the field above the Send test email button beforehand.
When you preview the recommendations in Personalization Portal, a sample output appears for the email address you entered. You can try out different email addresses to see how the recommendations may look for different users.
You can view information about the recommended products in the preview. Click Detailed information below the recommendations to open a new browser tab or window; detailed information appears for each recommended product, and the strategy that generated the recommendation.
