Cart
![]()
The Cart server controla server control uses API language to interact with the CMS and Framework UI to display the output. A server control can be dragged and dropped onto a Web form and then modified. lets a customer (site visitor) select products to purchase; an online "shopping basket." Products are added to the cart when the customer selects them.
A customer typically reaches the Cart server control from a product description or list page. A product description page contains a Product server control. Product list pages contain server controls that create a list of products, such as ProductList, ProductSearch or Recommendation server controls. These controls contain a button or link that allows a customer to add the product to the cart.
You could also create a link to the cart from a master page or menu that lets customers view their cart. This link lets a customer navigate directly to the cart when they arrive at your site.
Inserting the Cart server control onto a page
Prerequisite
You must have installed the server controls. See Installing server controls into Visual Studio Toolbox.
- In Visual Studio, choose View > Toolbox.
- Click the Ektron server control tab to display the server controls.
- Drag the Cart server control and drop it into the desired location on the page.
NOTE: You also can place the cursor on the page where you want the server control, then double click the server control that you want.
<CMS:Cart ID="Cart1" runat="server" />
- Click on
Cartin the code to display and modify the control’s properties using the Properties window of Visual Studio. The page is updated as you modify the property values.
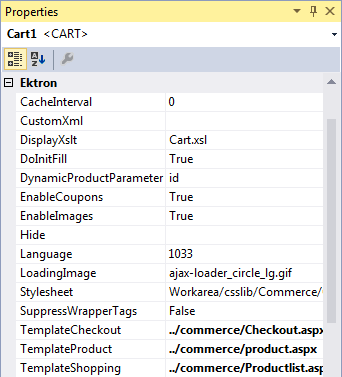
Cart properties
The following are Ektron-specific server controla server control uses API language to interact with the CMS and Framework UI to display the output. A server control can be dragged and dropped onto a Web form and then modified. properties. For information about native .NET properties such as font, height, width and border style, use Visual Studio® help.
- CacheInterval (Double)
The number of seconds that a server controla server control uses API language to interact with the CMS and Framework UI to display the output. A server control can be dragged and dropped onto a Web form and then modified.’s data is cached. The default is 0 (zero). For example, if you want to cache the data for 5 minutes, set to 300. See also: Caching with server controls.
- CustomXml (Code-behind Only) (String)
Lets you inject custom XML into the generated XML before being processed by the XSLTExtensible Stylesheet Language Transformations. Enter a string of XML that you want to make available to the XSLT as follows:
<root><customXml>custom-xml-inserted-here</customXml></root>
See also: Displaying custom XML in Ektron’s server controls.
- DisplayXslt (String). If desired, enter a relative or absolute path to an Xslt that determines the display of the page. By default, the control uses
siteroot\Workarea\Xslt\Commerce\Cart.xsl.WARNING! Files stored in the
siteroot\Workareafolder are overwritten (or deleted) when you upgrade Ektron. To avoid problems, copy the default file to a folder outside thesiteroot\workareafolder then edit it. If there is no default file, create the file outside thesiteroot\workareafolder. Next, in this property, enter the path to that file relative to the site root folder. - DoInitFill (Boolean). Controls when Fill occurs.
By default, Fill occurs during the Page_Init event. Set to false if you want to postpone the fill-action until later. In this case, Fill is automatically called during the Page Render event. You might do this if you need to set or change a property on the control in code-behind and have it render with your changes shown.
- DynamicProductParameter (String). The QueryString parameter name which is used to pass the product ID to the product details page. For example, if your QueryString parameter for products is ID, enter that in this property. Then, when a customer clicks a product’s title, this parameter is passed with the product’s ID to the product details page.
- EnableCoupons (Boolean). Set to true to allow a customer to enter coupon codes for discounts. When set to false, the Apply Coupon button is hidden. Default value is True if this property is not set. See also: Using Coupons.
- Hide (Boolean). Used to hide the control in design time and run time.
- True. Hide the control
- False. Show the control
- Language (Integer).
Set a language for viewing content; shows results in design-time (in Visual Studio) and at run-time (in a browser).
- LoadingImage (String). The image to display while the cart is loading. The default image is siteroot
\Workarea\images\application\ajaxloader_circle_lg.gif.WARNING! Files stored in the
siteroot\Workareafolder are overwritten (or deleted) when you upgrade Ektron. To avoid problems, copy the default file to a folder outside thesiteroot\workareafolder then edit it. If there is no default file, create the file outside thesiteroot\workareafolder. Next, in this property, enter the path to that file relative to the site root folder. - Stylesheet (String). Specify the path to a style sheet for use with this server control. Leave blank to use the default style sheet. To use a custom style sheet, place it in a folder outside the
siteroot\workareafolder then edit it. Next, in this property, enter the path to the custom style sheet relative to the site root folder. The default style sheet issiteroot\Workarea\csslib\Commerce\cart.css. - SuppressWrapperTags (Boolean)
Suppresses the output of the span/div tags around the control.
- True. Suppress wrap tags.
- False (default). Allow wrap tags.
- TemplateCheckout (String). The template that contains the Checkout server control. A customer is directed to this page when he clicks Checkout. If the template file is located in the same folder as the Web form containing this server control, just enter its name. The path can be relative or absolute. See also: Checking out.
- TemplateProduct (String). The template that contains the Product server control. A customer is directed to this page when a product in the cart is clicked. This page provides details about the product. See also: Displaying a product.
If this property is blank, the server control uses the Product’s QuickLink information.
If the template file is located in the same folder as the Web form containing this server control, just enter its name. The path can be relative or absolute.
- TemplateShopping (String). The URL to navigate to when the customer clicks Continue Shopping. This URL could direct the customer to a template containing a ProductSearch or ProductList server control, which lets the person select additional products. See also: Continuing to shop.
Items are added to a cart when a customer clicks Add to Cart in the following server controls.
- Product
- ProductList
- ProductSearch templated server controls
- Recommendation
When Add to Cart is clicked, the item is appended to the current cart’s list of items. If the customer does not have a cart, one is created. The following image depicts the flow of the Cart server control.
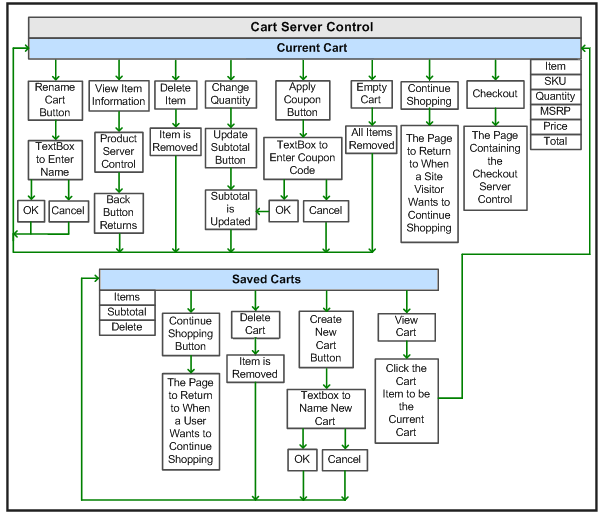
Cart server control areas
The Cart server controla server control uses API language to interact with the CMS and Framework UI to display the output. A server control can be dragged and dropped onto a Web form and then modified. consists of 2 major areas. The top part (My Cart) represents the cart with which the customer is currently working. The bottom (My Saved Carts) represents a visitor’s saved carts. Saved cart information appears only when a customer is logged in. See also: Creating a cart.
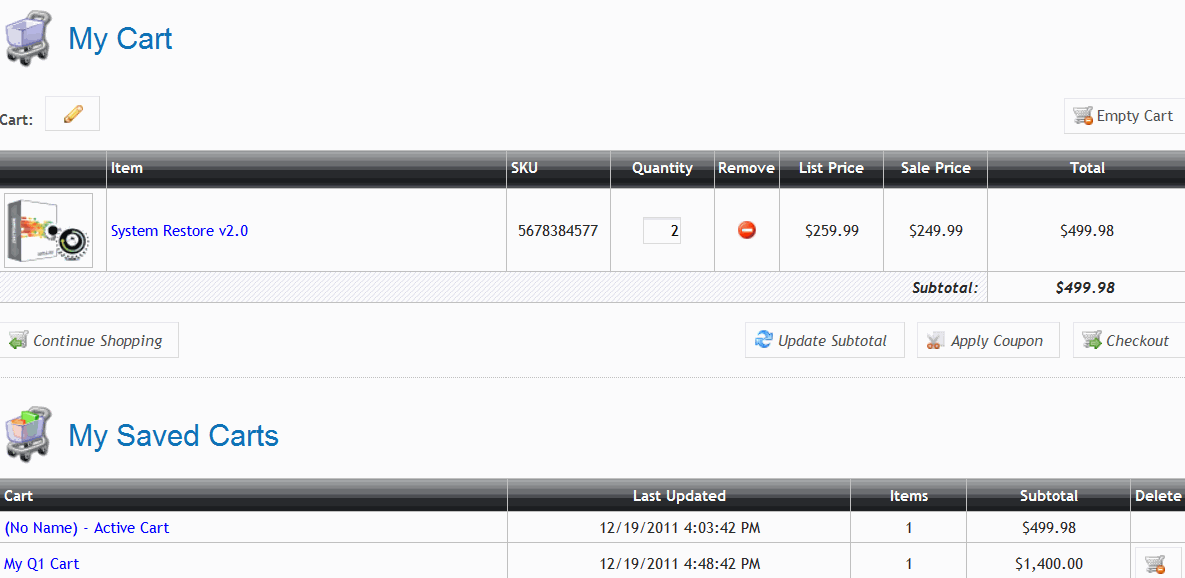
The My Cart area displays the Item, SKU, Quantity, List Price, Sale Price, Subtotal and Total. From this cart, a customer can remove items, update the quantity and subtotal information, apply coupons and check out. The customer can also choose to continue shopping or empty the cart.
The My Saved Cart area contains a list of carts the customer has saved and are awaiting checkout. This allows the customer to select products and save them for future purchase. This area contains:
- the name of each cart
- the last time it was updated
- how many items in each cart
- the subtotal of each cart
- options to
- delete a saved cart
- create a new cart
- continue shopping
Clicking a saved cart makes it the current cart, and displays its products in the Your Cart area. A customer can then proceed to check out.
Working with a Cart
This section explains how a logged-in customer would use the Cart server control. The following figure helps you locate key features of the Cart.
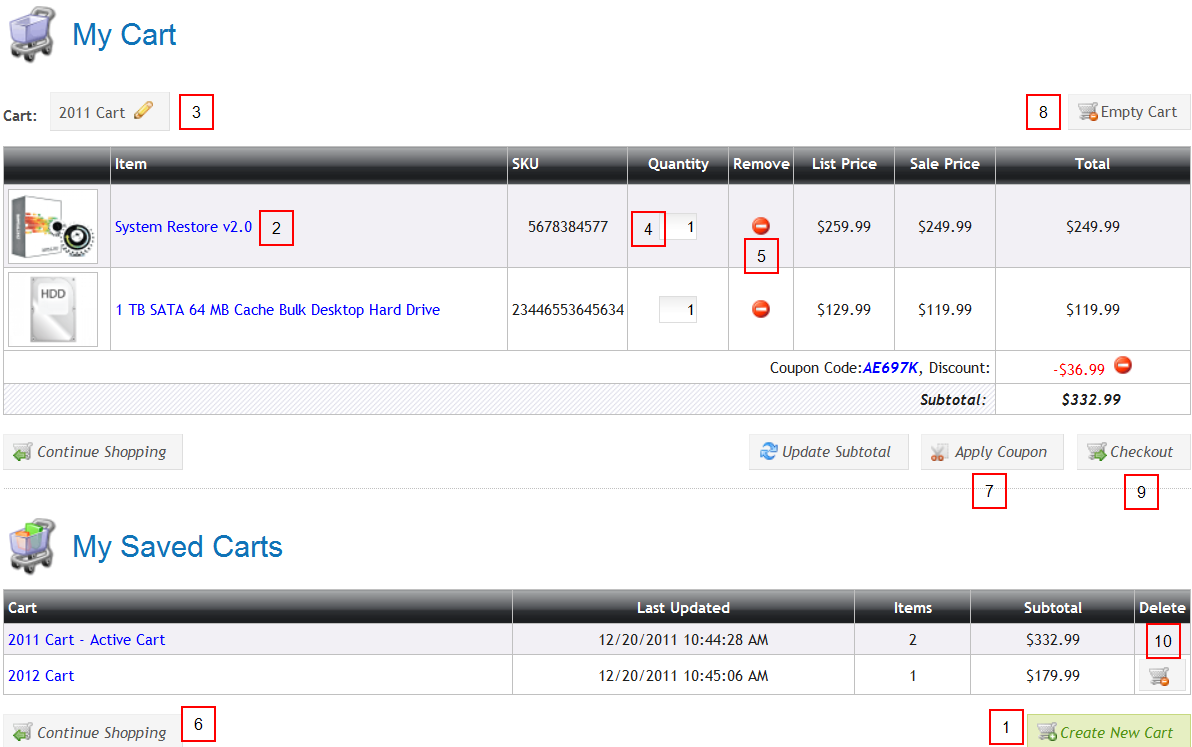
- Create New Cart button.
- Item name link.
- Cart name edit button.
- Item quantity field.
- Delete item button.
- Continue Shopping button.
- Apply coupon button.
- Empty Cart button.
- Checkout button.
- Delete Cart button.
Creating a cart
A customer automatically creates a new cart the first time a product is added to it. If needed, a customer can create multiple carts while using the Cart server controla server control uses API language to interact with the CMS and Framework UI to display the output. A server control can be dragged and dropped onto a Web form and then modified.. This allows for the grouping of products being purchased. For example:
- customers create carts based on concepts, such as, Son’s Birthday or Item Type.
- customers use separate payment types. For example, a customer places some products on one credit card and the rest on another. By having 2 carts, a customer can proceed with 2 separate checkouts.
- customer needs to prioritize purchases. For example, a customer wants to purchase certain products, but cannot afford them right now. The customer can add these products to a separate cart, then continue to purchase affordable products now. This helps customers remember purchases they want to make, driving additional sales for your site.
To create a new cart:
- Click Create New Cart in the Saved Cart area. The button is replaced with a text box.
- Enter the name of the new cart in the text box.
- Click OK.
When the customer clicks OK, the cart is added to the list of Saved Carts and becomes the active cart. A customer can then click Continue Shopping to select products to add to the new cart.
Displaying an item’s information
In the Cart server control, a product’s title is a link. When clicked, it takes you to the product’s detail page. To navigate back to the cart, click your browser's Back button.
By default, the server control uses the product’s QuickLink information to provide a path to the product. You can override this functionality by adding a new path to the TemplateProduct property.
Assigning or changing the name of the cart
Assigning a name to a cart makes it easier for customers to identify a cart in their saved cart list. A customer can assign or change the name of a cart by clicking Edit ( ) next to the cart’s name.
When clicked, the button and name are replaced with a text box that allows the customer to enter a new name for the cart.
Changing an item’s quantity
To change a product’s quantity, enter the new amount in the Quantity column’s textbox, located in the same row as the product you want to change. Next, click Update Subtotal. This recalculates the price of the product and updates the subtotal. The image below shows the Atrium Table quantity change to 3.
Removing an item from the cart
A customer can remove a product from the cart by clicking Remove From Cart ( ) in the Quantity column. When the customer clicks the button, the product is removed from the cart, and the subtotal is updated.
Continuing to shop
A customer can continue to shop by clicking Continue Shopping. This redirects the visitor to a template defined in the cart server control’s TemplateShopping property. For example, you might send the customer to a page containing a ProductList server control or ProductSearch templated server controls.
As a developer, you need to add the path to this page to the TemplateShopping property. If the page is in the same folder as the page that contains the Cart server control, just enter the page’s name.
Applying coupons
If coupons are defined in the Workarea and the EnableCoupons property is set to True, a customer can enter coupons to discount the purchase. How coupons affect the purchase is defined in the Workarea > Settings > Commerce > Catalog > Coupons. See also: Using Coupons.
To apply a coupon, a customer clicks Apply Coupon.
The button area changes to text box where the customer can enter the Coupon Code. The customer then enters a code and clicks OK. Next, the discount appears above the Subtotal, and the customer can continue to shop, check out, view other carts, or delete the coupon by clicking Remove Coupon.
Emptying the current cart
To remove all products from the current cart, a customer clicks Empty Cart. When clicked, a dialog box appears and the customer can click OK or Cancel.
Checking out
When a customer is satisfied that the cart contains all products they want, the quantity of each product is correct and all coupons have been applied, the customer can click Checkout. At that point, the customer is redirected to the page that hosts the Checkout server control. The path to the page is defined in the TemplateCheckout property. If the page containing the Checkout server control is in the same folder as the Cart server control, just enter the page name.
If a cart includes an item that is out of stock, the Checkout button is disabled (hidden).
Deleting a saved cart
A customer can delete a saved cart by clicking Delete Cart.