 Configure property groups and properties in Optimizely PIM
Overview
Properties are data elements that define your products, either for internal purposes, like shipping weight, or external purposes, like attributes visible to a customer on your site. For example, the properties for a table might be Material (wood), Finish (maple) and Shape (rectangular).
Property groups are a visual way to group and organize several properties together that are similar, from the same source or that should be edited together. For example, you might have a property group for "Shipping Data” which would include properties for Shipping Height, Shipping Weight, Shipping Length and Shipping Weight. Property groups are specifically to help you organize and make it easier to edit product data within Optimizely PIM. Property groups are not sent to commerce via integration and will not affect the way data displays on your commerce site.
PIM comes with a Base Property Group that includes the product number, product title, URL segment and deactivate on date, because these are the required properties for products in Optimizely Commerce.
B2B Commerce Storefront View
Properties mapped to attributes display as filterable attributes when customers search for or browse your B2B Commerce site.
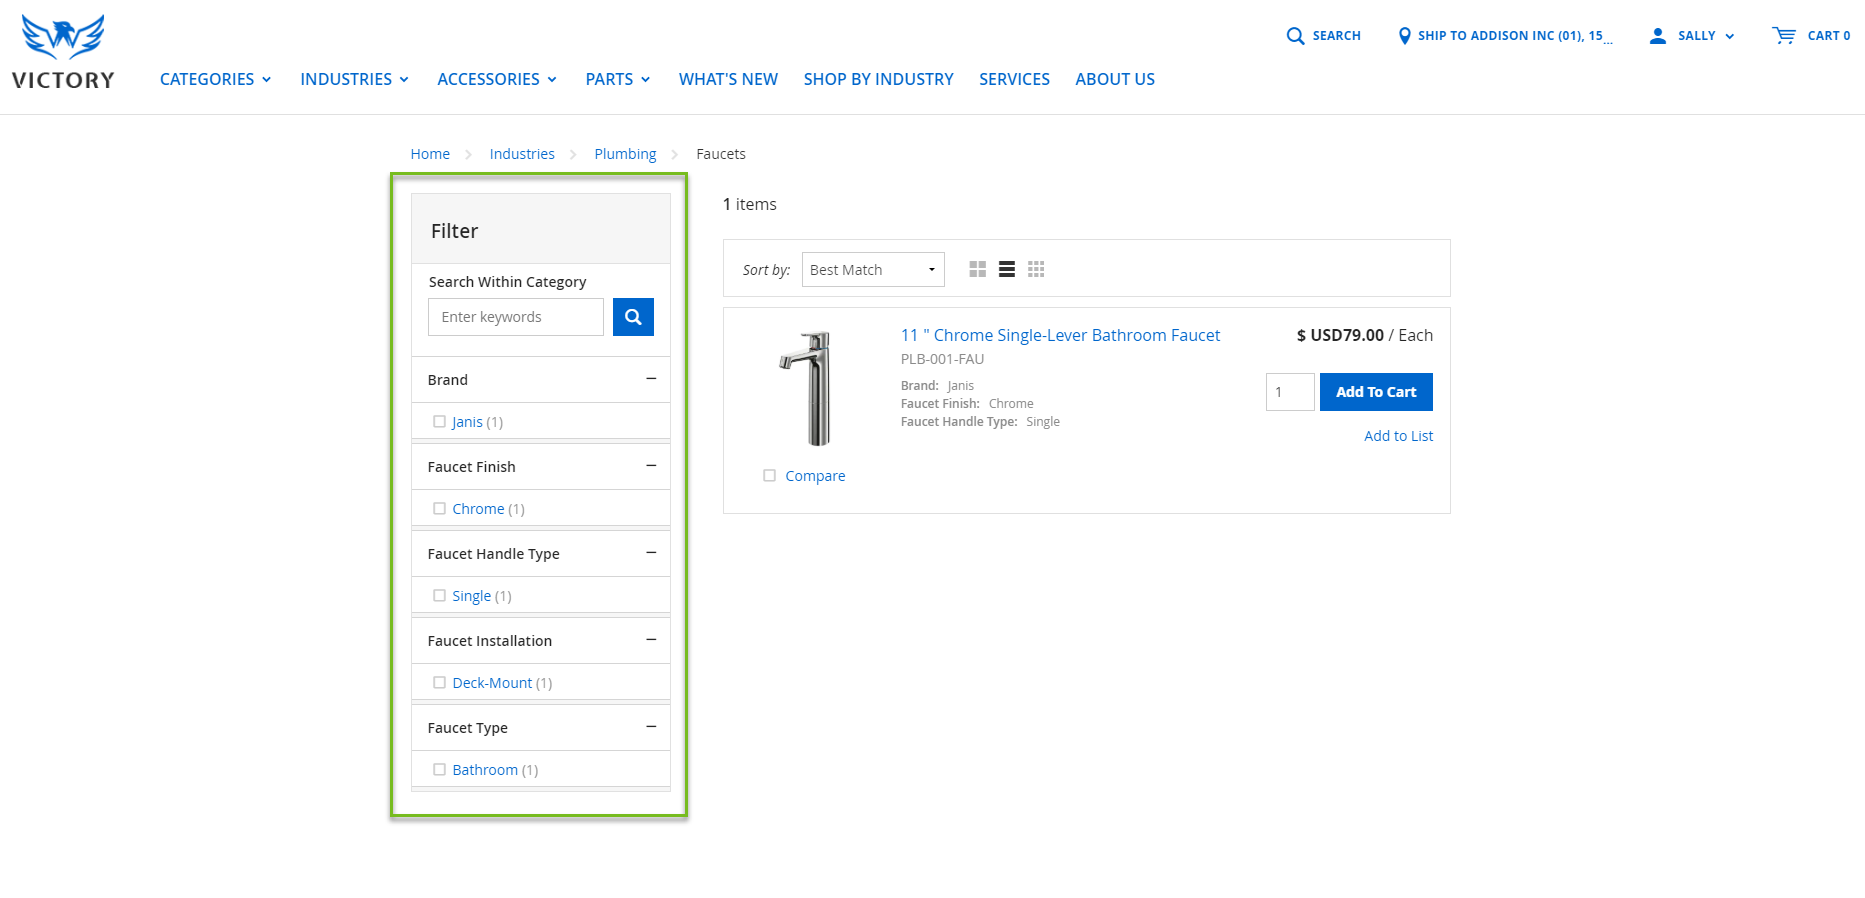
Properties also display as product content on the product detail page. This includes properties mapped as attributes, product descriptions, specifications, and others, depending on how your commerce site is configured. Transactional data you may display on your site, like product pricing, tax, and inventory information, will come from your ERP.
See the Review How PIM Data Appears to Customers article for more details.
Best Practices
Before you start adding properties and property groups, refer to the Design Considerations for Properties and Property Groups article to learn more about how properties affect your PIM ecosystem. Also think about if a property will be an attribute or product description, and so on so you know where it will appear to customers on your website.
When creating property groups, keep your overall data set in mind. You may have properties like Color, Material or dimensional data that are used by very broad sets of products, so creating very specific property groups may not make sense. It is ok to have property groups such as “Common Attributes”—only properties specifically assigned to a template will show up for products with that template assigned.
When creating properties, keep governance considerations in mind. Many properties will have a specific set of valid values. While a text field could be used in many cases, this eliminates the enforcement of data governance that comes with a dropdown control type. For example, if you sell faucets and wood furniture, you may require a Finish value for both sets of products. You know that you want to enforce governance to ensure consistency so you will create a Finish dropdown property with copper, chrome and nickel as valid values to support your faucets, and maple, walnut and pine values for your furniture. Since some of the values will not be valid for certain types of products, you enable the template-specific values option so that you can select the faucet specific finishes when defining the faucet template, and the furniture specific finishes when defining furniture template. You can also enforce consistency with spelling by defining the values for a property. For example, you can ensure that PIM users can only select gray by including gray as a value in the property definition.
During implementation, you may find it easier to create properties without defining all the valid values for these properties. You can enable the adhoc values option for properties, and then import your product data that will generate values. After the product data is imported, you can disable adhoc values for your properties and review the values to clean up inconsistencies. When editing values, any existing product with the old value will be replaced with the new value, so this can be used to propagate changes and clean up your data without having to clean it up before ingesting it.
Keep in mind that you use properties in conjunction with product templates to enforce governance. You may define properties as globally required and use validation to limit valid values for a property. Then, you can use product templates to define which properties are available and which of those to require or recommended for specific groups of products.
Use Case
Carrie is a Senior Merchandiser managing the PIM implementation for her company, Victory Distribution. Carrie worked with her team of merchandisers to design the best structure for importing and managing their product information in PIM, as well as how customers will view and access product information on their Optimizely Commerce website. Now, she needs to build out that structure in PIM.
Carrie wants to start her PIM configuration with faucets. She has identified both global and faucet-specific characteristics that she needs to add as properties in PIM. First, she must create the property groups to house these properties, which makes it easier to assign properties to specific products later.
Carrie goes to Configure > Property Groups & Properties. She clicks the Add Property Group icon to create a Dimensions group, a Brands group, and a Common Attributes group. The Dimensions and Brands groups include universal information that applies to all products. The Common Attributes group include properties that will not be used by all products, but may be common for multiple types of products. For instance, Carrie will have different product templates for Kitchen Faucets and Bathroom Faucets, but they will both use properties from this Common Attributes group.
Under the Dimensions group, Carrie clicks Add Property and adds the following properties, marking them all Globally required and mapping these to the B2B Commerce fields with the same name:
- Length (in)
- Width (in)
- Depth (in)
- Weight (lbs)
Under the Brands group, Carrie clicks Add Property and adds the following properties as dropdowns, marking them as Globally required and mapping these to the B2B Commerce fields with the same name:
- Brand
- Product Line
Under the Common Attributes group, Carrie clicks Add Property and adds the following properties as dropdowns and maps these as Attributes:
-
Finish
-
Number of Handles
-
Faucet Type
-
Faucet Handle Type
-
Faucet Installation Type
This scenario continues throughout other articles, based on the recommended implementation flow discussed in Recommended Strategy for Implementing PIM.
Properties List Page
Use the properties list page to search for, filter, and select property groups and property records for editing or deleting.
List Format Navigation and Editing
You can select the columns to display, sort data by clicking column headers, and filter records by properties.
Editing - Click an individual property record to view and edit its details.
Search by name - Enter a partial or full property name to narrow the results. Applied filters appear above the grid. You can clear filters individually or all at once.
Only unmapped properties - Select this checkbox to easily find only properties that have not been mapped to Optimizely Commerce. If you have any filters applied, only properties that match the filter and status of the checkbox display in the list.
Filters - Click the Filter icon to enable or disable column filters. This adds a row below the column headers with options for filtering each property. Filtering also updates the count of records and paging options. Click a filter to open a window to change the filter option or value. Depending on the column's property data type and control type, you may see the following options:
-
Search operator of Contains, Does not contain, Starts with, Ends with, Equals, Does not equal, or Reset
-
Property value of Yes, No, Is Empty, or Is Not Empty
Columns - Click the Column Selector icon to choose from an alphabetical list of properties to show or hide as columns, with the exception of Name, which is required. You can also search for a specific property to filter the list. When the Column Selector is open, deselect the checkbox beside the column name to remove it from view. Drag and drop column headers to change their order or expand columns as needed.
Pagination - By default, 25 products display in the list, with options to view 50 or 100 per page. Go to other pages using the pagination controls under the list.
Export Properties - Click Export to export all properties, your currently filtered list of properties, or your currently selected properties.
Organize Property Groups
Add Property Groups
- Click Configure in the taskbar.
- Select the Properties tab.
- Click Add Property Group in the left menu.
- Add a Name and Description for your property group.
- Click Save or Save & Create New to continue adding groups.
Edit Property Groups
- Hover over the property group you want to edit, click the More Options icon and select Edit.
- Edit the Property Group Name and Description in the new window.
- Click Save.
Delete Property Groups
- Hover over the property you want to edit, click More Options and select Delete.
- Click OK when the confirmation message appears.
Organize Properties
Add Properties
- Click Add Property on the Properties page.
- Select the Property Group for the new property.
- Add a Property Name. You cannot use spaces in the Property Name and any spaces you add will be replaced with underscoring in your list of properties.
- Add a Display Name. This is the name that will show to your customers. It will automatically populate with the Property Name, but you can edit it. Multiple properties can share a display name.
- Add a Property Description. This is an internal-only field that can be used to describe a property for your PIM team.
- Select the Globally required option if this property should be required for every product. You will likely use this option infrequently.
- Select a Control Type. Depending on which control type you select, you may have to fill in additional fields below the selection or on the Values tab to fully define the parameters for this property. For example, text fields require you to set a Minimum Character Length and a Maximum Character Length. This enforces validation when importing or editing data for this property, and determines which commerce mappings are valid. Refer to the Control Types Table for fields specific to each control type.
- Decide if you want to Enable Mapping to Optimizely Commerce. If you select Map Field, choose the appropriate Property Mapping from the generated list; for example, Attribute. The list is pre-filtered to include only Commerce fields that are not already mapped and are compatible with the property’s control type and validation. If you select a Property Mapping of Attribute or Specification, you will have additional configuration options. Attribute and Specification are also generic mappings that can be reused. When used, attributes and specifications are automatically created in B2B Commerce via integration from PIM, so you do not need to create the specific attributes and specifications in both applications
- If you selected a Control Type of Radio Button, Multi Select, or Dropdown, click the Values tab to enter values for the property.
- Select the Template Specific Values checkbox to customize available values based on template. For example, you may want to have different Length values available for patch cables (1.5 ft, 3 ft, 6 ft, etc.) compared to bulk cables (250 ft, 500 ft, 1,000 ft, etc.). Template-specific values can be entered when you import or edit the product template record.
- Add values one at a time or click the Add multiple values link to copy and paste a list of values from XLS, CSV, or TXT.
- If entering values for Radio Button, you can optionally select a default value for the property. With a default value defined, any product that does not have a value defined for this property will use the default value when imported or created.
- Drag and drop the values to rearrange the sort order. Click the values column header to alphabetically order the values.
- Click Save.
-
If you want to assign the newly created property to templates, click the Template Assignments tab.
-
Select the Included checkbox to add the property to the template.
-
Select the Required or Recommended checkbox to make the property a required or recommended field for a template.
-
Select a checkbox in the Template row to select or deselect all templates for the Included, Required, or Recommended columns.
-
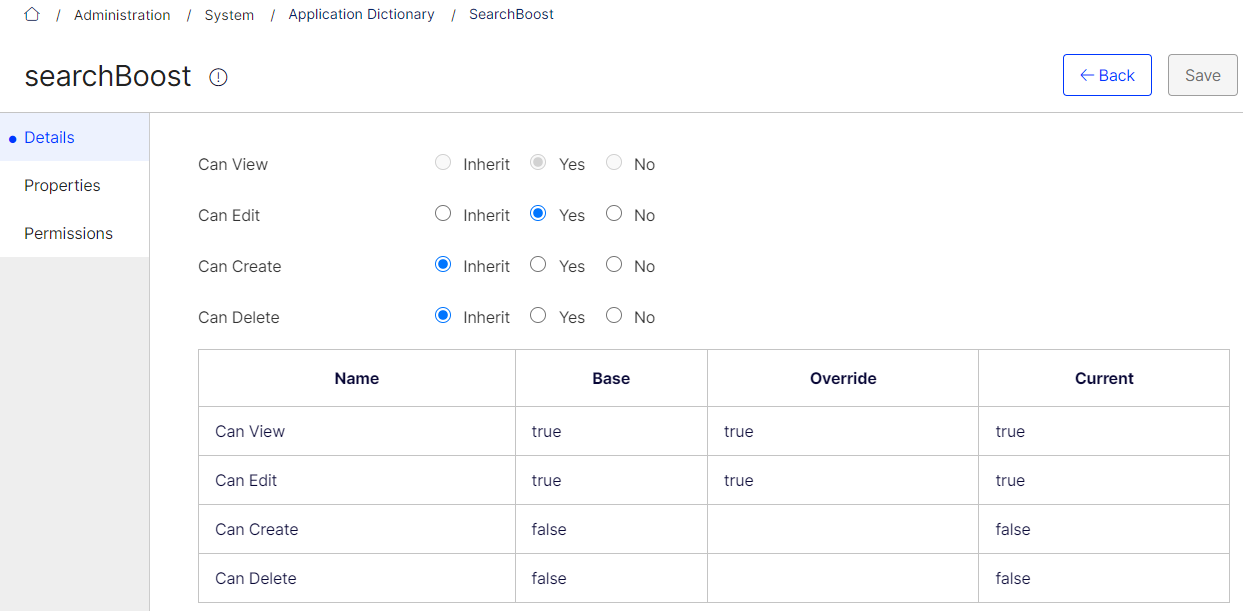
If you are looking to map a field that is hidden in B2B Commerce, you will first need to make it so the Property configuration to Can Edit = yes. See the example below.
Move or Edit Properties
If you have a large number of templates and products, changes to things like Globally Required may take time to show up on your templates and products. This issue occurs because when you change a property, there is a background job that runs to update all the templates and products.
If you change a property's definition in a way that invalidates the mapping to B2B Commerce, you must remap the property (such as if you change the control type, or the validation rules for things like max length, this may make the initial mapping invalid).
To move properties, click the Reorder icon in the upper right corner of the Properties screen. From there, you can drag and drop properties within or between groups to ensure they are in the order in which it is easiest to work with them.
Delete Properties
Deleting a property can affect your product data and organization in ways you might not anticipate. Optimizely recommends you do not delete properties. However, there may be cases in which it is necessary to delete a property, for example, if you discontinue selling a line of products that has properties specific to only those products.
- Find the property you want to delete.
- Hover over the property and click the Delete icon.
- Click Confirm Changes when the warning message appears.
Bulk Delete Properties
There may be situations where you need to delete many properties and a bulk delete will be appropriate.
- Choose one or more properties using the selector in the first column.
- In the lower right corner, click Delete.
- Click Confirm Changes when the warning message displays to proceed.
Control Types Table
This table shows the Control Type options available for properties.
When mapping to specifications, enter a sort order, which will be the order of the tab.
| Control Type | Description | Property Mapping to B2B Commerce Examples |
|---|---|---|
| Text Field | You want a text value that is likely to be unique for each product, like a model number. Configuration options include default value, min and max character length, and a RegEx entry value. |
|
| Text Area | You want a longer text value, like a description. Configuration options include default value, min and max character length, and a RegEx entry value. |
|
| Radio Button | You want to allow a single selection from multiple options. Recommended when you will have a small number of options. Enter your values and set a default value on the Values tab. |
|
| Multi Select | You want to allow multiple selections from multiple options. Enter your values and set a default value on the Values tab. |
|
| Dropdown | You want to allow a single selection from multiple options. Recommended when you will have a large number of options. Enter your values on the Values tab. Select the Allow Adhoc Values checkbox if new values should automatically be added, and then set a min and max character length and an optional RegEx entry value. |
|
| HTML | You want to allow HTML-formatted text, like on the tabs on the product detail page. |
|
| Number | You want a number-only property. Enter min and max values, number of decimals and a default value. |
|
| Date Picker | You want a date-only property. |
|
| Date/Time Picker | You want a property that lets you set both a date and time. |
|
| Boolean | You want a true/false, yes/no or on/off property. |
|
Externally Managed Properties from B2B Commerce
You can externally manage property values in PIM to avoid maintaining identical data in more than one spot. For example, your company may want to manage product release dates in your ERP system, which would then sync the ActivateOn date with B2B Commerce and subsequently PIM.
The PIM: Sync Product Data job pushes the values of externally managed products from B2B Commerce to PIM. See Publish Optimizely PIM update to Optimizely B2B Commerce for more information on the sync jobs.
-
Select a Control Type of Text Field, Text Area, HTML, Number, Date Picker, Date/Time Picker, or Boolean.
-
Select Map Field below Enable Mapping to Commerce.
-
Select the appropriate Property Mapping from B2B Commerce. You cannot externally manage properties mapped to Attribute or Specification.
-
If applicable, enter any min or max character or value that is lower than the corresponding property's value in B2B Commerce. For example, if the Brand property max character length in B2B Commerce is 250, you must enter a value of 250 or lower in PIM).
-
Select the Externally Managed checkbox. The property is now externally managed by B2B Commerce
Import Properties
You can import new property groups, properties, and values or update details for property groups and properties in bulk. You can import properties without values in the import file and add them later.
- On the Properties page, click the Import icon in the upper right.
- If you have not already formatted your categories according to the template format, click Download Template.
- Once you have a formatted template file, click Choose File. The property import only supports .xls or .xlsx files. Click Continue.
- Your import will begin to process.
- Next, when your import is finished, you will be prompted to correct any errors right in the import wizard. For example, you may need to change property names if there is a duplicate. If you do not want to correct errors, click Skip All Errors or Skip Row. The skipped rows will not be created as properties. When finished, click Process.
- Finally, you will be prompted to map your properties to B2B Commerce attributes. If mappings were defined in the import file, they will be selected in the drop-down lists if valid. Follow the same process you would when adding properties manually.
- Click Finish.
Export Properties
You can export the property information for all properties, a filtered list, or selected properties.
- If you wish to export only selected properties, ensure you have them selected.
- Click Export, and then select either All properties, Filtered list, or Selected properties.
- Click Continue. The export window appears in the lower right corner.
- Once the file is ready for download, the Download exported file link appears. Click the link to download the file.