Approving content for publication
Workflow, a core element of Ektron, lets you set up a sequence of approvers who control the publication of content to your website.
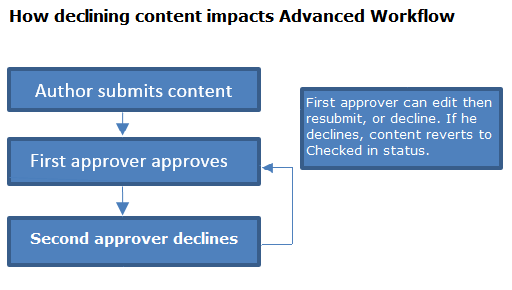
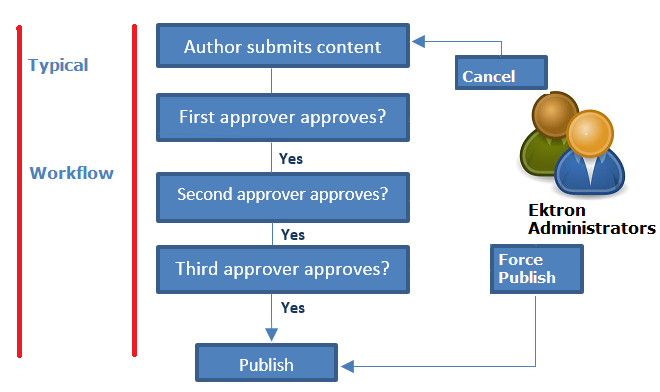
When workflow is implemented, submitted content must be approved by each user or group in the sequence before the content is published. Any reviewer can edit the content, decline the content (which returns it to the previous approver), or approve the content (which forwards it to the next approver). Upon final approval, the content is published, and the website is updated.
To apply unique workflow rules to a folder or content, break inheritance from the content's permission screen.
The email text and directions for customizing it are described in Customizing Ektron email with tokens.
The list of automatic emails and directions for customizing their content are described in Customizing Ektron email with tokens.
 ).
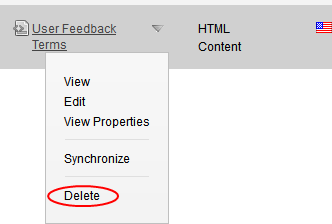
).If you see the following screen, no workflow is assigned to the folder.
NOTE: If a folder inherits its workflow, instead of seeing it, you see Approval workflow for this folder is currently inherited. You can break this inheritance in the "View Permissions" screen for parent folder.
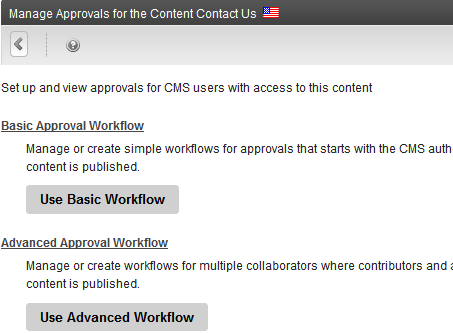
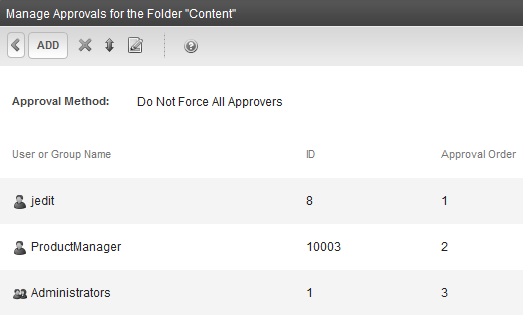
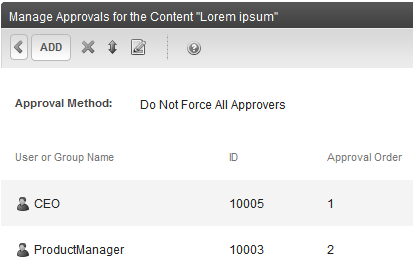
Assigning basic workflow to a folder consists of selecting users or groups who are responsible for approving changes to the folder's content before it gets published. You can also change the order of the approvers and assign an approval method.
Prerequisite
Only administrators group members and users assigned to the Folder User Admin Role screen can assign a basic workflow. See also: Defining roles
). You may see a screen that prompts you to create either basic workflow or Advanced workflow.NOTE: If a folder inherits its workflow, instead of seeing it, you see Approval workflow for this folder is currently inherited. You can break this inheritance in the "View Permissions" screen for parent folder.
To view (and possibly break) the inherited workflow, view the parent folder's workflow. See also: Breaking inheritance
From this screen, you can perform these actions:
 . Remove approvers. See also: Deleting approvers
 . Change the order of approvers. See also: Editing the approval order
 . Change the approval method. See also: Setting the approval method
When you add approvers to a folder or content, that action creates a basic workflow.
Prerequisite
Only users and user groups with read-only or higher permissions to the folder may be added as approvers. See Adding a user or user group to the permissions screen for more information.
Best Practice
Assign user groups (not individual users) to a basic workflow. In this way, if someone is out of the office, any group member can approve content.
You can delete approvers at any time, including while content is in an approval process. If you do, the users or groups are eliminated from the basic workflow. If a removed user was the current approver, approval moves to the next user or group in the basic workflow.
WARNING! If a user is deleted from a folder or content Permissions screen, the user is deleted from the basic workflow. If all approvers are deleted from a Permissions screen, the basic workflow is removed.
). The Remove Approval screen appears.NOTE: If you delete all approvers from a basic workflow, it is removed.
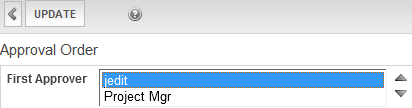
After assigning approvers to a folder or content, you can adjust the approval order. Place the user or group with final approval at the end of the workflow (that is, assign the highest number). For example, if a department head must approve edits, and a Webmaster has final review of content, the approval order is:
To edit approval order:
). The Edit Approval Order screen appears. ) or Down (
 ) to move users and groups to the desired order.
The approval method determines if content must be approved by all users in the workflow, or only users higher up the workflow than the user submitting the content. The approval method affects the approval process only if the person submitting content is a member of the basic workflow.
There are 2 approval methods.
The Approval Method applies to all content in a folder, regardless of its language. For example, assume a basic workflow consists of
If the approval method is Force All Approvers, and the department head submits content, the content must be approved by the content contributor, department head, then Webmaster before it is published.
If the approval method is Do Not Force All Approvers, and the department head submits content, the content must only be approved the Webmaster before it is published.
Prerequisites
- If basic workflow is inherited, the approval method is also inherited from the parent folder. Before you can change an inherited approval method, you must break inheritance.
By default, the approval method is set to Do Not Force All Approvers. To change the approval method for a content folder or item:
).). The Edit Approval Method screen appears. ).). ) then selecting each approver one at a time. When you complete this, the workflow is no longer assigned to the folder. See also: Deleting approvers
You can create, edit, or delete a basic workflow for a specific content item. If you do, content-level workflow overrides folder-level workflow.
Prerequisites
- You must disable the inheritance of permissions for content whose basic workflow you want to edit. See Setting permissions for content.
- You must assign users or groups to a basic workflow. Only users and user groups with permissions to the content can be assigned. See Managing folder and content permissions.
). If content-level basic workflow is applied to this content, it appears.If content inherits a basic workflow from its folder, you are informed of this. To view (and possibly break)the inherited workflow, view the content folder's workflow. See also: Viewing a folder’s basic workflow
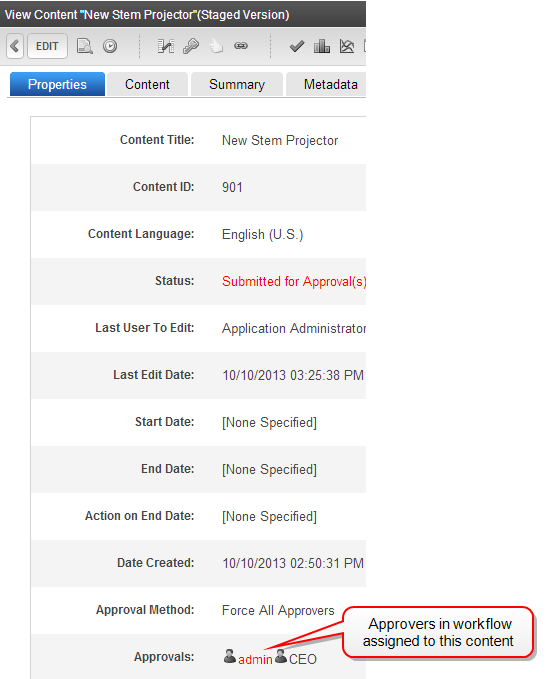
. Remove approvers. See also: Deleting approvers. Change the order of users. See also: Editing the approval order. Change the approval method. See also: Setting the approval methodTo see any content item's basic workflow and current approver, view its properties screen. Red text indicates the current approver.
To see content
Prerequisite
There are several ways that a current approver (or approver group member) can approve or decline content.
If you approve, the content is either submitted to the next publisher or published immediately, depending on your sequence in the content's workflow, and how the Approval Method is set.
If you decline, the content status changes to Checked In, and it leaves the approval process.
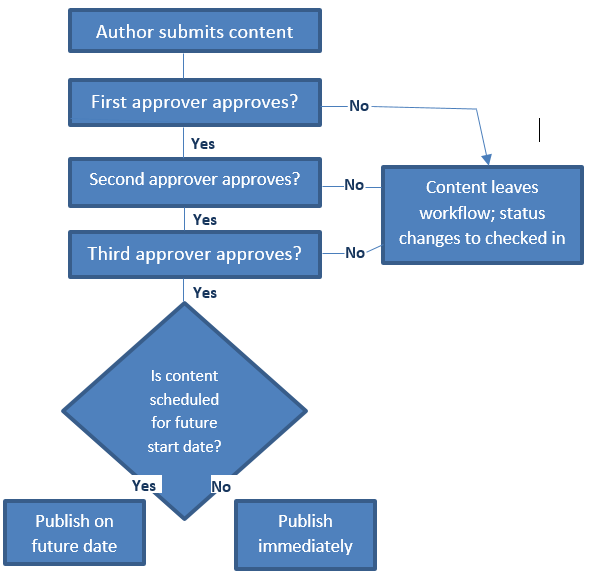
The following example shows a typical content item from creation to publication. Three users make up the basic workflow.
Each user has different permissions that correspond to their roles.
Basic workflow begins when a content contributor submits new content or edits existing content.
First approver
After the Sports Writer submits content, the first user in the basic workflow, the Sports Editor, receives an email stating that content needs approval. The Sports Editor can modify and approve the content or decline it.
On the Approve screen, the Sports Editor has these options.
 Decline. Edit. Invokes the editor. From here, the approver can change the content.
Second approver
After the content is approved, the Editor-in-Chief is the next approver in the basic workflow who is notified by email that content is ready for approval.
Like the Sports Editor, the Editor-in-Chief has these options:
Decline. Edit. Invokes the editor. The approver changes the content.Any member of the administrators group, or user or group assigned delete permission for content, can begin the process of deleting it. Because content is under basic workflow control, every approver must approve the request before the deletion is final.
You can only begin the deletion process if the content's status is Checked In (I) or Approved (A). See also: Deleting content
To delete content under a basic workflow:
The content is set to Submitted status, and assigned to the first approver in the workflow. That approver can approve or decline the deletion request.
When the last approver approves the deletion request, the content is deleted, and the website is updated.
See also: Switching from advanced workflow to basic workflow
Prerequisites
- You have permission to edit the folder or content item being switched.
- All approvers for the advanced workflow are assigned to the folder's or content item's Permissions screen.
).) then selecting each approver one at a time.NOTE: If no users are assigned to basic workflow, and you do not see an advanced workflow option, it is likely that your Ektron administrator has not enabled advanced workflow. See Enabling and disabling advanced workflow.
Advanced workflow provides an alternative way to manage the publication of content. Like basic workflow, the advanced version supports a sequence of users or groups who approve content before it is published. Also, content and folders inherit workflow from their parent folders unless you break inheritance. Advanced workflow differs significantly from basic workflow in the following ways.
NOTE: You cannot apply an advanced workflow to assets imported via the Multiple DMS Documents option. See also: Adding multiple DMS documents
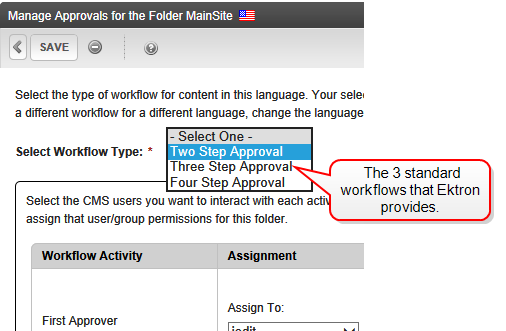
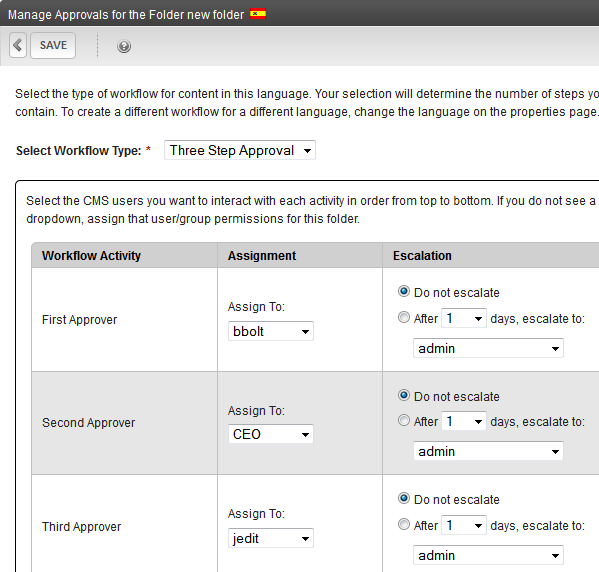
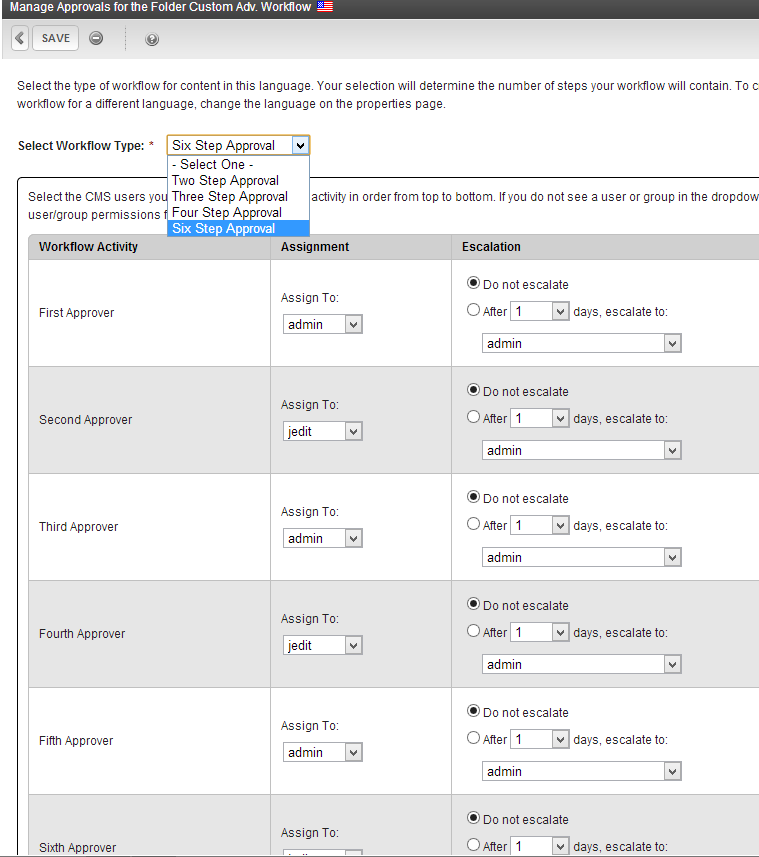
When you install Ektron, 3 standard workflows are provided. They appear when you are assigning a workflow on the Manage Approvals screen.
You can use a standard workflow to implement an approval process that consists of 2, 3 or 4 users or groups. To assign a workflow with more than 4 approvers, or to add custom code to any approval activity, have a developer create a custom advanced workflow. See also: Creating a custom advanced workflow
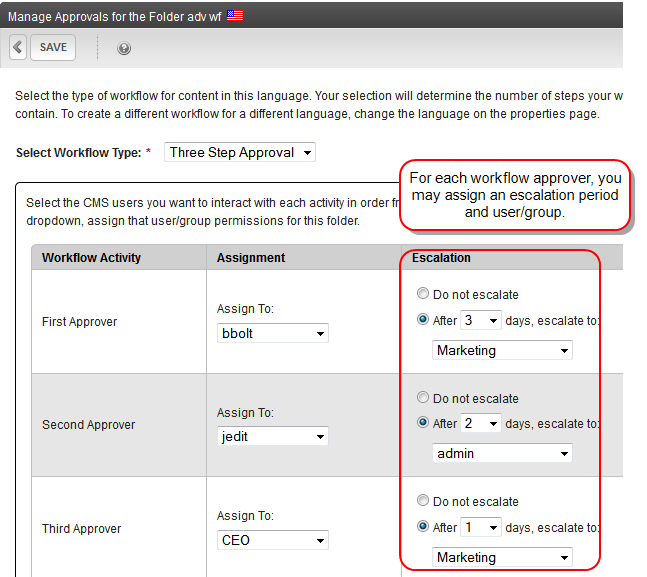
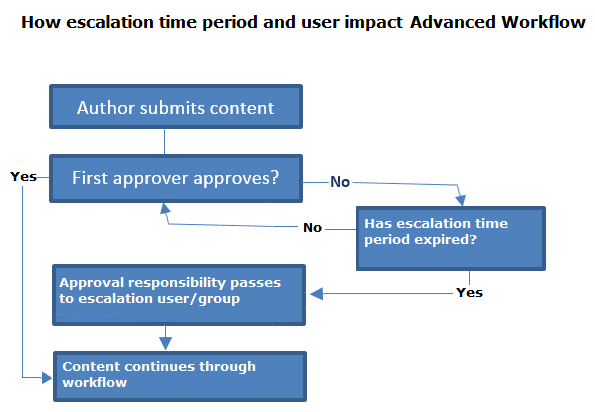
How escalation affects the approval process
After choosing a workflow, you select a user or group for each approval step. For each step, you can also assign an escalation time period and user or group. If they are assigned, and the original user or group member does not approve or decline within that period, the approval request is transferred to the escalation user or group. If this happens, the escalation user or group is notified that they are responsible for approving the content, and the original user can no longer act on the approval request.
Content Escalated For Your Approval
The following content has been escalated for your approval: Blog Post at: Blog Check/
originally submitted to:adam by James Smith on 12/24/2013 2:15:55 PM
To approve or decline this content,log in to your Ektron workarea, select the content
and click on the Approve or Decline icon or link.
Approval Has Been Escalated
The following content was not approved within x days, so the approval has been escalated:
HTML 1 at: Content Level Test/escalated for approval to: Application Administrator on 12/24/2013 2:16:15 PM
You are no longer required to approve or decline this content.
Prerequisite
You have permission to edit files in the Ektron site root folder.
web.config file.ek_AdvancedWorkflowEnabled element.true.false.Ektron's advanced workflow feature automatically sends email to affected users when certain events occur.
You identify the email "from" address in your siteroot\web.config file's ek_AdvancedWorkflowEscalationEmail property.
Prerequisite
Email notification is enabled. See Enabling email notification.
Request for content approval
The content HTML 1 has been submitted for your approval by James Smith.
To locate the content, the folder path in your workarea is: \Content Level Test.
The following link will take you to the submitted content block on the Web site: http://servername/OnTrek/Default.aspx?id=910&LangType=1033
Please Note: You must login and select the preview icon to view the changes.
The content was submitted for approval on: 23-Dec-2013 14:02:50 PM.
Approvals: [adam]-JohnB
NOTE: The current approver is surrounded by square brackets [ ].
Comment:
Request for content approval
The content HTML 1 has been submitted for your approval by James Smith.
To locate the content, the folder path in your workarea is: \Content Level Test.
The following link will take you to the submitted content block on the Web site: http://servername/OnTrek/Default.aspx?id=910&LangType=1033
Please Note: You must login and select the preview icon to view the changes.
The content was submitted for approval on: 23-Dec-2013 14:02:50 PM.
Approvals: [adam]-JohnB
Comment:
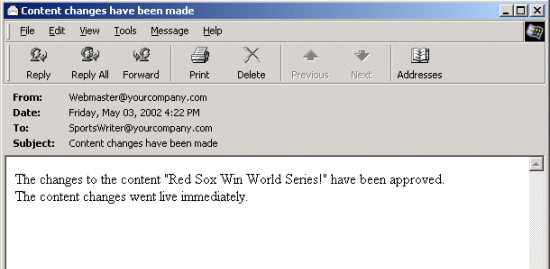
Content changes have been made
The changes to the content Break-room Survey have been approved. The content changes went live immediately.
Content approval request declined
Your submitted approval request for the content Break-room Survey has been declined by user a. Reason: .
Approval Has Been Escalated
The following content was not approved within x days, so the approval has been escalated:
HTML 1 at: Content Level Test/
escalated for approval to: Application Administrator on 12/24/2013 2:16:15 PM
You are no longer required to approve or decline this content.
Content Escalated For Your Approval
The following content has been escalated for your approval:
Blog Post at: Blog Check/
originally submitted to: adam
by James Smith on 12/24/2013 2:15:55 PM
To approve or decline this content, log in to your Ektron workarea, select the content and click on the Approve or Decline icon or link.
C:\Program Files (x86)\Microsoft SDKs\Windows\v7.0A\Bin\NETFX 4.0 Tools.NOTE: In some Windows versions, the folder is C:\Program Files (x86)\Microsoft SDKs\Windows\v8.0A\Bin\NETFX 4.0 Tools.
resgen.exe file.siteroot\Workarea\resources folder.cd C:\Inetpub\wwwroot\yoursiteroot\Workarea\resources (replace yoursiteroot with your site root folder)resgen EKResource.en-US.resources anyfilename.txt (You can assign any name to the .txt file.)A .txt file of resource strings is created in the resources folder.
IMPORTANT: Each message has a name followed by an equal sign (=). Do not change text to the left of the equal sign.
The standard message text is shown in Notifying users of advanced workflow activities.
To understand the variables within the text, see Customizing Ektron email with tokens.
resgen anyfilename.txt EKResource.en-US.resources. This action saves your changes to the resources file. Assigning an advanced workflow to a folder consists of 3 steps.
Prerequisites
- Only administrator group members and users assigned to the Folder User Admin Role screen can assign an advanced workflow. See also: Defining roles.
- Advanced workflow is enabled. See also: Enabling and disabling advanced workflow.
NOTE: If you create a new folder, its workflow initially matches the parent folder's workflow.
). Several things can happen:Then, continue to the next step.
Prerequisite
Only users or groups who have read-only or greater permissions for the folder are available.
Best Practice
Assign user groups (not individual users) to a workflow. In this way, if someone is out of the office, any other group member can approve content.
To view a folder's workflow, click View > Properties > Manage Approvals (). If any content in the folder is in Submitted status, the following message appears instead of its workflow: The workflow for this folder cannot be changed because some content is currently in an approval process.
You can only view a folder's workflow if none of its content is in Submitted status. Typically, this occurs when the content is approved, although content also can be canceled or declined, which change the content's status to Checked In.
You can change the following advanced workflow information for a folder:
Prerequisites
To edit a folder's advanced workflow:
).Prerequisite
Only users or groups who have read-only or greater permissions for the folder are available.
Best Practice
Assign user groups (not individual users) to a workflow. In this way, if someone is out of the office, any other group member can approve content.
This section explains how to remove an advanced workflow from a folder, so that it has no workflow. If you want to switch an advanced workflow to basic workflow, see Switching from advanced workflow to basic workflow.
Because workflow is language-specific, the procedure explains how to delete a workflow for one language only. To remove workflow for multiple languages, repeat this procedure for each one.
Prerequisites
- Only administrator group members and users assigned to the Folder User Admin Role screen can remove an advanced workflow. See also: Defining roles
- The folder does not inherit its workflow. If it does, you must break inheritance by viewing the folder's Permissions screen and unchecking the Allow this object to inherit permissions check box. See also: Key workflow concepts
- No content in the folder is in Submitted status. If it is, and you want to remove a workflow, your options are as follows:
- cancel the approval process for each content item in Submitted status. See also: Canceling an approval request in an advanced workflow
- force publish each content item in Submitted status. See also: Forcing the publication of content
- get all approvers to approve Submitted content, so its status changes to Published.
To remove an advanced workflow from a folder:
).Assigning an advanced workflow to content consists of several steps.
Prerequisites
- Only administrators group members and users assigned to the Folder User Admin Role screen can assign an advanced workflow. See also: Defining roles
- Advanced workflow is enabled. See Enabling and disabling advanced workflow
). Several things can happen:Then, continue to the next step.
Choose Advanced. The Manage Approvals screen appears.
Best Practice
Assign user groups (not individual users) to a workflow. In this way, if someone is out of the office, any other group member can approve content.
Prerequisite
Only users or groups who have read-only or greater permissions for the folder are available.
To view a content item's workflow, click View > Properties > Manage Approvals (). If any content in the folder is in Submitted status, the following message appears instead of its workflow: The workflow for this folder cannot be changed because some content is currently in an approval process.
You can only view a folder's workflow if none of its content is in Submitted status. Typically, this occurs when the content is approved, although content also can be canceled or declined, which change the content's status to Checked In.
If a content item inherits workflow from its folder, this message appears: Approval workflow for this content is currently inherited. You can break this inheritance in the "View Permissions" screen for content title. To view the workflow assigned to the content's folder, choose the folder's View > Properties menu option, then click Manage Approvals ().
You can change the following advanced workflow information for a content item:
Prerequisites
To edit a content item's advanced workflow:
).Best Practice
Assign user groups (not individual users) to a workflow. In this way, if someone is out of the office, any other group member can approve content.
Prerequisite
You can only choose users or groups who have read-only or greater permissions for the folder.
You can remove an advanced workflow from a content item, so that it has no workflow. If you want to switch an advanced workflow to basic workflow, see Switching from advanced workflow to basic workflow.
Because workflow is language-specific, the procedure explains how to delete content workflow for only 1 language. To remove workflow for multiple languages, repeat this procedure for each one.
Prerequisites
- Only administrator group members and users assigned to the Folder User Admin Role screen can remove an advanced workflow. See also: Defining roles
- The content does not inherit its workflow. If it does, you must break inheritance by viewing its Permissions screen and unchecking Allow this object to inherit permissions. See also: Key workflow concepts
- The content is not in Submitted status. If it is, and you want to remove a workflow, your options are as follows:
- cancel the approval process. See also: Canceling an approval request in an advanced workflow
- force publish the content. See also: Forcing the publication of content
- get all approvers to approve the content, so its status changes to Published.
To remove an advanced workflow from a content item:
).See also: Switching from basic workflow to advanced workflow
Prerequisites
- No content in the folder is in an approval process. If it is, and you want to switch a workflow, your options are as follows:
- cancel the approval process for each content item in Submitted status. See also: Canceling an approval request in an advanced workflow
- force publish each content item in Submitted status. See also: Forcing the publication of content
- get all approvers to approve Submitted content, so its status changes to Published.
- You have permission to edit the folder or content item being switched.
- All approvers for the basic workflow have at least read-only permission for the folder or content.
).After you set up an advanced workflow, read the following sections to learn how to manage content through the approval process.
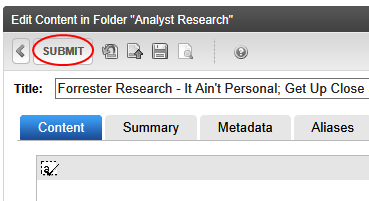
To submit content into the workflow process, a content author uses the Submit button (on the editor toolbar) or menu option; the content status changes to Submitted.
NOTE: If no workflow is assigned to a folder or content, a Publish button appears instead of the Submit button.
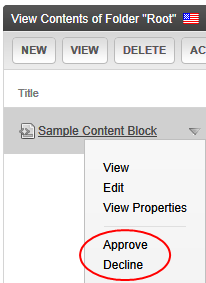
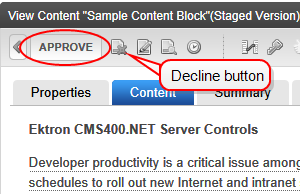
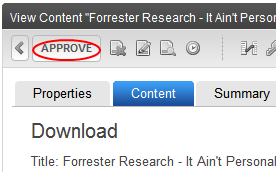
When content is submitted, the workflow's next approver or group is notified by email that content awaits their approval. That user can go to the content, then review and approve it using the Approve context menu option or toolbar button on the View Content screen.
Alternatively, the approver can use the Approval report or Submitted content report to find, review and approve content. Upon approving the content, the approver is prompted to enter an optional comment. If one is entered, it is included in the notification email.
See also: Canceling an approval request in an advanced workflow, Forcing the publication of content
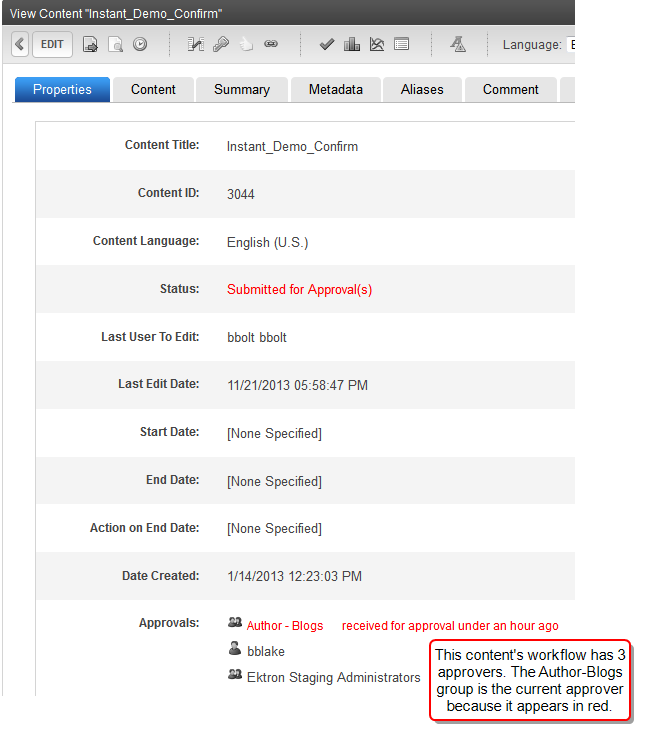
To see any content item's workflow and current approver, view its properties screen. Red text indicates the current approver. Next to that approver is an indication of how long ago the approval request was assigned.
NOTE: If a content item's approval request is escalated, the escalation user or group does not appear on the View Content screen. See also: How escalation affects the approval process
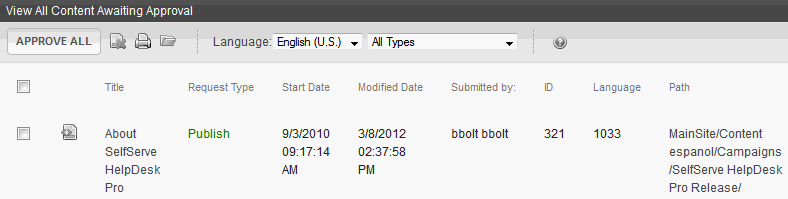
To see all content
You can cancel an approval request for any Submitted content item. It does not matter if anyone has approved the content yet.
For example, you want to change one of the users assigned to a workflow, and can only do this if no content is in Submitted status. Upon cancellation, the content's status reverts to Checked In.
Prerequisites
- Content status is Checked in (I), Submitted (S) or Checked out (O)
- You are a member of the administrators group, or assigned to both of these roles. See also: Defining roles
- folder user admin
- content workflow admin
To cancel an approval request for a Submitted content item:
).You can force the publishing of a content item, bypassing its workflow. Upon publication, the content's status changes to Approved. For example, you want to change one of the users assigned to a workflow, and can only do this if no content is in Submitted status.
NOTE: On PageBuilder pages, Force Publish (![]() ) only appears after the content is submitted. The button does not appear on the initial PageBuilder dialog when creating a new page.
) only appears after the content is submitted. The button does not appear on the initial PageBuilder dialog when creating a new page.
- Content status is Checked in (I), Submitted (S) or Checked out (O).
- You can force publish content upon creating it.
- You are a member of the administrators group, or assigned to both of the following roles. See also: Defining roles
- content workflow admin
- folder user admin
To force the publishing of a content item:
Only the current approver (or user group member) can decline content. This would typically be done if the content was unsatisfactory. Upon declining, the user is prompted to enter a comment. The next action depends on that user's workflow position.
The previous approver is notified by email that the content was declined. The notification includes the comment. Notifying users of advanced workflow activities
You can delete content only if the status is Checked In, Approved, or Pending Go Live Date. If the content status is Submitted and you need to delete it, your options are:
Content controlled by an advanced workflow is deleted immediately—no approval is required. In this way, the procedure is different from the deletion of content controlled by basic workflow, which requires approval.
For additional guidelines, see Deleting content.
Prerequisite
You are a member of the Administrators group, or are assigned to the Content Workflow Admin role and have delete permission for the content.
NOTE: If you do not see a Delete button or menu option, either you lack permission to delete, or the content status is not Checked In, Approved, or Pending Go Live Date.
If you are the current approver and have edit permission for Submitted content, you can edit it. Otherwise, you can edit content with the status of Checked In, Approved, or Pending Go Live Date only.
If you want to edit Submitted content but are not the current approver, your options are as follows:
Prerequisite
You are a member of the Administrators group or have edit permission for the content.
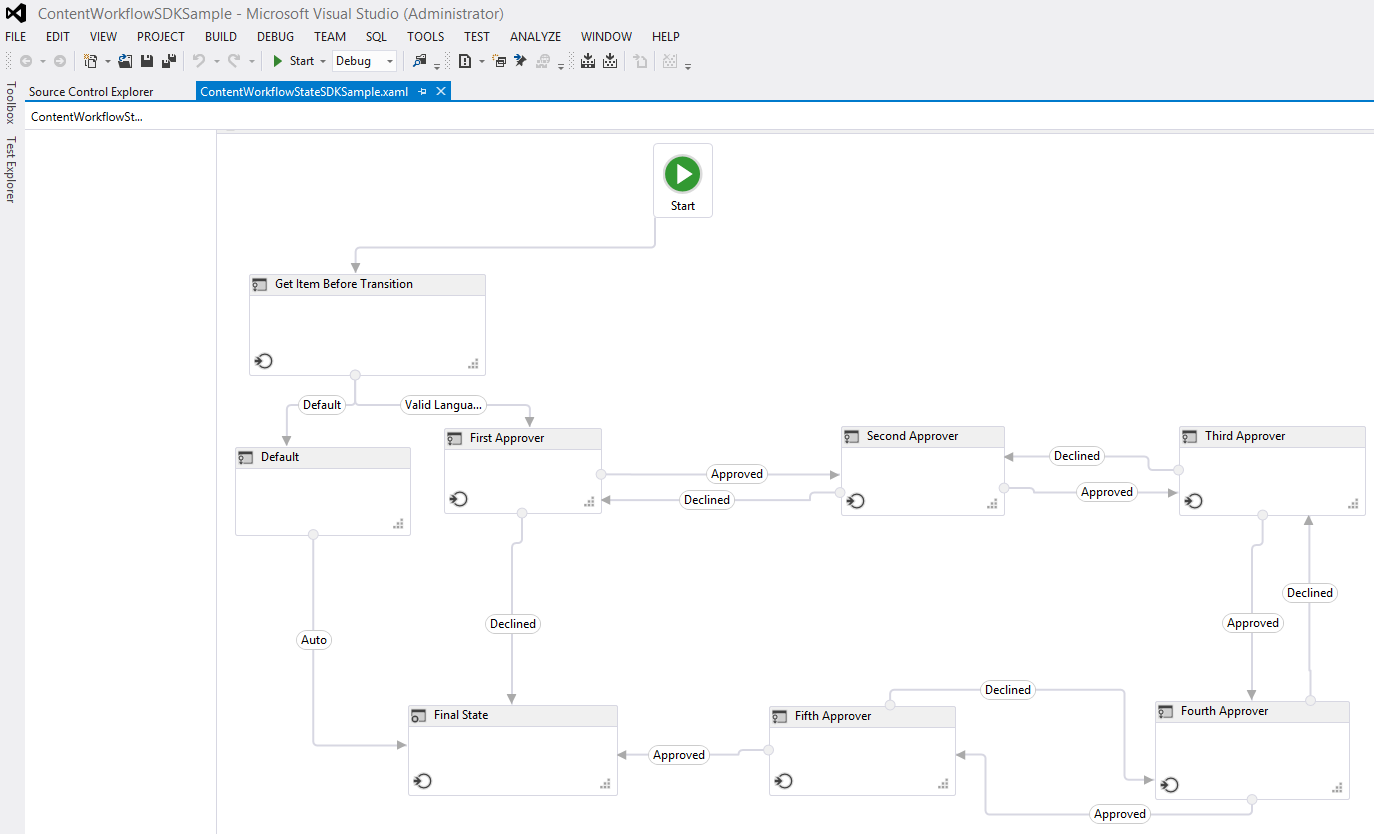
This section explains how a developer can customize an advanced workflow so that it meets the needs of your business processes. To customize, Ektron recommends saving the sample workflow installed with the product under a different name, then customizing the copied file using the following instructions.
Prerequisites
- Visual Studio 2012 (full version with developer tools, and so on)
- .NET 4.5
- Knowledge of Windows Workflow Foundation
- Permission to edit files on the Ektron server
To install Ektron's Software Development Kit (SDK) during installation, choose SDK on the Site Options screen.
If SDK is not selected during installation, you can install the SDK in either of the following ways:
C:\Program Files (x86)\Ektron\CMS400vx.x\Utilities\CMS400SDK_Setup.exe
The SDK's workflow components are installed to C:\Program Files (x86)\Ektron\CMS400SDK\Contentworkflow\code.
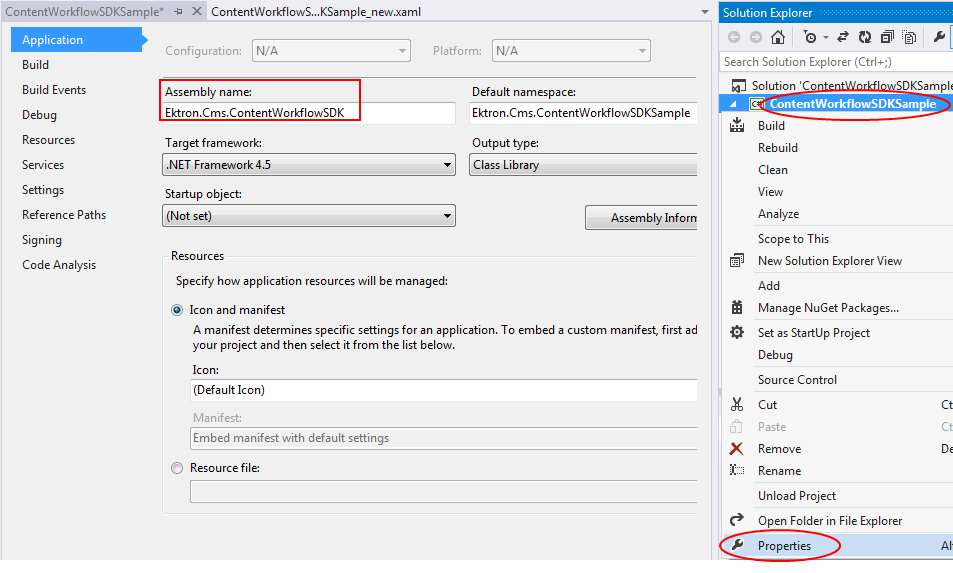
C:\Program Files (x86)\Ektron\CMS400SDK\Contentworkflow\code\ContentWorkflowSDKSample.sln.ContentWorkflowStateSDKSample.xaml. The sample workflow file opens.C:\Program Files (x86)\Ektron\CMS400SDK\Contentworkflow\code\CMS\Ektron.Cms.ContentWorkflow.dll.IMPORTANT: Save the sample workflow file under a different name, then customize the copy of the file.
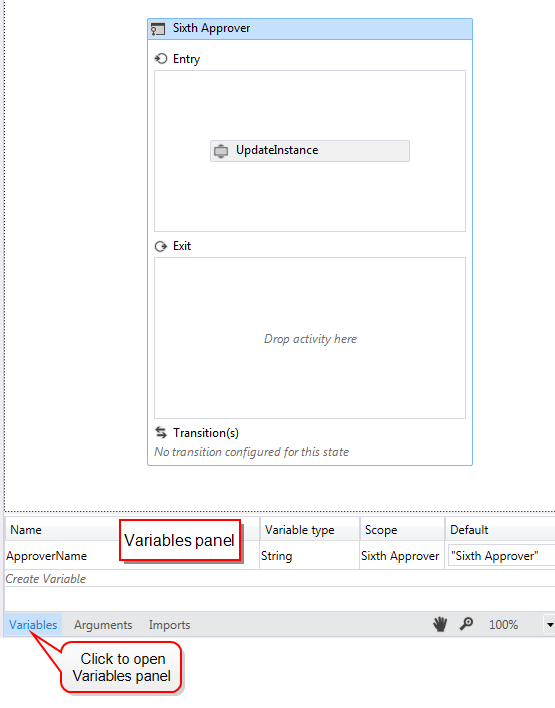
Rules for working with the sample workflow file
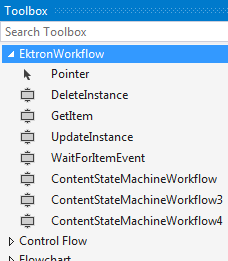
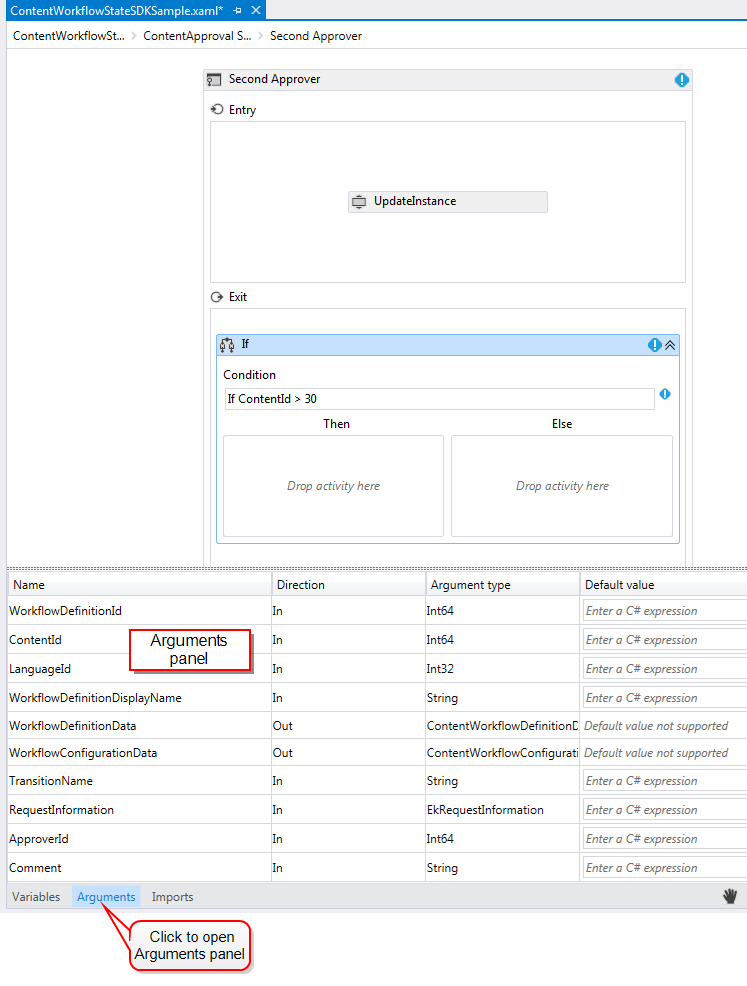
To see the arguments for use in custom code, open the Arguments panel.
WaitForItemEvent.WaitForItemEvent activity.WaitForItemEvent.WaitForItemEvent activity.For example, if you are removing the Fourth Approver in a Five Approver workflow, move the Fifth Approver's declined transition to Third Approver. Then, move the Third Approver's Approved transition to the Fifth approver.
IMPORTANT: Do not change the name of the Final State.
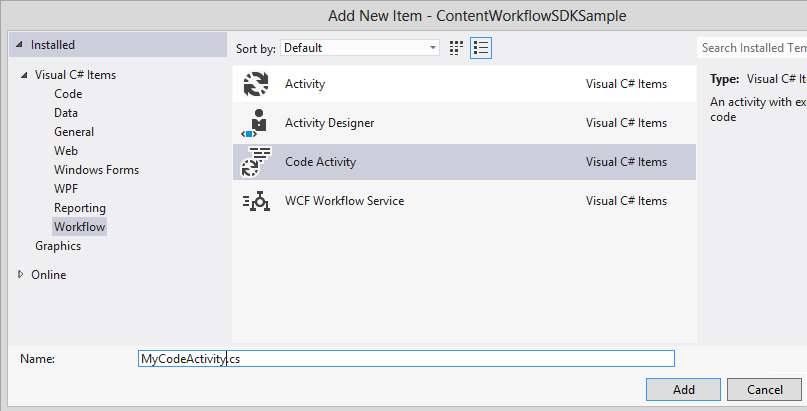
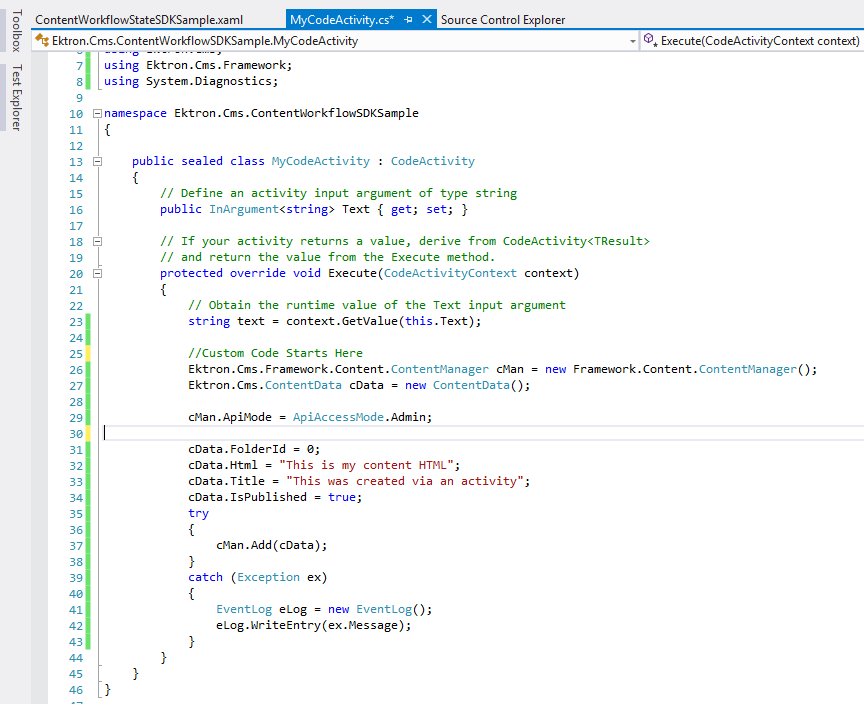
ContentWorkflowSDKSample.sln, add a new Code Activity item to the project.In the new Code Activity file, add custom code. In the following example, a simple content block is created.
IMPORTANT: Use Try Catches around your code.
After saving the Code Activity file, you can find it in the Visual Studio Toolbox. By default, it appears under the name of your assembly, Ektron.Cms.ContentWorkflowSDKSample.
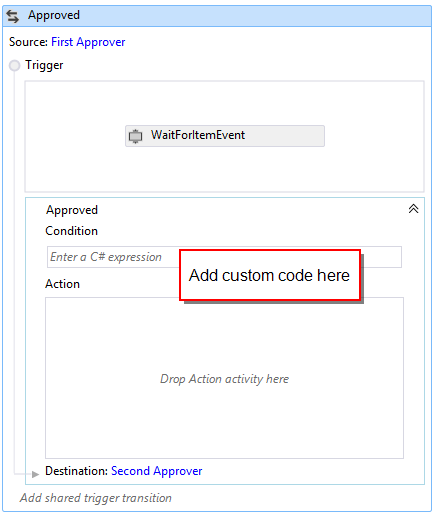
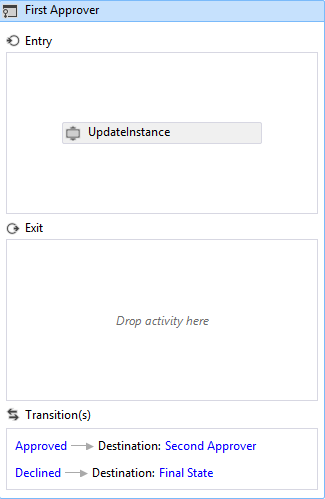
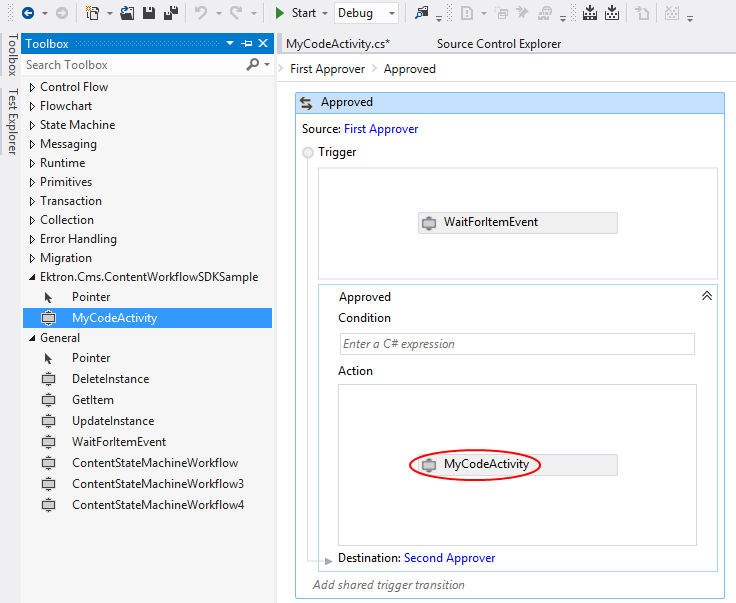
You can place the activity anywhere you see Drop activity here.
In the following example, the activity is placed in the Approved transition between First Approver and Second Approver.
After you customize the sample workflow file and save it to a different name, edit Ektron.cms.contentworkflow.config. Ektron references this file to determine the properties of your advanced workflows.
x:Class in the top line.
<Activity mc:Ignorable="sap sap2010 sads" x:Class="Ektron.Cms.ContentWorkflowStateSDKSample"
xmlns="http://schemas.microsoft.com/netfx/2009/xaml/activities"
xmlns:av="http://schemas.microsoft.com/winfx/2006/xaml/presentation"
xmlns:ecc="clr-namespace:Ektron.Cms.Common;assembly=Ektron.Cms.Common"siteroot\Ektron.Cms.ContentWorkflow.config. In this file, each workflow activity contains the following XML structure.
Each workflow has several "activities" (approvers or states), and each state has several transitions (typically, a decline and an approve). <Workflow>
<Activities>
<Activity ActivityName="First Approver" AssignUser="true">
<Transitions>
<Transition TransitionName="Approved" BookmarkName = "First Approver Approved"
Destination="Second Approver" />
<Transition TransitionName="Declined" BookmarkName = "First Approver Declined"
Destination="Author" />
</Transitions>
</Activity>
<Activities>
</Workflow><Workflow> </Workflow> elements.DisplayName to the name you want to appear in the Ektron Workarea.ClassName with the class name you copied in Step 4 of this procedure.AssemblyName with the assembly name you copied in Step 2 of this procedure.<Activity> properties to match the new workflow. To continue the example:DisplayName to "5 Step Approval."<Activity> element, update the approved and declined transition values to match the .xaml file. Destination from "Final State" to "Fifth Approver".<Workflow>) and ending (</Workflow>) elements. Destination from "Fourth Approver" to "Final State".The build creates a new .dll file in C:\Program Files (x86)\Ektron\CMS400SDK\Contentworkflow\code\bin\Debug. The file name matches the assembly name that you copied in Step 2 of Step 4: Update the Ektron.cms.contentworkflow.config file.
siteroot\bin folder.Before using the new workflow file, publish content that will be affected by it.
Ektron Workarea users can select the new workflow on the Manage Approvals screen.
Try out the new workflow in a test environment before moving it to a live system.
Use this procedure to remove advanced workflows that are delivered with Ektron, or any that are created for your site.
Prerequisite
You have permission to edit files on the Ektron server.
siteroot\Ektron.Cms.ContentWorkflow.config.<Workflow> tags of the workflow you want to remove.<Workflow DisplayName = "Two Step Approval"
ClassName = "Ektron.Cms.ContentWorkflow.ContentStateMachineWorkflow"
AssemblyName = "Ektron.Cms.ContentWorkflow" >
<Activities>
<Activity ActivityName="First Approver">
<Transitions>
<Transition TransitionName="Approved" BookmarkName = "First Approver Approved"
Destination="Second Approver" />
<Transition TransitionName="Declined" BookmarkName = "First Approver Declined"
Destination="Author" />
</Transitions>
</Activity>
<Activity ActivityName="Second Approver">
<Transitions>
<Transition TransitionName="Approved" BookmarkName = "Second Approver Approved"
Destination="Final State" />
<Transition TransitionName="Declined" BookmarkName = "Second Approver Declined"
Destination="First Approver" />
</Transitions>
</Activity>
</Activities>
</Workflow>