Checkout
![]()
Customers typically arrive at this server control by clicking Checkout on the Cart server control. They also might reach this server control from a Checkout link you create on your site. The Checkout server controla server control uses API language to interact with the CMS and Framework UI to display the output. A server control can be dragged and dropped onto a Web form and then modified. lets a customer navigate through the checkout process. This process includes:
- adding billing and shipping information
- selecting a shipping method
- reviewing the order
- submitting the order and credit card information
- notification that checkout process is complete
IMPORTANT: When using the Checkout server control, your website should have an SSL certificate installed. Set its IsSSLRequired property to True. This protects your customers’ payment information during transmission. Do not use a self-signed SSL certificate; obtain one from a trusted certificate authority.
The control provides a navigational aid that indicates the customer's step in the checkout process. At any point, the customer can move forward to the next step or back to a previous one. When appropriate, some steps do not appear. For example, if merchandise is not tangible, the shipping screen does not appear.
Inserting the Checkout server control onto a page
Prerequisite
You must have installed the server controls. See Installing server controls into Visual Studio Toolbox.
- In Visual Studio, choose View > Toolbox.
- Click the Ektron server control tab to display the server controls.
- Drag the Checkout server control and drop it into the desired location on the page.
NOTE: You also can place the cursor on the page where you want the server control, then double click the server control that you want.
<CMS:Checkout ID="Checkout1" runat="server" />
- Click on
Checkoutin the code to display and modify the control’s properties using the Properties window of Visual Studio. The page is updated as you modify the property values.
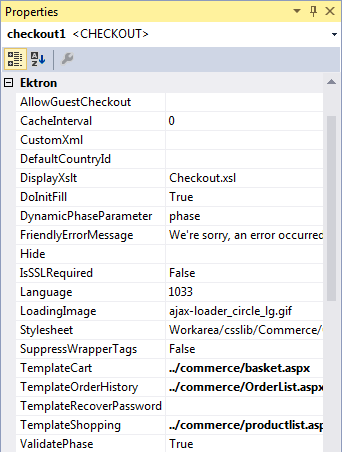
Checkout properties
The following are Ektron-specific server controla server control uses API language to interact with the CMS and Framework UI to display the output. A server control can be dragged and dropped onto a Web form and then modified. properties. For information about native .NET properties such as font, height, width and border style, use Visual Studio® help.
- AllowGuestCheckout (Boolean)
Set to true if you wish to allow the Guest Checkout feature.
- CacheInterval (Double)
The number of seconds that a server controla server control uses API language to interact with the CMS and Framework UI to display the output. A server control can be dragged and dropped onto a Web form and then modified.’s data is cached. The default is 0 (zero). For example, if you want to cache the data for 5 minutes, set to 300. See also: Caching with server controls.
- CurrentPhase (Code-behind Only) (ControlPhase)
Reports or selects the current page (or phase) of the checkout control. This lets you customize the flow of the control. For example, if you only offer one shipping option, skip the ShippingInfoEntry phase.
- Login. Allows existing users to log in. Logging in or setting up an account.
- BillingInfo. Displays a customer’s billing information. See also: Billing Information.
- BillingInfoEntry. Allows entry of a customer’s billing information. See also: Billing Information.
- ShippingInfo. Allows entry of a customer’s shipping information.
- ShippingInfoEntry. Allows entry of a customer’s shipping information. See also: Shipping information.
- ShippingMethodSelect. Allows selection of the shipping method. See also: Shipping method.
- ReviewOrder. Displays the current order’s details. See also: Review order.
- SubmitOrder. Lets customers add payment information. See also: Submit order.
- Complete. Displays completion message. See also: Order complete.
- Error_EmptyBasket. Used when a cart has no items and the customer somehow enters the control.
- Error_UnhandledException. Occurs when there’s an error that the control cannot resolve.
- CustomXml (Code-behind Only) (String)
Lets you inject custom XML into the generated XML before being processed by the XSLTExtensible Stylesheet Language Transformations. Enter a string of XML that you want to make available to the XSLT as follows:
<root><customXml>custom-xml-inserted-here</customXml></root>
See also: Displaying custom XML in Ektron’s server controls.
- DefaultCountryId (Integer)
The ID of the default country that appears in the Billing Address and Shipping Address. Set this to the country from which the majority of your customers make purchases. If a customer is from a different country, he can change it when editing the Billing or Shipping Address.
To find a country’s numeric ID, go to Workarea > Settings > Commerce > Configuration > Countries. The Numeric ID is in the left column of that screen.
- DisplayXslt (String)
If desired, enter a relative or absolute path to an Xslt that determines the display of the page. By default, the control uses
Checkout.xsl. This file is located insiteroot\Workarea\Xslt\Commerce\Checkout\Standard.WARNING! Files stored in the
siteroot\Workareafolder are overwritten (or deleted) when you upgrade Ektron. To avoid problems, copy the default file to a folder outside thesiteroot\workareafolder then edit it. If there is no default file, create the file outside thesiteroot\workareafolder. Next, in this property, enter the path to that file relative to the site root folder. - DoInitFill (Boolean)
By default, Fill occurs during the Page_Init event. Set to false if you want to postpone the fill-action until later. In this case, Fill is automatically called during the Page Render event. You might do this if you need to set or change a property on the control in code-behind and have it render with your changes shown.
- DynamicPhaseParameter (String)
The name of the parameter on the QueryString that identifies desired phase ID.
- FriendlyErrorMessage (String)
The message displayed when an unhandled error occurs. Details are sent to the event log.
The default message is “We're sorry, an error occurred while processing your request. Please try again later...”
- Hide (Boolean)
Hides or displays the output of the control in design time and run time.
- True. Hide the control output.
- False. Display the control output.
- IsSSLRequired (Boolean)
When set to True, switches to an SSL encrypted URL. For the SSL encryption to work, you must have an SSL certificate installed for your site. See also: Updating web.config to use SSL. Information on SSL can be found at the following websites.
NOTE: Episerver is not associated with TechFAQ or VeriSign. However, both sites offer good explanations of Secure Sockets Layer.
Installing and using an SSL is one of the most important things you can do to protect your customer’s credit card data.
- Language (Integer)
Set a language for viewing the checkout control. This property shows results in design-time (in Visual Studio) and at run-time (in a browser).
- LoadingImage (String)
The image to display while the control fetches data. The default is
siteroot\Workarea\images.
\application\ajax-loader_circle_lg.gifWARNING! Files stored in the
siteroot\Workareafolder are overwritten (or deleted) when you upgrade Ektron. To avoid problems, copy the default file to a folder outside thesiteroot\workareafolder then edit it. If there is no default file, create the file outside thesiteroot\workareafolder. Next, in this property, enter the path to that file relative to the site root folder. - Stylesheet (String)
Specify the path to a style sheet for use with this server control. Leave blank to use the default style sheet. To use a custom style sheet, place it in a folder outside the
siteroot\workareafolder then edit it. Next, in this property, enter the path to the custom style sheet relative to the site root folder. - SuppressWrapperTag (Boolean)
Suppresses the output of the span/div tags around the control.
- True. Suppress wrap tags.
- False (default). Allow wrap tags.
- TemplateCart (String)
The URL path of the template that contains the Cart server control. The path can be relative or absolute.
When a path is entered, a link appears in the Review Order part of the process that allows a user to navigate to the template containing the Cart server control.
- TemplateOrderHistory (String)
The URL path of the template that contains the OrderList server control. The path can be relative or absolute. When a path is entered, a link appears at the end of checkout process that allows a user to navigate to the template containing the OrderList server control.
- TemplateRecoverPassword (String)
The URL path of the template that helps a customer recover a password. The path can be relative or absolute. When a path is entered and a customer has not logged in, a link appears at the beginning of checkout process that lets the customer navigate to a template containing information to recover the password. The Membership server control contains an option for recovering passwords. See also: Logging In or Setting Up an Account and Membership server control.
- TemplateShopping (String)
The URL path of the template that allows the customer to continue shopping. If a path is entered, a link appears at the end of checkout that allows a user to navigate to a template that lets the person continue shopping; for example, the template containing a ProductList server control or ProductSearch server controls.
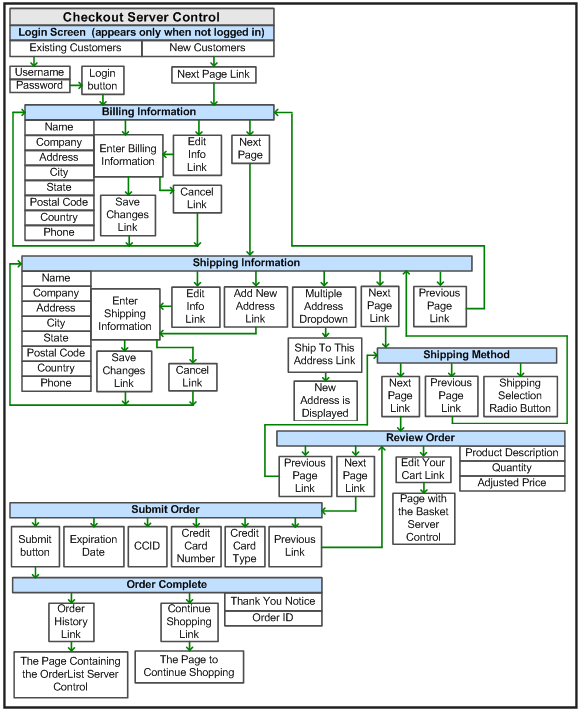
The following chart represents the options and processes of the Checkout server control.
Logging in or setting up an account
The login portion of the Checkout server control accommodates these types of customers.
- Existing customers
If an existing customer is not logged in when the customer reaches this server control, it prompts the customer to log in. Optionally, this screen could have a link that lets an existing user to recover a password. To enable this link, add a template path to the control's
TemplateRecoverPasswordproperty.After a customer who previously purchased from this site logs in, billing and shipping information is retrieved and appear by default. The visitor can review and edit this information. However, Ektron does not store credit card numbers, so that information must be entered each time.
- First-Time Customer. Customers who have not logged in before but who wish to create an account
If a customer has not purchased from your site before and wants to set up an account, the customer clicks Create Profile and Checkout. On the new screen, the customer enters billing information including a password. After completing that screen, a membership user account is created, and the customer is logged in. The new user can then proceed through the checkout. The next time this visitor logs in, the customer is treated as an existing customer.
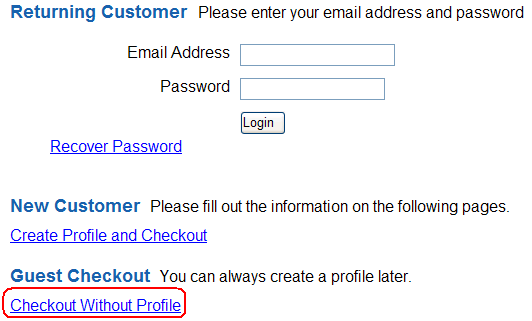
- Guest Account Registration. Customers who wish to make one-time only purchase and not set up an account.
The Checkout server control provides a guest checkout feature (circled below) for customers who do not want to set up an account on your site. To enable this feature, set the
AllowGuestcheckoutproperty of the Checkout server control totrue.If a user clicks Checkout Without Profile, the customer proceeds to a version of the billing screen that does not ask for a password. The rest of the checkout is the same.
Although the customer can proceed through the checkout like other customers, if the customer wants to checkout in the future, the customer must re-enter billing and shipping information. Customers who use the guest checkout feature can view their orders using the Order List server control if its
GuestOrderViewproperty is set totrue.
Checkout screens
The Checkout server controla server control uses API language to interact with the CMS and Framework UI to display the output. A server control can be dragged and dropped onto a Web form and then modified. has several sections, each representing a portion of the checkout process.
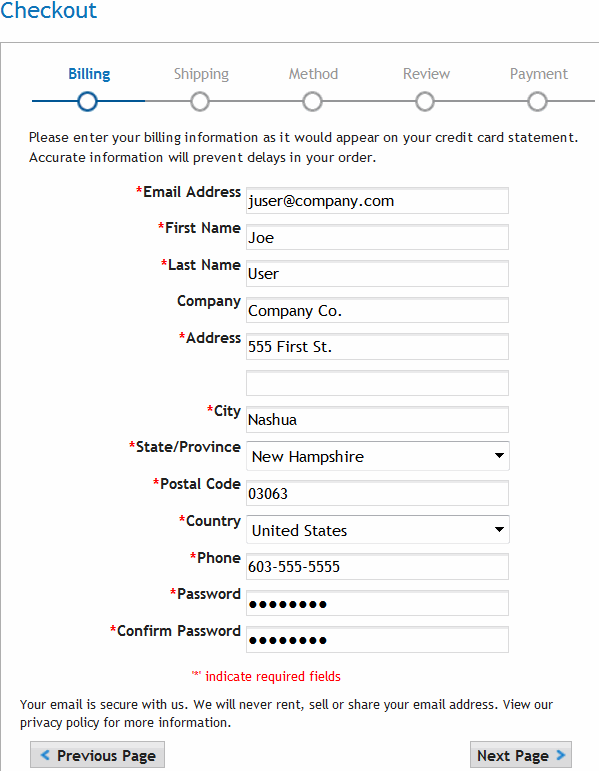
Billing information
Prompts customers to enter or update billing information, including:
- Name
- Company (Optional)
- Street Address, City, State, Postal Code, Country
NOTE: If a customer chooses a country other than the United States, no field validation is applied to the postal code by default. To apply country-specific postal code validation, see Applying field validation for non-U.S. postal codes.
- Phone
- email address (appears when a visitor is creating a new account or doing a guest checkout)
- Password (appears when a visitor is creating a new account or doing a guest checkout)
Applying field validation for non-U.S. postal codes
- Search the XSLTs for
EktronCheckout_PostalField. The standard US Postal RegEx is applied to all input fields of this class. - Remove that class.
WARNING! Be careful to remove only this class name; otherwise, the CSS styling may not be applied properly and the layout will be altered.
- Add an attribute to each postal-code input field in the XSLTs with the following name:
data-ektron-validation-regex. Then, add the desired RegEx as the value of this attribute. The RegEx expression will validate the user's input.
For the RegEx expression, you should be able to find one for the target country via a Web search. Alternatively, you can start here: http://www.regular-expressions.info/.
Canadian postal code solution
The following example shows how to apply field validation for Canada.
Attribute for U.S. postal code regex:
<xsl:attribute name="data-ektron-validation-regex">/^\d{5}(-\d{4})?$/
</xsl:attribute>
Attribute for Canadian postal code regex:
<xsl:attribute name="data-ektron-validation-regex">/^([ABCEGHJKLMNPRSTVXY]
  \d[ABCEGHJKLMNPRSTVWXYZ])\ {0,1}(\d[ABCEGHJKLMNPRSTVWXYZ]\d)$/
</xsl:attribute>
The following sample shows the entire postal code input block taken from billing info XSLT. Three checkout-related files that need these changes (Checkout_BillingInfo.xsl, Checkout_BillingInfoEntry.xsl and Checkout_ShippingInfo.xsl) are updated in the sample below for Canadian only postal codes.
<input class="EktronCheckout_PostalCode EktronCheckout_Row_RightContents" >
  <xsl:attribute name="name">EktronCheckout_BillingInfo_PostalCode_
    <xsl:value-of select="$ControlId"/></xsl:attribute>
  <xsl:attribute name="id">EktronCheckout_BillingInfo_PostalCode_
    <xsl:value-of select="$ControlId"/></xsl:attribute>
  <xsl:attribute name="value"><xsl:value-of select="/root/billingInfo/postalCode"/>
    </xsl:attribute>
  <xsl:attribute name="data-ektron-validation-regex">/^([ABCEGHJKLMNPRSTVXY]
    \d[ABCEGHJKLMNPRSTVWXYZ])\ {0,1}(\d[ABCEGHJKLMNPRSTVWXYZ]\d)$/</xsl:attribute>
</input>
Shipping information
Add or edit shipping information. By default, it uses the billing address as the shipping address. From this screen, customers can:
- add new addresses
- edit or delete existing addresses
- if more than one address is entered, pick address for current order
- proceed to the next step or back to the previous page
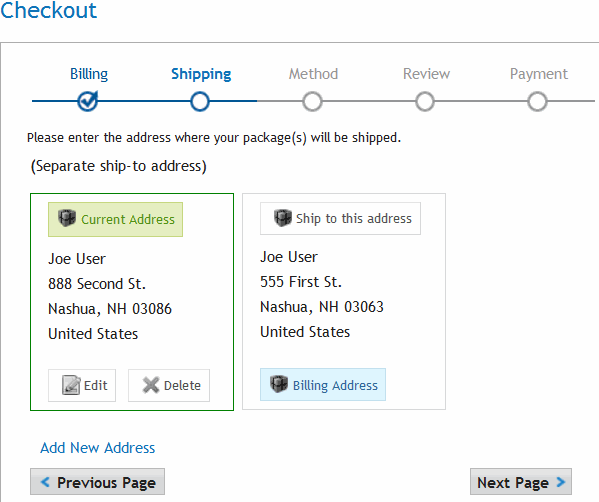
When a logged-in customer adds a new address, it is stored with the account information in Ektron.
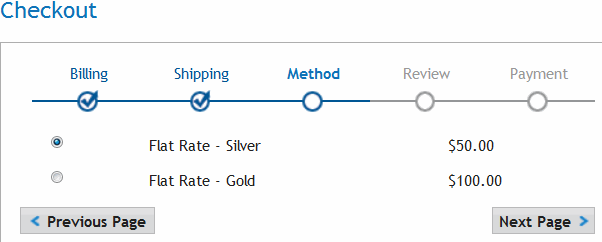
Shipping method
Select the type of shipping for products. Shipping methods that appear are defined in the Workarea > Settings > Commerce > Shipping > Methods. See also: Configuring Shipping Methods.
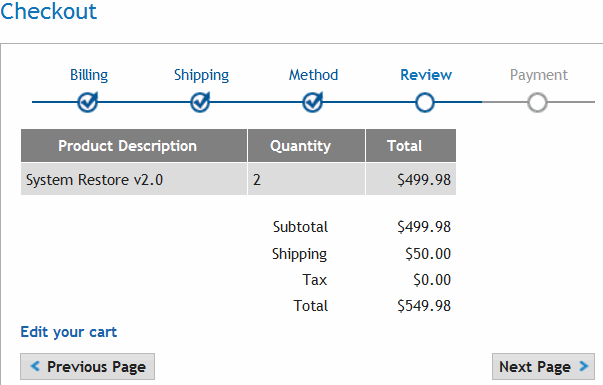
Review order
Displays information about products being purchased: their price, shipping charges, discounts, and taxes. At this point, if customers want to modify their cart, they click Edit your cart. For example, a customer wants to apply a coupon to the cart. For this link to work properly, add the path to the template that contains the Cart server controla server control uses API language to interact with the CMS and Framework UI to display the output. A server control can be dragged and dropped onto a Web form and then modified. to the Checkout server control’s TemplateCart property.
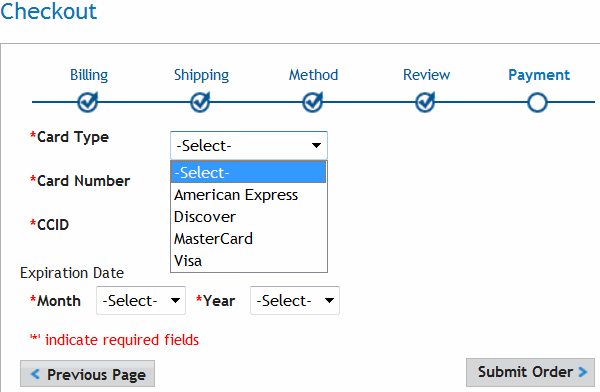
Submit order
On the Submit Order page, a customer enters payment information. The customer can pay by check, credit card, or PayPal, depending on what has been set up in the eCommerce Payment Options screen. When a customer enters the information, the customer clicks Submit. At that point, the charge is submitted to the payment gateway, and the order is posted in Ektron. See also: Processing Orders.
Order complete
The Order Complete page displays a Thank You note, the order ID, and links to continue shopping or view an order’s history.
The Continue Shopping link appears when you add the path of a template that allows a customer to find products to the TemplateShopping property. For example, you send them to a template containing a ProductSearch or ProductList server control.
The Order History link appears when you add the path of a template containing the OrderList server control to the TemplateOrderHistory property.
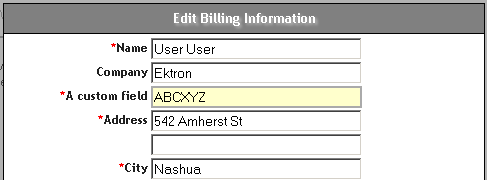
Adding a custom field to the checkout control
This example demonstrates how to add a custom field to the Checkout control's Billing Info entry screen.
Step1: Add a field to the XSL
In the workarea/XSLT/Commerce/Checkout/ folder, look for the Checkout_BillingInfo.xsl file. In the file, locate EktronCheckout_BillingInfo_Company_. Under the bulleted list item for company, add the following:
<li class="EktronCheckout_Required EktronCheckout_SerializableContainer">
      <label class="EktronCheckout_Row_LeftContents">
	  <xsl:attribute name="for">
   EktronCheckout_BillingInfo_CustomField_<xsl:value-of select="$ControlId"/>
         </xsl:attribute>
        <span class="EktronCheckout_RequiredSymbol">*</span>
        A custom field
      </label>
      <input class="EktronCheckout_Company EktronCheckout_Row_RightContents">
         <xsl:attribute name="name">
   EktronCheckout_BillingInfo_CustomField_<xsl:value-of select="$ControlId"/>
         </xsl:attribute>
         <xsl:attribute name="id">
   EktronCheckout_BillingInfo_CustomField_<xsl:value-of select="$ControlId"/>
          </xsl:attribute>
         <xsl:attribute name="value">ABCXYZ</xsl:attribute>
      </input>
 </li>
Important notes:
EktronCheckout_Required. Denotes that the field is required and will impose validation.EktronCheckout_NotRequiredis also acceptable.EktronCheckout_SerializableContainer. Tells the checkout control to process and include the field in this <li> tag with the callback.EktronCheckout_BillingInfo_CustomField_. The name of the field, whereEktronCheckout_BillingInfois replaced withparam__internally. The last portion,CustomField, is how the field will be referenced (see below).
Step2: Get the value of the field
In the codebehind of the page with the Checkout control, you need the following imports:
using Ektron.Cms.Controls;
using Ektron.Cms.Controls.ECommerce;
using Ektron.Cms.Controls.ECommerce.Checkout;
Next, place the following into the Page_Init method:
cmsCheckout.FilterAjaxCallback += this.HandleFilterAjaxCallback;
Then implement the HandleFilterAjaxCallback method:
protected void HandleFilterAjaxCallback(object sender,
FilterAjaxCallbackEventArgs e)
{
     string callbackParameters = e.EventArgs;
     System.Collections.Specialized.NameValueCollection data =
Ektron.Cms.Common.EkFunctions.ConvertToNameValueCollection(callbackParameters,
 true);
      string customFieldValue = data["param__customfield"];
}
Upon completing the Billing Info screen, the data is returned as part of the EventArgs, with the prefix param__ (note the double underscore).

It can then be obtained directly by converting the string to a NameValueCollection (or other construct). Developers are free to call their own methods from here.